前言
本文(指本系列文章,下同)将使用 Scala 3 及其生态系统,构建一个尽可能功能完整的静态文件服务器,并打包成实用的命令行工具。我们将得到一个可以运
行在 Linux/MacOS 上的实用命令行工具,可用于取代 python -m http.server,使用并体验以下“秘技”:
- 构建工具
mill及其插件versionFile,mill-universal-packager - 代码格式化工具
scalafmt - 函数式抽象库
cats及其 IO 库cats-effect - HTTP service 库
http4s - HTML/CSS 构建/模板库
scalatags - 单元测试库
scalatest - 支持
cats-effect的命令行解析库decline GraalVM Native Image- Tagless Final 风格的副作用处理
- 调用
Java NIO2 API读取文件系统
本文旨在展示 Scala 3 生态系统的先进,简洁,精巧和高度可用,通过实用的应用程序开发揭示当前 Scala 3 开发的一般流程,但不会讨论以下内容:
Scala语法- 函数式编程,不可变性
- 副作用管理
Monad,Functor,ApplicativeScala标准库- 涉及到的
Scala库的具体用法
2
在这个前提下,当你无法理解本文某些 Scala 语法和库的调用方式时,应当可以略过而不影响学习和吸收全文的主要内容。
因此,本文阅读指南:
- 如果你是一名已经掌握了
Scala 3基本语法和上述库基本用法的初学者,希望本文能为你进入实际的 Scala 项目开发提供有益的帮助和参考。 - 如果你是一名还没有开始学习
Scala的“路人”,那么本文将带你大致领略一种比较特别的Scala开发工作流,帮你下定决心来学习它或者拒绝它。
在普遍的固有的印象中, Scala 是一门具有可伸缩性,为处理大规模数据和服务而生的后端语言。但本人既然自号“细数据工程师”,一个自然而然的做法就是通
过使用 Scala 3 构建命令行程序这种“细数据”项目来展示 Scala 作为一门通用语言的强大和优美之处。这是本文不同于其他 Scala 教程文章的一个显著特
点,请在阅读的时候多加留意,多多点赞。
我们在本地文件共享、临时快速测试之类的场景下,有时候会有随手起一个 HTTP 静态文件服务器的需求。而Python 的 http.server 模块给我们提供了非常方便的支持,但其缺点也很明显,比如:
安全性:它不支持HTTPS和HTTP/2,这意味着所有传输的数据都不是加密的,容易受到中间人攻击。功能缺乏:缺乏进阶的 HTTP 服务器功能,如身份验证、缓存、日志记录、虚拟主机等,播放音频视频的时候,不支持任意快进,等等。错误处理:错误处理非常基础,不适合需要定制错误页面或执行复杂错误处理的场景。配置限制:几乎没有可配置的选项,例如不能设置服务的头信息、不能定义MIME类型等。
本文不会逐个实现或修复上述缺陷,但会尽可能提供其可行性。
准备工作
为了开发我们的项目,需要安装 JDK 17+ 和 mill. 其中, mill 作为替代 sbt 的构建工具,可以参考其 官方文档 进行安装。
请注意:
- 虽然我们要写一个
Scala项目,但是我们并不需要安装Scala. - 在结束我们的开发以后,运行我们生产出来的实用程序,并不需要
JDK和mill。
项目脚手架
我们首先在 ~/projects/ 下新建一个新的 Scala 项目 static-snap .
1@nixos ~ $ cd projects/
1@nixos ~/projects $ mkdir -pv static-snap
mkdir: created directory 'static-snap'
1@nixos ~/projects $ cd static-snap
1@nixos ~/projects/static-snap $ touch build.sc .scalafmt.conf
1@nixos ~/projects/static-snap $
其中, .scalafmt.conf 是代码格式化配置文件,暂时不去细究其中的内容。
.scalafmt.conf:
version = "3.8.0"
maxColumn = 144
align.preset = most
continuationIndent.defnSite = 2
runner.dialect = scala3
rewrite.rules = [Imports]
rewrite.imports.sort = scalastyle
rewrite.imports.groups = [
  ["java[x]*\\..*"],
  ["scala\\..*"],
  ["^(?!simple.).*"]
]
newlines.topLevelStatementBlankLines = [ { blanks { before = 1 } } ]
build.sc 是最关键的项目构建文件,它指定了项目使用的 Scala 版本(为当前最新的 3.4.0 ),lib 依赖及其版本,自动格式化配置,打包配置的关键信息,Scala 编译器的关键选项,应用主程序的类等等。
build.sc :
import $ivy.`io.github.hoangmaihuy::mill-universal-packager::0.1.2`
import io.github.hoangmaihuy.mill.packager.archetypes.JavaAppPackagingModule
import mill._
import mill.scalalib.scalafmt.ScalafmtModule
import scalalib._

object Versions {
  val http4sV         = "0.23.26"
  val declineV        = "2.4.1"
  val scalatagsV      = "0.12.0"
  val scalaloggingV   = "3.9.5"
  val logbackClassicV = "1.4.14"
}

object app extends ScalaModule with ScalafmtModule with JavaAppPackagingModule {

  import Versions._

  def scalaVersion = "3.4.0"

  // Define the main class
  def mainClass = Some("simple.Main")

  // Define the top-level directory name for the archived package
  def topLevelDirectory = Some(packageName())

  // Define the version of the package
  def packageVersion = "0.0.1-SNAPSHOT"

  def scalacOptions = Seq(
    "-deprecation",
    "-encoding",
    "UTF-8",
    "-feature",
    "-unchecked",
    "-Wunused:all"
  )

  def ivyDeps = Agg(
    ivy"org.http4s::http4s-ember-server:$http4sV",
    ivy"org.http4s::http4s-dsl:$http4sV",
    ivy"com.lihaoyi::scalatags:$scalatagsV",
    ivy"com.monovore::decline:$declineV",
    ivy"com.monovore::decline-effect:$declineV",
    ivy"com.typesafe.scala-logging::scala-logging:$scalaloggingV",
    ivy"ch.qos.logback:logback-classic:$logbackClassicV"
  )
}
以上使用到的库解释如下:
http4s作为 HTTP Server,本节暂时不会用到scalatags作为模板引擎,本节暂时不会用到deline提供命令行参数支持scala-logging和logback-classic用于日志打印
现在可以用 IDEA 或者 VS Code 打开我们的项目,写一个基本的 Hello World 程序了。
app/src/simple/Main.scala:
package simple

import cats.effect.{ExitCode, IO}
import cats.implicits.*
import com.monovore.decline.Opts
import com.monovore.decline.effect.CommandIOApp
import com.typesafe.scalalogging.StrictLogging

object Main
    extends CommandIOApp(name = "static-snap", header = "A Simple Static Server Powered By Scala", version = "0.0.1-SNAPSHOT")
    with StrictLogging {

  val rootOpts: Opts[String] = Opts.argument[String]("root directory")
  val hostOpts: Opts[String] = Opts.option[String]("host", short = "h", help = "host").withDefault("0.0.0.0")
  val portOpts: Opts[Int]    = Opts.option[Int]("port", short = "p", help = "port").withDefault(8888)

  override def main: Opts[IO[ExitCode]] = {
    (hostOpts, portOpts, rootOpts).mapN { (host, port, root) =>
      for {
        _ <- IO.delay(logger.info(s"hello world!"))
        _ <- IO.delay(logger.info("got parameters: host = {}, port = {}, pathPrefix = {}", host, port, root))
      } yield ExitCode.Success
    }
  }
}
这个简单的 Hello World 程序接受三个参数 root, --host (-h) 和 --port (-p), 然后打印 "hello world!" 和接收到的参数。其中, host 和 port 参数都有默认值。
我们可以直接运行这个程序:
1@nixos ~/projects/static-snap $ mill app.run /
[36/49] app.compile
[info] compiling 1 Scala source to /home/weiwen/projects/static-snap/out/app/compile.dest/classes ...
[info] done compiling
[49/49] app.run
20:36:42.590 [io-compute-1] INFO simple.Main$ -- hello world!
20:36:42.591 [io-compute-1] INFO simple.Main$ -- got parameters: host = 0.0.0.0, port = 8888, root = /
可以加上所有的参数,用全称或者简写:
1@nixos ~/projects/static-snap $ mill app.run /tmp --host 127.0.0.1 -p 1234
[49/49] app.run
20:37:39.414 [io-compute-29] INFO simple.Main$ -- hello world!
20:37:39.416 [io-compute-29] INFO simple.Main$ -- got parameters: host = 127.0.0.1, port = 1234, root = /tmp
还可以加上 --help 参数显示命令行帮助文档:
1@nixos ~/projects/static-snap $ mill app.run --help
[49/49] app.run
Usage: static-snap [--host <string>] [--port <integer>] <root directory>

A Simple Static Server Powered By Scala

Options and flags:
    --help
        Display this help text.
    --version, -v
        Print the version number and exit.
    --host <string>, -h <string>
        host
    --port <integer>, -p <integer>
        port
所有的这些命令行功能,都是由 Scala 库 decline 提供的,这里只是用到了最基础的功能,可以去它的网站 https://monovore.com/decline 了解更多复杂的用法。
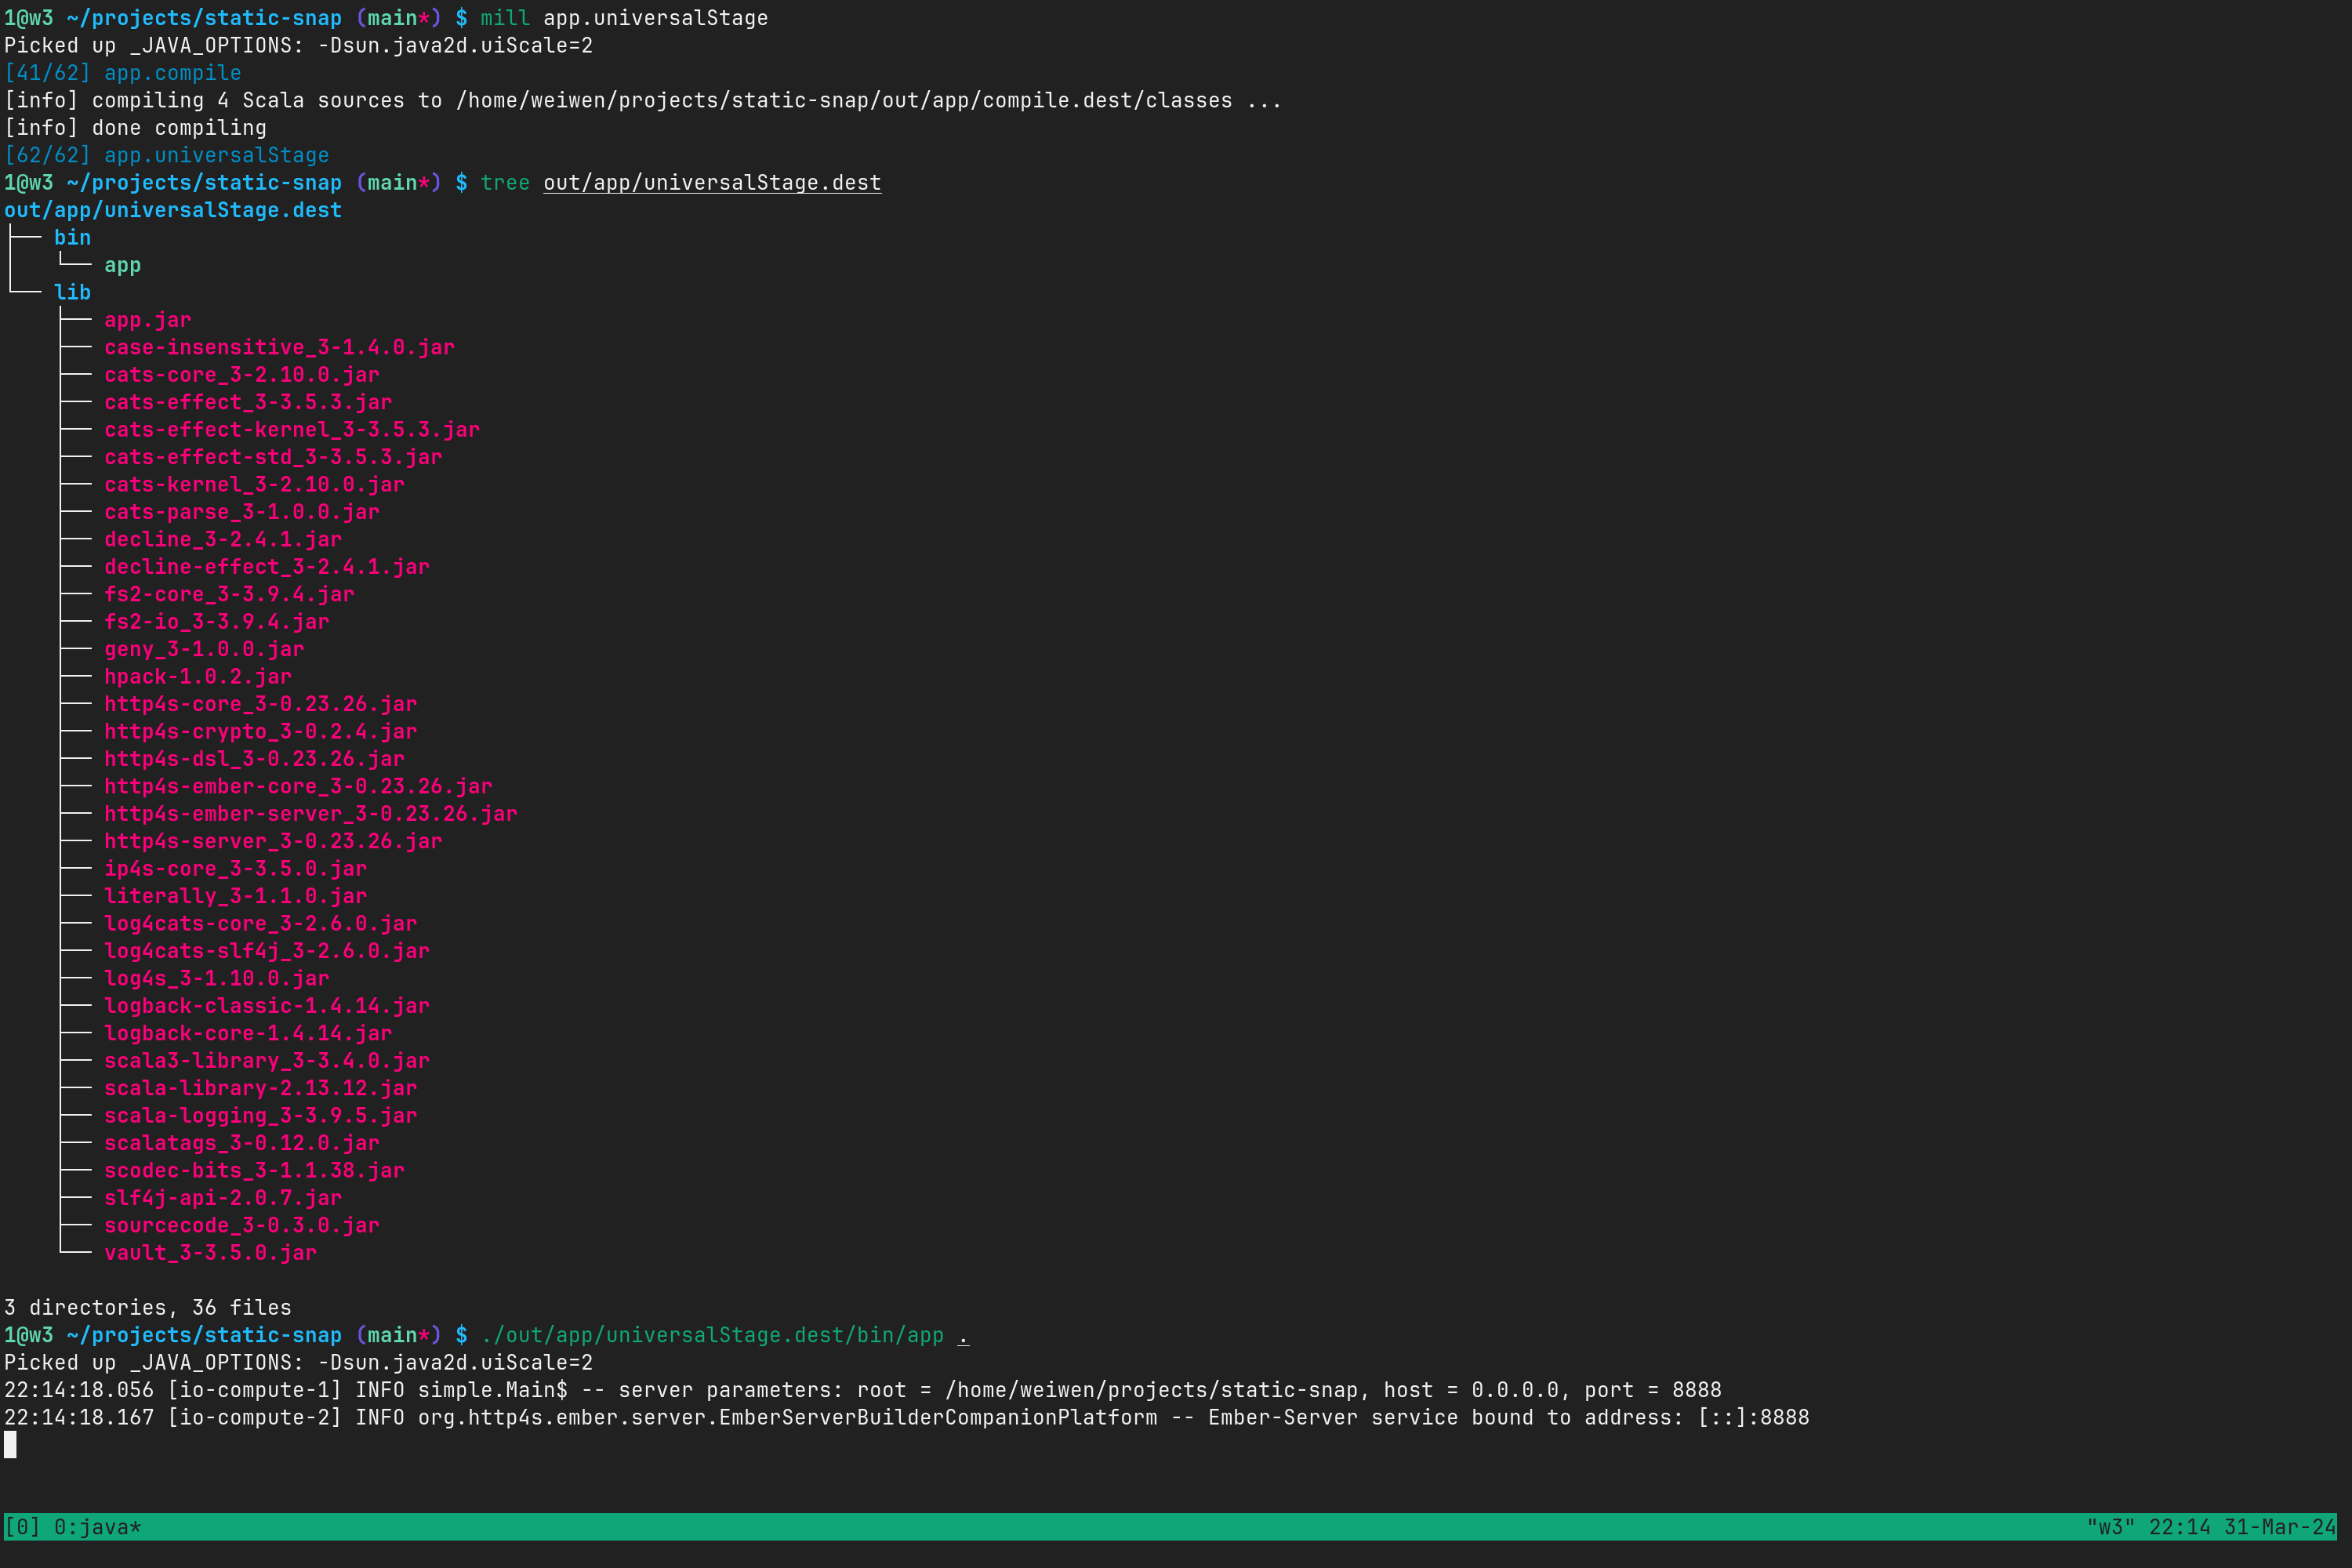
由于我们已经在 build.sc 里配置了 mill 的插件 mill-universal-packager 为应用程序打包,现在可以执行 mill app.universalStage 打包出一个可以执行的应用程序:
1@nixos ~/projects/static-snap $ mill app.universalStage
[62/62] app.universalStage
可以在 ./out/app/universalStage.dest/ 目录下找到我们打包出来的产物,并且执行它:
1@nixos ~/projects/static-snap $ ./out/app/universalStage.dest/bin/app /
20:50:57.437 [io-compute-6] INFO simple.Main$ -- hello world!
20:50:57.439 [io-compute-6] INFO simple.Main$ -- got parameters: host = 0.0.0.0, port = 8888, root = /
还可以使用其他的命令来生成压缩包:
1@nixos ~/projects/static-snap $ mill app.universalStagePackageTarBzip2
[68/68] app.universalStagePackageTarBzip2
Generated package: /home/weiwen/projects/static-snap/out/app/universalStagePackageTarBzip2.dest/app-0.0.1-SNAPSHOT.tar.bz2

1@nixos ~/projects/static-snap $ mill app.universalStagePackageTarZstd
[69/69] app.universalStagePackageTarZstd
Generated package: /home/weiwen/projects/static-snap/out/app/universalStagePackageTarZstd.dest/app-0.0.1-SNAPSHOT.tar.zstd
附注: 上面用到的三个 mill-universal-packager 功能是我本人写的,参见项目地址 https://github.com/hoangmaihuy/mill-universal-packager .
下面是其它一些常用的 mill 命令(以 app 子项目为例):
mill app.compilemill clean, 顾名思义,会删除整个./out目录。mill app.reformat, 读取.scalafmt.conf中的配置并重新格式化app子目录的所有.scala文件.mill __.reformat则重新格式化整个项目。mill app.runMain simple.Main, 指定 main class 运行。mill -w app.run, 运行并且保持热更新,在调试服务器端程序的时候特别有用。mill -i app.console, 进入一个可供调试的 REPL 控制台。mill resolve app._,mill resolve __, 显示所有可以执行的mill子命令。
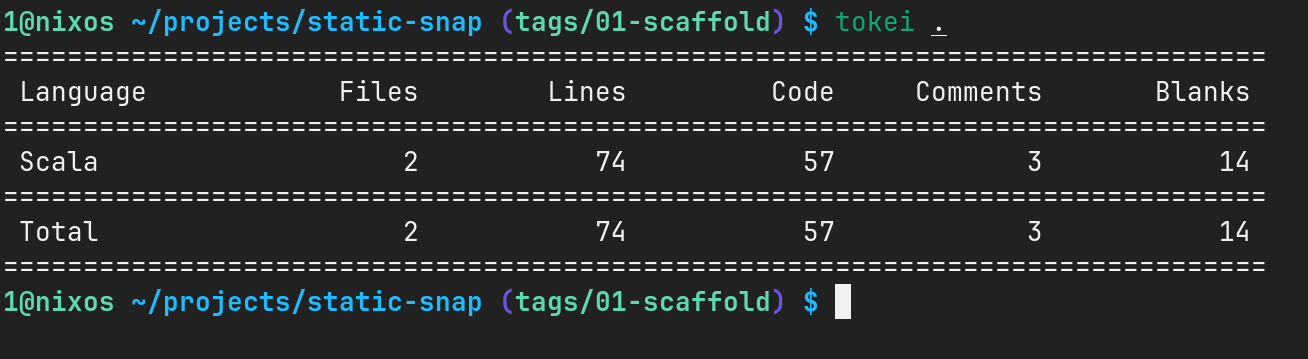
统计下代码行数,会发现仅仅用了 74 行 Scala 代码(其中还包含空行和注释)。
小结:以上完整代码可以在这里找到:https://github.com/weiwen99/static-snap/tree/01-scaffold
第一个 HTTP Service
本节的主要任务是基于 http4s 实现一个最简单的 HTTP Service 并测试。
参数的解析
不过在开始之前,我们需要对之前的工作做一些改进。在上一节中,我们通过命令行接收 host 和 port 参数的时候,并没有对这个两个参数作必要的校验。我们可以很方便地使用 decline 这个现成的库来达到这一点。
app/src/simple/CmdOpts.scala:
package simple

import java.nio.file.{Path, Paths}

import scala.util.*

import cats.data.Validated
import com.comcast.ip4s.{Host, Port}
import com.monovore.decline.Argument

object CmdOpts {

  given Argument[Port] = new Argument[Port] {

    def read(in: String) = {
      in.toIntOption.flatMap(Port.fromInt) match
        case Some(port) => Validated.valid(port)
        case None       => Validated.invalidNel(s"Invalid port: $in")
    }
    def defaultMetavar   = "8888"
  }

  given Argument[Host] = new Argument[Host] {

    def read(in: String) = Host.fromString(in) match
      case Some(host) => Validated.valid(host)
      case None       => Validated.invalidNel(s"Invalid host: $in")

    def defaultMetavar: String = "127.0.0.1"
  }

  given Argument[Path] = new Argument[Path] {

    // 转化为 realpath 以检验路径是否存在
    def read(in: String) = Try(Paths.get(in).toRealPath()) match
      case Success(path)      => Validated.valid(path)
      case Failure(exception) => Validated.invalidNel(s"Invalid path: $in, exception: $exception")

    def defaultMetavar: String = "."
  }
}
可以看到,我们使用了 cats 提供的 Validated 来帮助校验参数。 Validated 是个非常有用的数据结构,可以去 https://typelevel.org/cats/datatypes/validated.html 了解更详细的信息。
对于输入的 root path 目录,我们转化为 real path 以检验路径是否存在。这样就避免了对一个不存在或者不合法的目录提供服务。
现在我们把 CmdOpts 应用到 Main 里:
app/src/simple/Main.scala:
++ import CmdOpts.given

-- val rootOpts: Opts[String] = Opts.argument[String]("root directory")
-- val hostOpts: Opts[String]   = Opts.option[String]("host", short = "h", help = "host").withDefault("0.0.0.0")
-- val portOpts: Opts[Int]   = Opts.option[Int]("port", short = "p", help = "port").withDefault(8888)
++ val rootOpts: Opts[Path] = Opts.argument[Path]("root directory")
++ val hostOpts: Opts[Host]   = Opts.option[Host]("host", short = "h", help = "host").withDefault(Host.fromString("0.0.0.0").get)
++ val portOpts: Opts[Port]   = Opts.option[Port]("port", short = "p", help = "port").withDefault(Port.fromInt(8888).get)
测试一下:
1@nixos ~/projects/static-snap (main*?) $ mill app.run . -h 1234
[36/49] app.compile
[info] compiling 1 Scala source to /home/weiwen/projects/static-snap/out/app/compile.dest/classes ...
[info] done compiling
[49/49] app.run
14:58:19.487 [io-compute-14] INFO simple.Main$ -- hello world!
14:58:19.488 [io-compute-14] INFO simple.Main$ -- got parameters: host = 1234, port = 8888, root = /home/weiwen/projects/static-snap
对于错误的参数:
1@nixos ~/projects/static-snap (main*?) $ mill app.run /tmp -p 123456
[49/49] app.run
Invalid port: 123456

Usage: static-snap [--host <127.0.0.1>] [--port <8888>] <root directory>

A Simple Static Server Powered By Scala

Options and flags:
    --help
        Display this help text.
    --version, -v
        Print the version number and exit.
    --host <127.0.0.1>, -h <127.0.0.1>
        host
    --port <8888>, -p <8888>
        port
1 targets failed
app.run subprocess failed
1@nixos ~/projects/static-snap (main*?) $ mill app.run /xyz-muhahahha
[49/49] app.run
Invalid path: /xyz-muhahahha, exception: java.nio.file.NoSuchFileException: /xyz-muhahahha

Usage: static-snap [--host <127.0.0.1>] [--port <8888>] <root directory>

A Simple Static Server Powered By Scala

Options and flags:
    --help
        Display this help text.
    --version, -v
        Print the version number and exit.
    --host <127.0.0.1>, -h <127.0.0.1>
        host
    --port <8888>, -p <8888>
        port
1 targets failed
app.run subprocess failed
/_status API 的实现
现在可以来实现一个简单的 API 了。
app/src/simple/SnapRouter.scala:
package simple

import cats.effect.kernel.Async
import fs2.io.file.Files
import org.http4s.HttpRoutes
import org.http4s.dsl.Http4sDsl

class SnapRouter[F[_]: Async: Files]() extends Http4sDsl[F] {

  private val statusR = HttpRoutes.of[F] { case request @ GET -> Root / "_status" =>
    Ok("simple static server is running.\n")
  }

  val routes: HttpRoutes[F] = statusR

}
这个 API 很简单,就是 GET /_status, 返回一个简单的字符串。
然后是一个简单的 HTTP Service。
app/src/simple/SnapServer.scala:
package simple

import cats.effect._
import cats.effect.kernel.Async
import com.comcast.ip4s.{Host, Port}
import fs2.io.file.Files
import fs2.io.net.Network
import org.http4s.HttpRoutes
import org.http4s.ember.server.EmberServerBuilder
import org.http4s.server.{Router, Server}

object SnapServer {

  def build[F[_]: Async: Files: Network](routes: HttpRoutes[F], host: Host, port: Port): Resource[F, Server] =
    EmberServerBuilder
      .default[F]
      .withHttpApp(Router("/" -> routes).orNotFound)
      .withHost(host)
      .withPort(port)
      .withHttp2
      .build
}
最后,在 Main 里启动这个 HTTP Service, 并把之前的 hello world 日志打印删去。
app/src/simple/Main.scala:
--      for {
--        _ <- IO.delay(logger.info(s"hello world!"))
--        _ <- IO.delay(logger.info("got parameters: host = {}, port = {}, root = {}", host, port, root))
--      } yield ExitCode.Success
++      val routes    = SnapRouter[IO]().routes
++      val runServer: IO[Unit] = SnapServer.build(routes, host, port).use(_ => IO.never)
++      for {
++        _ <- IO.delay(logger.info("server parameters: root = {}, host = {}, port = {}", root ,host, port))
++        _ <- runServer
++      } yield ExitCode.Success
现在我们终于可以启动服务了:
1@nixos ~/projects/static-snap (main*?) $ mill app.run .
[36/49] app.compile
[info] compiling 1 Scala source to /home/weiwen/projects/static-snap/out/app/compile.dest/classes ...
[info] done compiling
[49/49] app.run
15:36:37.449 [io-compute-3] INFO simple.Main$ -- server parameters: root = /home/weiwen/projects/static-snap, host = 0.0.0.0, port = 8888
15:36:37.565 [io-compute-2] INFO org.http4s.ember.server.EmberServerBuilderCompanionPlatform -- Ember-Server service bound to address: [::]:8888
保持这个服务的运行状态,我们可以用浏览器打开 http://127.0.0.1:8888/_status 或者用 curl 之类的命令行工具来测试我们的服务。
1@nixos ~ $ curl http://127.0.0.1:8888/_status
simple static server is running.
还可以用 wrk 之类的工具来测试这个服务的基础性能:
1@nixos ~ $ wrk --latency -t 8 -c 200 -d 60 http://127.0.0.1:8888/_status
Running 1m test @ http://127.0.0.1:8888/_status
  8 threads and 200 connections
  Thread Stats   Avg      Stdev     Max   +/- Stdev
    Latency     2.16ms    1.24ms 210.49ms   94.90%
    Req/Sec    11.64k   464.19    15.10k    79.02%
  Latency Distribution
     50%    2.05ms
     75%    2.15ms
     90%    2.27ms
     99%    4.25ms
  5557970 requests in 1.00m, 0.90GB read
Requests/sec:  92588.59
Transfer/sec:     15.36MB
另外,我们的服务是天然支持 IPv6 的:
1@nixos ~ $ curl 'http://[::1]:8888/_status'
simple static server is running.
甚至支持 HTTP/2:
1@nixos ~ $ curl -vvvv --http2 'http://[::1]:8888/_status'
*   Trying [::1]:8888...
* Connected to ::1 (::1) port 8888
> GET /_status HTTP/1.1
> Host: [::1]:8888
> User-Agent: curl/8.6.0
> Accept: */*
> Connection: Upgrade, HTTP2-Settings
> Upgrade: h2c
> HTTP2-Settings: AAMAAABkAAQAoAAAAAIAAAAA
>
< HTTP/1.1 101 Switching Protocols
< Date: Thu, 28 Mar 2024 07:52:43 GMT
< connection: Upgrade
< upgrade: h2c
* Received 101, Switching to HTTP/2
< HTTP/2 200
< content-type: text/plain; charset=UTF-8
< content-length: 33
<
simple static server is running.
* Connection #0 to host ::1 left intact
单元测试
首先引入 scalatest 依赖并新增子项目 app/test :
build.sc:
  object Versions {
  ++  val scalatestV      = "3.2.18"
  }

  object app extends ScalaModule with ScalafmtModule with JavaAppPackagingModule {
++   object test extends ScalaTests with TestModule.ScalaTest {
++
++    def ivyDeps = Agg(
++      ivy"org.scalatest::scalatest:$scalatestV"
++    )
++  }
  }
新建目录 app/test/src/, 并把单元测试代码放在这个目录下。
app/test/src/simple/SnapRouterSpec.scala:
package simple

import cats.effect.*
import cats.effect.unsafe.IORuntime
import org.http4s.*
import org.http4s.dsl.io.*
import org.http4s.implicits.uri
import org.scalatest.matchers.should
import org.scalatest.wordspec.AnyWordSpec

class SnapRouterSpec extends AnyWordSpec with should.Matchers {

  implicit val runtime: IORuntime = cats.effect.unsafe.IORuntime.global

  "API `/_status`" should {
    "work" in {
      val router = SnapRouter[IO]()
      val actual = router.routes.orNotFound.run(Request[IO](GET, uri"/_status")).unsafeRunSync()
      actual.status shouldBe Ok
      actual.as[String].unsafeRunSync() shouldBe "simple static server is running.\n"
    }
  }
}
现在我们可以运行单元测试了:
1@nixos ~/projects/static-snap (main*?) $ mill app.test
[85/85] app.test.test
SnapRouterSpec:
API `/_status`
- should work
Run completed in 1 second, 58 milliseconds.
Total number of tests run: 1
Suites: completed 1, aborted 0
Tests: succeeded 1, failed 0, canceled 0, ignored 0, pending 0
All tests passed.
至此,我们整个项目结构和代码行数统计如下:
1@nixos ~/projects/static-snap (tags/02-first-http-service) $ tree .
.
├── app
│   ├── src
│   │   └── simple
│   │       ├── CmdOpts.scala
│   │       ├── Main.scala
│   │       ├── SnapRouter.scala
│   │       └── SnapServer.scala
│   └── test
│       └── src
│           └── simple
│               └── SnapRouterSpec.scala
└── build.sc

7 directories, 6 files
1@nixos ~/projects/static-snap (tags/02-first-http-service) $ tokei .
===============================================================================
 Language            Files        Lines         Code     Comments       Blanks
===============================================================================
 Scala                   6          189          145            4           40
===============================================================================
 Total                   6          189          145            4           40
===============================================================================
1@nixos ~/projects/static-snap (tags/02-first-http-service) $
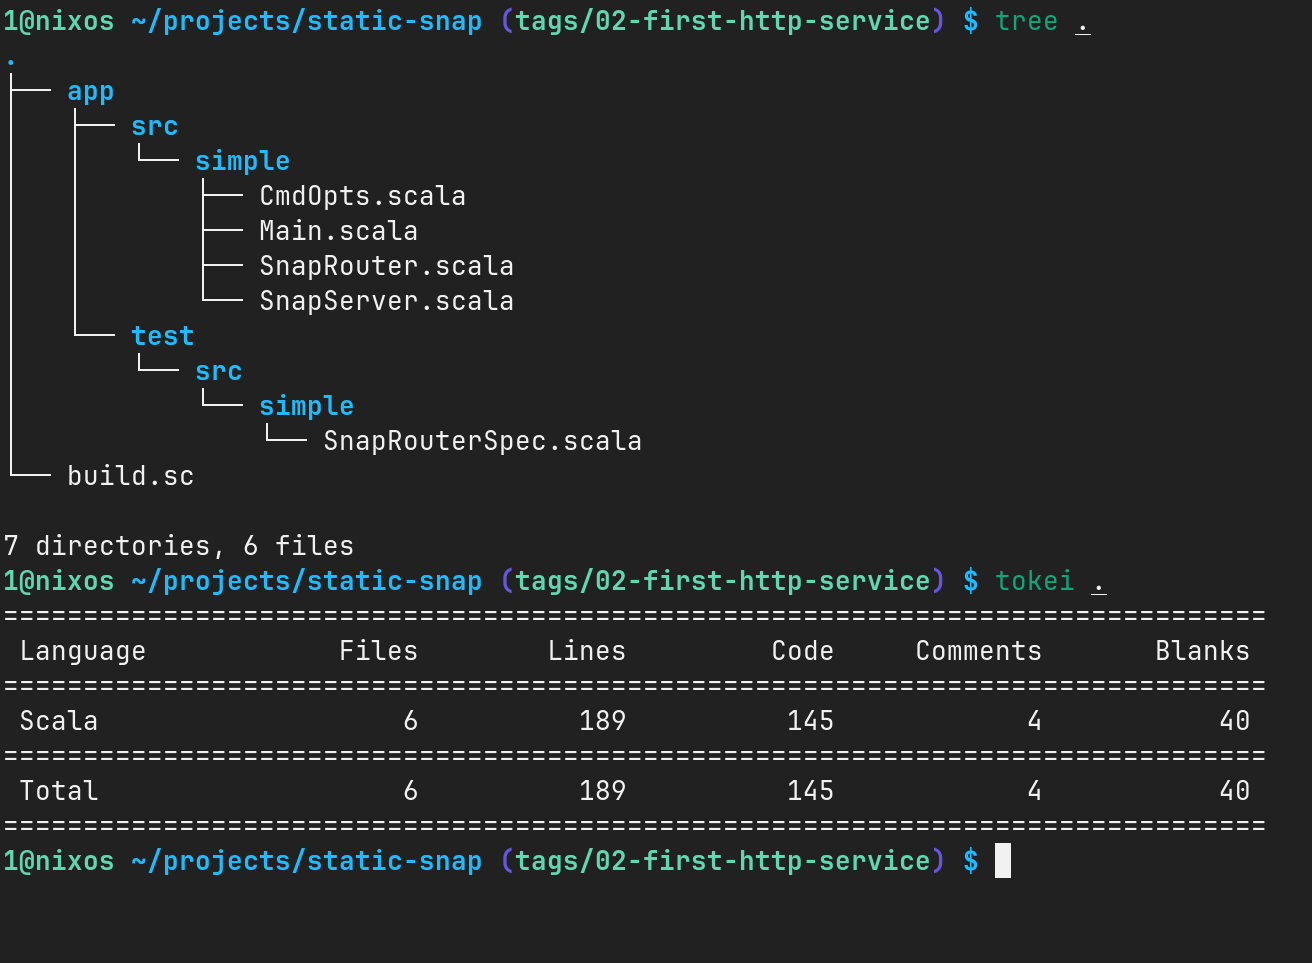
由此可见,使用 mill 的 Scala 项目,跟使用 sbt 的类 maven 结构是有所区别的,一般会更简洁明了一些。
小结:本节的阶段性源代码可以在 https://github.com/weiwen99/static-snap/tree/02-first-http-service 找到。
单文件服务器
我们大致分两步来实现核心功能:
- 单文件服务,返回指定目录下的单个文件。
- 目录浏览功能,返回一个 HTML 页面,并提供上一级和子目录浏览功能。
本节先实现第一步。在 SnapRouter 中增加一个 fileR, 提供单文件服务。 Main 和 Unit Test 中的引用需要做的变更非常明显而且简单,略过不提。
app/src/simple/SnapRouter.scala:
package simple

import java.nio.charset.StandardCharsets
import java.nio.file.{Path => NioPath, Paths}

import cats.effect.kernel.Async
import cats.implicits.*
import com.typesafe.scalalogging.StrictLogging
import fs2.io.file.{Files, Path => Fs2Path}
import org.http4s.{HttpRoutes, StaticFile}
import org.http4s.dsl.Http4sDsl
import org.http4s.headers.`Accept-Ranges`

/** @param root
  *   提供服务的文件系统根目录
  * @param metaPrefix
  *   元信息 API 的前缀. 比如, 如果 metaPrefix 为 "__", 则元信息 API 为 `/__/status`
  */
class SnapRouter[F[_]: Async: Files](root: NioPath, metaPrefix: String) extends Http4sDsl[F] with StrictLogging {

  require("metaPrefix".nonEmpty, "metaPrefix should not be empty")

  private val META_PREFIX: String = metaPrefix

  private val statusR = HttpRoutes.of[F] { case request @ GET -> Root / META_PREFIX / "status" =>
    Ok("simple static server is running.\n")
  }

  private val fileR = HttpRoutes.of[F] { case request @ GET -> path =>
    // 由于 path 被 URL 编码,所以需要 URL 解码
    val decoded          = java.net.URLDecoder.decode(path.toString, StandardCharsets.UTF_8)
    // 将解码后的路径拼接到根路径下
    val nioPath: NioPath = Paths.get(root.toAbsolutePath.toString, decoded)
    val fs2Path: Fs2Path = Fs2Path.fromNioPath(nioPath)
    StaticFile
      .fromPath(fs2Path, request.some)
      // 支持 Range 请求, 否则播放音视频无法任意快进
      .map(_.putHeaders(`Accept-Ranges`.bytes))
      // 如果文件不存在,返回 404 Not Found
      .getOrElseF({
        logger.error("resource {} not found", nioPath)
        NotFound()
      })
  }

  val routes: HttpRoutes[F] = statusR <+> fileR

}
工作机制:在我们指定的根目录 rootPath 下,如果有路径 x/y/z.json, 那么 HTTP 请求为 GET /x/y/z.json 时,返回文件 z.json 的内容。
因为路径 /x/y/z.json 可能会被 URL 编码,比如 /x/y/[z].json 会被编码成 /x/y/%5bz%5e.json, 我们需要对 URL 路径作解编码处理。
为了支持多媒体文件播放时的快进快退,我们需要在 HTTP Response 加上 Accept-Ranges: bytes 这个 HTTP 头。
如果文件不存在,返回 404 Not Found.
注意,由于我们通过 cats 的 SemigroupK type class 运算符 <+> 把 statusR 和 fileR 复合在一起,如果根目录 root 下恰好有与 META_PREFIX
这个参数同名的文件或者目录,则该文件不可见。例如,如果恰好有个名为 __/status 的文件在根目录下,那么这个文件不能被我们的服务捕获,因为
/__/status 这个 API 会被 statusR 优先匹配。这也是我们特别令 META_PREFIX 可配置的原因。如果不需要 /META_PREFIX/status 这个 API, 也可以直
接删去它。
单元测试
app/test/src/simple/SnapRouterSpec.scala:
package simple

import java.nio.file.Paths

import scala.util.Random

import cats.effect.*
import cats.effect.unsafe.IORuntime
import cats.implicits.*
import com.typesafe.scalalogging.StrictLogging
import org.http4s.*
import org.http4s.dsl.io.*
import org.http4s.implicits.*
import org.scalatest.BeforeAndAfterAll
import org.scalatest.matchers.should
import org.scalatest.wordspec.AnyWordSpec
import org.typelevel.ci.CIString

class SnapRouterSpec extends AnyWordSpec with should.Matchers with BeforeAndAfterAll with StrictLogging {

  implicit val runtime: IORuntime = cats.effect.unsafe.IORuntime.global

  private val dir   = "__static_snap_" + Random.alphanumeric.take(10).mkString
  private val dir1  = s"/tmp/$dir"
  private val dir2  = s"$dir1/subdir"
  private val text1 = "text 1"
  private val file1 = s"$dir1/1.txt"
  private val text2 = """{"key":"value"}"""
  private val file2 = s"$dir2/2.json"

  override def beforeAll(): Unit = {
    os.write(os.Path(file1), text1, createFolders = true)
    os.write(os.Path(file2), text2, createFolders = true)
    super.beforeAll()
  }

  override def afterAll(): Unit = {
    os.remove.all(os.Path(dir1))
    super.afterAll()
  }

  "Meta API" should {
    "work" in {
      val router = SnapRouter[IO](Paths.get("/tmp"), "_")
      val actual = router.routes.orNotFound.run(Request[IO](GET, uri"/_/status")).unsafeRunSync()
      actual.status shouldBe Ok
      actual.as[String].unsafeRunSync() shouldBe "simple static server is running.\n"
    }
  }

  "Single File API" should {
    val router = SnapRouter[IO](Paths.get(dir1), "_")
    "serve top level files" in {
      val actual = router.routes.orNotFound.run(Request[IO](GET, uri"/1.txt")).unsafeRunSync()
      actual.status shouldBe Ok
      actual.as[String].unsafeRunSync() shouldBe text1
    }
    "serve nested dir files" in {
      val actual = router.routes.orNotFound.run(Request[IO](GET, uri"/subdir/2.json")).unsafeRunSync()
      actual.status shouldBe Ok
      actual.headers.get(CIString("content-type")).map(_.head.value) shouldBe "application/json".some
      actual.as[String].unsafeRunSync() shouldBe text2
    }
  }

}
测试的总体思路是先生成一个随机的目录,然后在目录里新建两个不同层级的文本文件,并分别测试,最后再删掉整个测试目录。
运行测试
1@nixos ~/projects/static-snap (main*) $ mill app.run .
[49/49] app.run
21:42:32.152 [io-compute-28] INFO simple.Main$ -- server parameters: root = /home/weiwen/projects/static-snap, host = 0.0.0.0, port = 8888
21:42:32.235 [io-compute-28] INFO org.http4s.ember.server.EmberServerBuilderCompanionPlatform -- Ember-Server service bound to address: [::]:8888
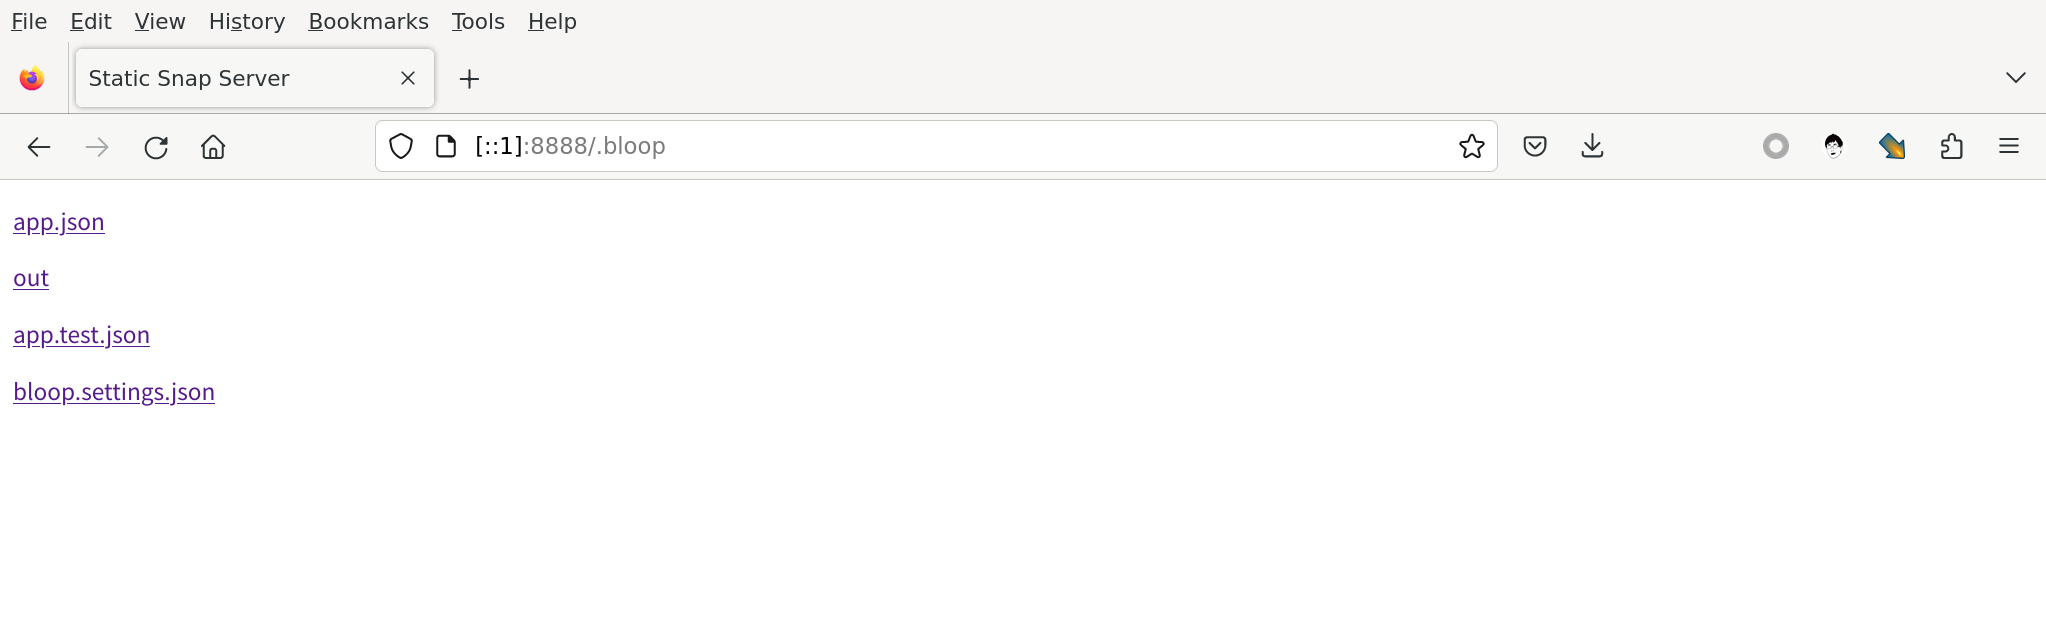
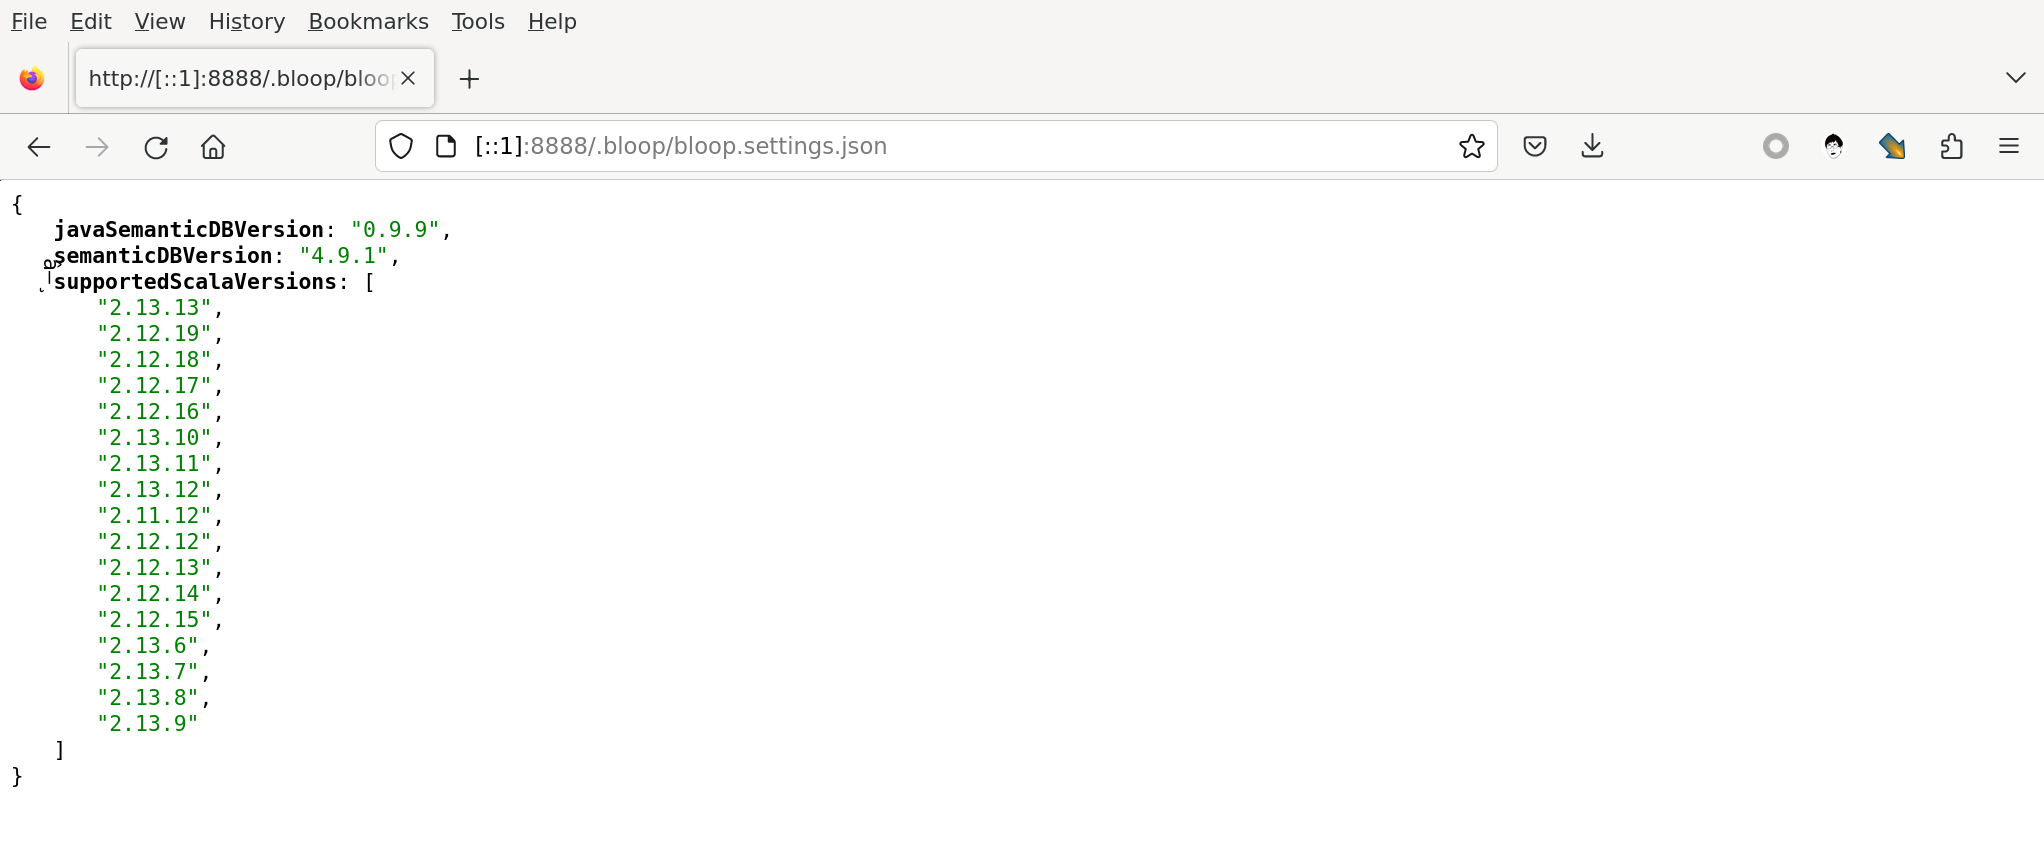
1@nixos ~ $ curlie 'http://[::1]:8888/.bloop/bloop.settings.json'
HTTP/1.1 200 OK
Date: Thu, 28 Mar 2024 13:43:36 GMT
Connection: keep-alive
Last-Modified: Thu, 28 Mar 2024 13:13:52 GMT
Content-Length: 431
Content-Type: application/json
ETag: "18e8532099b-1af"
Accept-Ranges: bytes

{
    "javaSemanticDBVersion": "0.9.9",
    "semanticDBVersion": "4.9.1",
    "supportedScalaVersions": [
        "2.13.13",
        "2.12.19",
        "2.12.18",
        "2.12.17",
        "2.12.16",
        "2.13.10",
        "2.13.11",
        "2.13.12",
        "2.11.12",
        "2.12.12",
        "2.12.13",
        "2.12.14",
        "2.12.15",
        "2.13.6",
        "2.13.7",
        "2.13.8",
        "2.13.9"
    ]
}
至此,我们整个项目结构和代码行数统计如下:
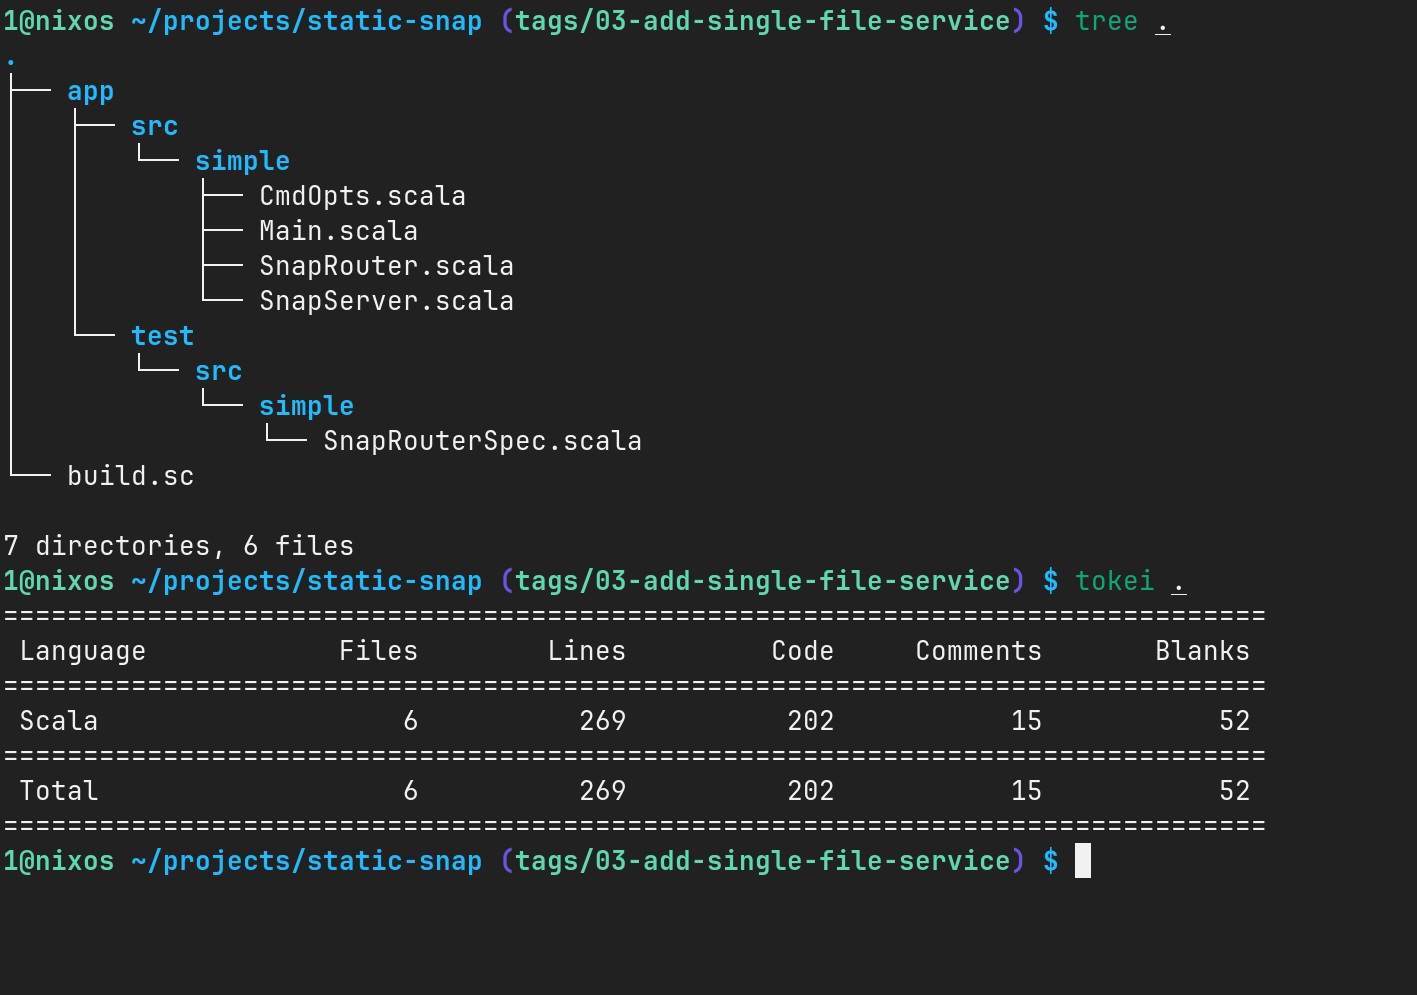
小结: 本节所有代码都可以在 https://github.com/weiwen99/static-snap/tree/03-add-single-file-service 里找到。
目录浏览的基础支持
功能的规划
我们设计以下的目录浏览功能:
- 列出指定目录下的所有文件和子目录
- 在功能 1 的页面上,可以打开任意文件或者进入下一级子目录
- 在功能 1 的页面上,可以进入上一级目录,直到根目录
- 支持根据文件名或者其他文件属性排序
- 支持在页面上进行文件搜索,这是一个 Python 的
http.server或者 Nginx 默认没有的功能
本节我们先用 ScalaTags 来实现基础的目录浏览功能 1, 2, 3.
根据官网的自述, ScalaTags 是一款小型、快速的 ScalaXML/HTML/CSS 构建库。其详细文档可以去官网 https://com-lihaoyi.github.io/scalatags/ 阅读。本
项目使用 ScalaTags 的原因是因为它小巧,易用,功能强大而又依赖极少。我们马上开始请出 ScalaTags, 开始它的表演。
不过,开始之前,我们需要先理一下实现思路,免得在代码中迷失方向。总体思路应当清晰明了:
- API 从 URL 里接收到一个相对路径
path - 判断
path是否为一个文件(含符号链接)。如果是文件,那么输出文件内容;如果是目录,则列出其下所有文件和子目录 - 在目录列表中,所有 HTTP 超链接都需要作 URL 编码
- 对于目录,显示上一级的链接
../, 除非本身已经是根目录
引入 ScalaTags
我们从一个最简单的页面开始。首先我们需要有一个 EntityEncoder 来把 ScalaTags 的输出转化为 http4s 的 HTML 输出。http4s-scalatags 是一个
http4s 官方提供的实现。考虑到这个实现比较简单,而且本着依赖多一个不如少一个的原则,我们干脆自己写一个好了。
app/src/simple/SnapRouter.scala:
- import org.http4s.{HttpRoutes, StaticFile}
+ import org.http4s._
  import org.http4s.dsl.Http4sDsl
- import org.http4s.headers.`Accept-Ranges`
+ import org.http4s.headers.{`Accept-Ranges`, `Content-Type`}
+ import scalatags.Text.*
+ import scalatags.Text.all.*

class SnapRouter[F[_]: Async: Files](root: NioPath, metaPrefix: String) extends Http4sDsl[F] with StrictLogging {

  private given EntityEncoder[F, TypedTag[String]] =
    EntityEncoder
      .stringEncoder[F]
      .contramap[TypedTag[String]](content => "<!DOCTYPE html>" + content.render)
      .withContentType(`Content-Type`(MediaType.text.html, Charset.`UTF-8`))

}
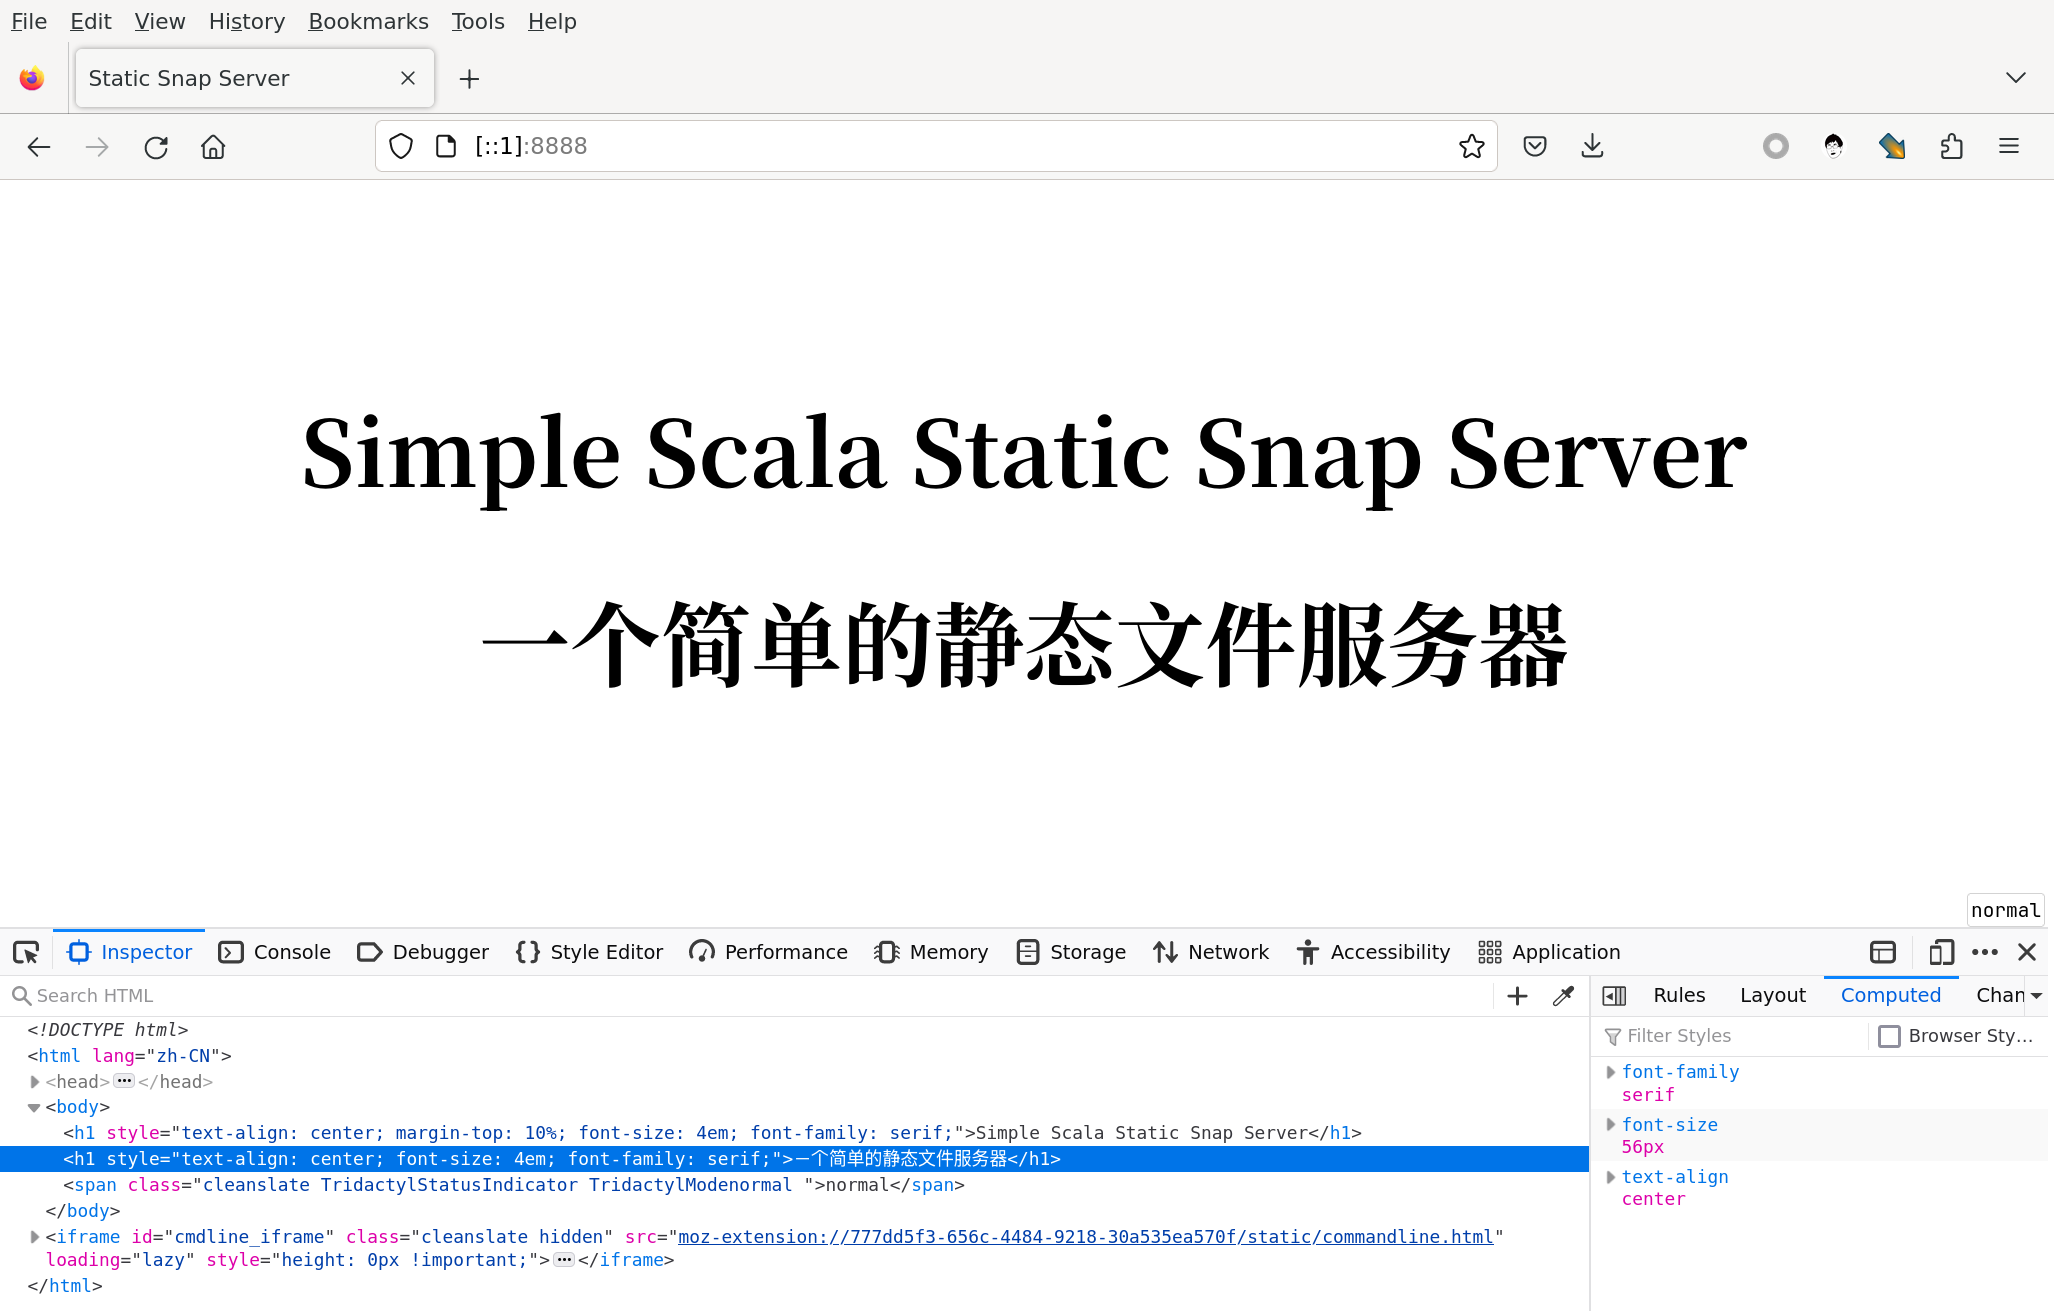
现在可以写一个最简单的页面了。我们让这个页面拥有完整的 HTML 元素,只有两行标题,路由自 API 根目录 /.
app/src/simple/SnapRouter.scala:
class SnapRouter[F[_]: Async: Files](root: NioPath, metaPrefix: String) extends Http4sDsl[F] with StrictLogging {

  def rootR = HttpRoutes.of[F] { case request @ GET -> Root =>
    val page: TypedTag[String] = html(
      lang := "zh-CN",
      head(
        meta(charset := "utf-8"),
        meta(name    := "viewport", content := "width=device-width, initial-scale=1.0, user-scalable=no, maximum-scale=1, minimum-scale=1"),
        tags2.title("Static Snap Server")
      ),
      h1("Simple Scala Static Snap Server", style := "text-align: center; margin-top: 10%; font-size: 4em; font-family: serif;"),
      h1("一个简单的静态文件服务器", style := "text-align: center; font-size: 4em; font-family: serif;")
    )
    Ok(page)
  }
- val routes: HttpRoutes[F] = statusR <+> fileR
+ val routes: HttpRoutes[F] = rootR <+> statusR <+> fileR
}
请注意,路由的复合顺序 rootR <+> statusR <+> fileR 不能改变,否则可能得不到期望的结果。
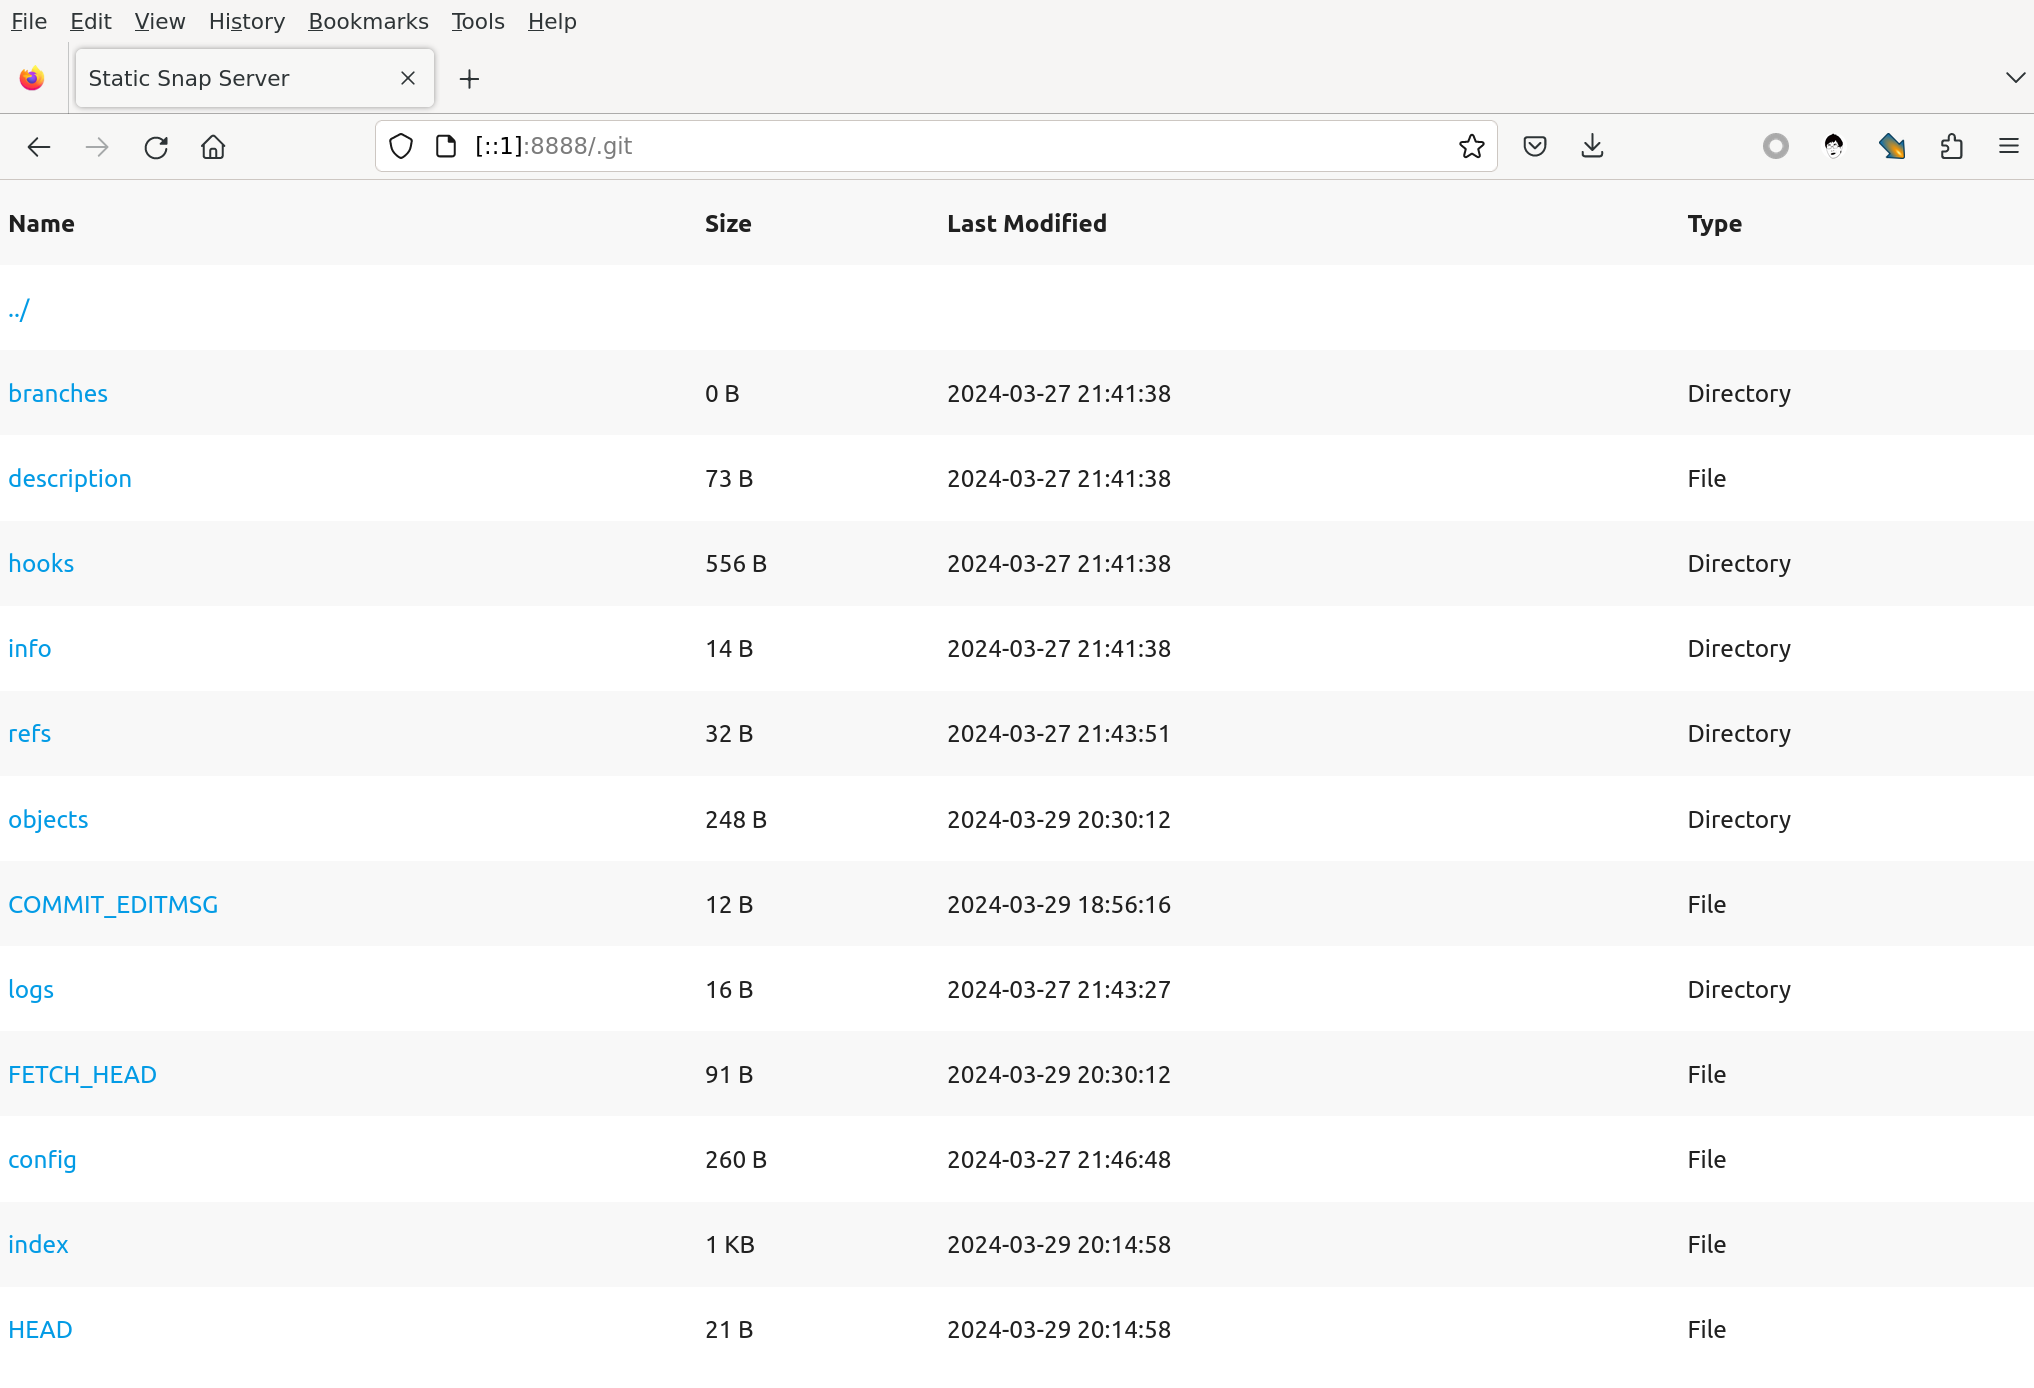
现在我们执行 mill app.run . 把服务运行起来以后,就可以用浏览器打开 :8888 地址得到一个期望中的页面了:
根目录文件列表
接下来我们尝试列出根目录下的所有内容。只需要删去两行标题,用列出来的内容生成超链接,去替代即可。
app/src/simple/SnapRouter.scala:
+ import scala.jdk.CollectionConverters.*

class SnapRouter[F[_]: Async: Files](root: NioPath, metaPrefix: String) extends Http4sDsl[F] with StrictLogging {

  def rootR = HttpRoutes.of[F] { case request @ GET -> Root =>
    val children               = java.nio.file.Files.list(Paths.get(root.toAbsolutePath.toString)).toList().asScala.toList
    val links                  = children
      .map { d =>
        val r       = root.relativize(d)
        val encoded = java.net.URLEncoder.encode(r.toString, StandardCharsets.UTF_8)
        p(a(href := s"/$encoded", r.toString))
      }
    val page: TypedTag[String] = html(
      lang := "zh-CN",
      head(
        meta(charset := "utf-8"),
        meta(name    := "viewport", content := "width=device-width, initial-scale=1.0, user-scalable=no, maximum-scale=1, minimum-scale=1"),
        tags2.title("Static Snap Server")
      ),
      // h1("Simple Scala Static Snap Server", style := "text-align: center; margin-top: 10%; font-size: 4em; font-family: serif;"),
      // h1("一个简单的静态文件服务器", style := "text-align: center; font-size: 4em; font-family: serif;")
      links
    )
    Ok(page)
  }
}
请注意,超链接需要用 URL 编码。
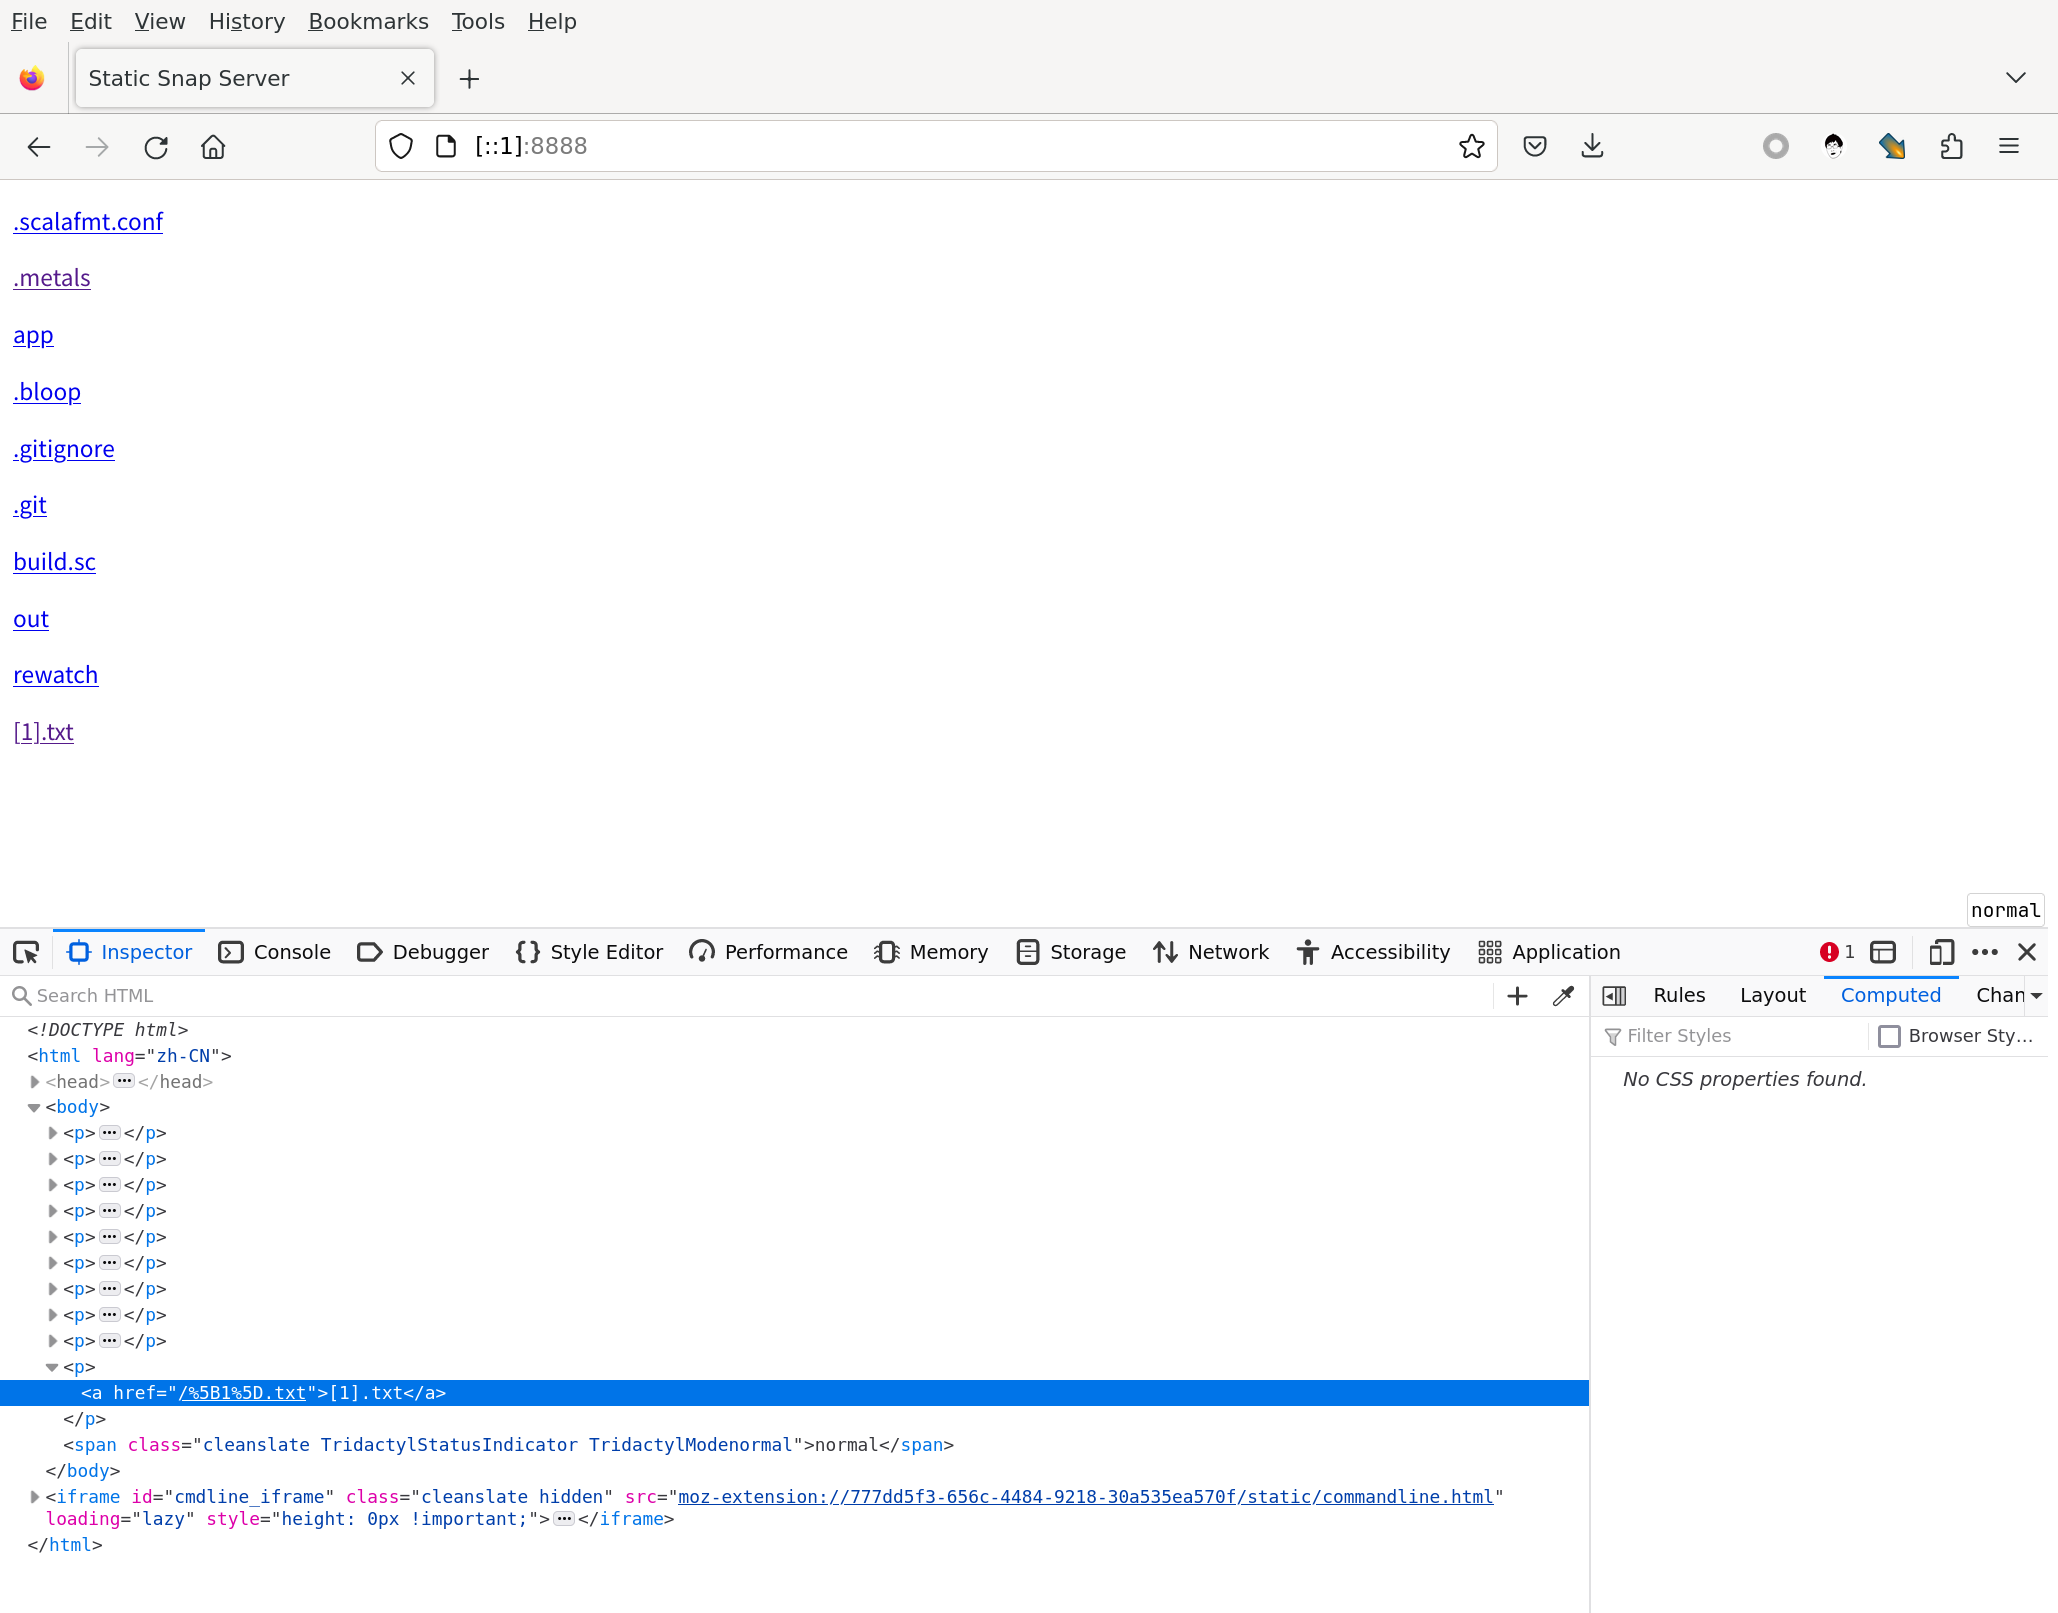
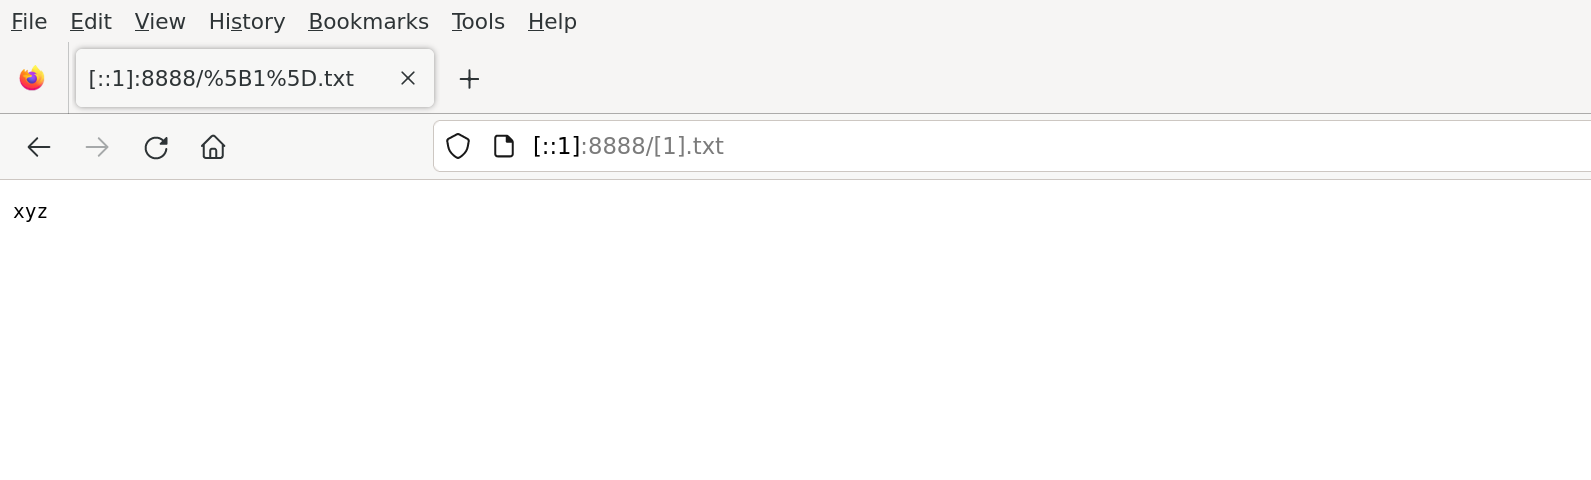
特别制造一个含有方括号需要转义的文件,测试一下:
1@nixos ~/projects/static-snap (main*?) $ echo 'xyz' > "[1].txt"
1@nixos ~/projects/static-snap (main*?) $ mill app.run .
[49/49] app.run
15:59:09.931 [io-compute-16] INFO simple.Main$ -- server parameters: root = /home/weiwen/projects/static-snap, host = 0.0.0.0, port = 8888
15:59:10.053 [io-compute-14] INFO org.http4s.ember.server.EmberServerBuilderCompanionPlatform -- Ember-Server service bound to address: [::]:8888
测试没有问题:
测试完毕,请记得删除测试文件 [1].txt, 否则可能会被误提交到 git repo 上去。
递归地列出目录或输出文件
为了递归地列出目录或输出文件,我们把 SnapRouter 简单重构。
package simple

import java.nio.charset.StandardCharsets
import java.nio.file.{Path => NioPath, Paths}

import scala.jdk.CollectionConverters.*

import cats.effect.kernel.Async
import cats.implicits.*
import com.typesafe.scalalogging.StrictLogging
import fs2.io.file.{Files, Path => Fs2Path}
import org.http4s._
import org.http4s.dsl.Http4sDsl
import org.http4s.headers.{`Accept-Ranges`, `Content-Type`}
import scalatags.Text.*
import scalatags.Text.all.*

/** @param root
  *   提供服务的文件系统根目录
  * @param metaPrefix
  *   元信息 API 的前缀. 比如, 如果 metaPrefix 为 "__", 则元信息 API 为 `/__/status`
  */
class SnapRouter[F[_]: Async: Files](root: NioPath, metaPrefix: String) extends Http4sDsl[F] with StrictLogging {

  require("metaPrefix".nonEmpty, "metaPrefix should not be empty")

  private val META_PREFIX: String = metaPrefix

  private given EntityEncoder[F, TypedTag[String]] =
    EntityEncoder
      .stringEncoder[F]
      .contramap[TypedTag[String]](content => "<!DOCTYPE html>" + content.render)
      .withContentType(`Content-Type`(MediaType.text.html, Charset.`UTF-8`))

  // 元信息 API
  private val statusR = HttpRoutes.of[F] { case request @ GET -> Root / META_PREFIX / "status" =>
    Ok("simple static server is running.\n")
  }

  // 列出目录内容或者返回文件
  private val mainR = HttpRoutes.of[F] { case request @ GET -> path =>
    // 由于 path 被 URL 编码,所以需要 URL 解码
    val decoded          = java.net.URLDecoder.decode(path.toString, StandardCharsets.UTF_8)
    // 将解码后的路径拼接到根路径下
    val nioPath: NioPath = Paths.get(root.toAbsolutePath.toString, decoded)
    nioPath match {
      // 如果文件不存在,返回 404 Not Found
      case n if !java.nio.file.Files.exists(n)       => NotFound()
      // 如果文件不在根目录下,返回 403 Forbidden. (虽然 URL path 理论上能阻止溢出根目录范围)
      case n if !n.toAbsolutePath().startsWith(root) => Forbidden()
      // 如果是目录,列出目录内容
      case n if (java.nio.file.Files.isDirectory(n)) => Ok(listDir(nioPath))
      // 如果是文件,返回文件内容
      case n                                         => serveFile(n, request.some)
    }
  }

  private def serveFile(path: NioPath, req: Option[Request[F]]) =
    StaticFile
      .fromPath(Fs2Path.fromNioPath(path), req)
  // 支持 Range 请求, 否则播放音视频无法任意快进
      .map(_.putHeaders(`Accept-Ranges`.bytes))
  // 如果文件不存在,返回 404 Not Found. 这里仅仅是为了形式上的正确,因为前面已经处理了文件不存在的情况
      .getOrElseF(NotFound())

  private def listDir(path: NioPath) = {
    val children: List[NioPath]       = java.nio.file.Files.list(path).toList().asScala.toList
    val links: List[TypedTag[String]] = children
      .map { d =>
        // 相对于根目录的路径
        val relativePath: NioPath = root.relativize(d)
        // 相对于父级目录的路径,为了显示的简介性
        val displayPath: NioPath  = path.relativize(d)
        // URL 编码后的路径,用于超链接
        val encoded: String       = "/" + urlEncodePath(relativePath)
        p(a(href := encoded, displayPath.toString))
      }
    html(
      lang := "zh-CN",
      head(
        meta(charset := "utf-8"),
        meta(name    := "viewport", content := "width=device-width, initial-scale=1.0, user-scalable=no, maximum-scale=1, minimum-scale=1"),
        tags2.title("Static Snap Server")
      ),
      links
    )
  }

  // 将路径中的每个部分进行 URL 编码,避免 x/y/z -> x%2Fy%2Fz
  private def urlEncodePath(path: NioPath): String =
    path.toString.split("/").map(java.net.URLEncoder.encode(_, StandardCharsets.UTF_8)).mkString("/")

  val routes: HttpRoutes[F] = statusR <+> mainR

}
请注意:
- 对于一个目录,我们会尝试列出目录内容. 如果目录本身不存在,因为
Files.isDirectory(nioPath)会返回false, 所以不会尝试列出不存在的目录的内容,而会返回404 Not Found. - 在 URL 编码路径的时候,我们需要将路径中的每个部分进行 URL 编码,而不是直接对整个路径做编码,从而避免
x/y/z -> x%2Fy%2Fz这样的情况发生。 - 除了显示的文件名,所有的相对路径都应该以根目录为基准。
测试一下:
顺便加上父级目录链接,只需要简单加一行就够了:
app/src/simple/SnapRouter.scala:
private def listDir(path: NioPath) = {
  html(
+    if (path != root) List(p(a(href := "../", "../"))) else List.empty[Modifier],
    links
  )
}
当前我们只是列出了文件名,简陋得有点惨不忍睹。可以很容易加上文件大小,最后修改日期和文件类型。为此我们只需要重写 listDir 方法,增加一个表格。
private def listDir(path: NioPath) = {
  val children: List[NioPath]       = java.nio.file.Files.list(path).toList().asScala.toList
  val trs = children
    .map { d =>
      // 相对于根目录的路径
      val relativePath: NioPath = root.relativize(d)
      // 相对于父级目录的路径,为了显示的简介性
      val displayPath: NioPath  = path.relativize(d)
      // URL 编码后的路径,用于超链接
      val encoded: String       = "/" + urlEncodePath(relativePath)
      val size                  = d.toFile().length() match {
        case s if s < 1024L                 => s"$s B"
        case s if s < 1024L * 1024L         => s"${s / 1024L} KB"
        case s if s < 1024L * 1024L * 1024L => s"${s / 1024L / 1024L} MB"
        case s                              => s"${s / 1024L / 1024L / 1024L} GB"
      }
      val lastModified          = java.nio.file.Files.getLastModifiedTime(d).toInstant().atZone(java.time.ZoneId.systemDefault())
      val formatter             = java.time.format.DateTimeFormatter.ofPattern("yyyy-MM-dd HH:mm:ss")
      val lastModifiedDisplayed = formatter.format(lastModified)
      val typ                   = if (java.nio.file.Files.isDirectory(d)) "Directory" else "File"
      tr(td(a(href := encoded, displayPath.toString)), td(size), td(lastModifiedDisplayed), td(typ))
    }
  html(
    lang := "zh-CN",
    head(
      meta(charset := "utf-8"),
      meta(name    := "viewport", content := "width=device-width, initial-scale=1.0, user-scalable=no, maximum-scale=1, minimum-scale=1"),
      tags2.title("Static Snap Server")
    ),
    table(
      tr(th("Name"), th("Size"), th("Last Modified"), th("Type")),
      if (path != root) tr(td(a(href := "../", "../"))) else tr(),
      tbody(trs)
    )
  )
}
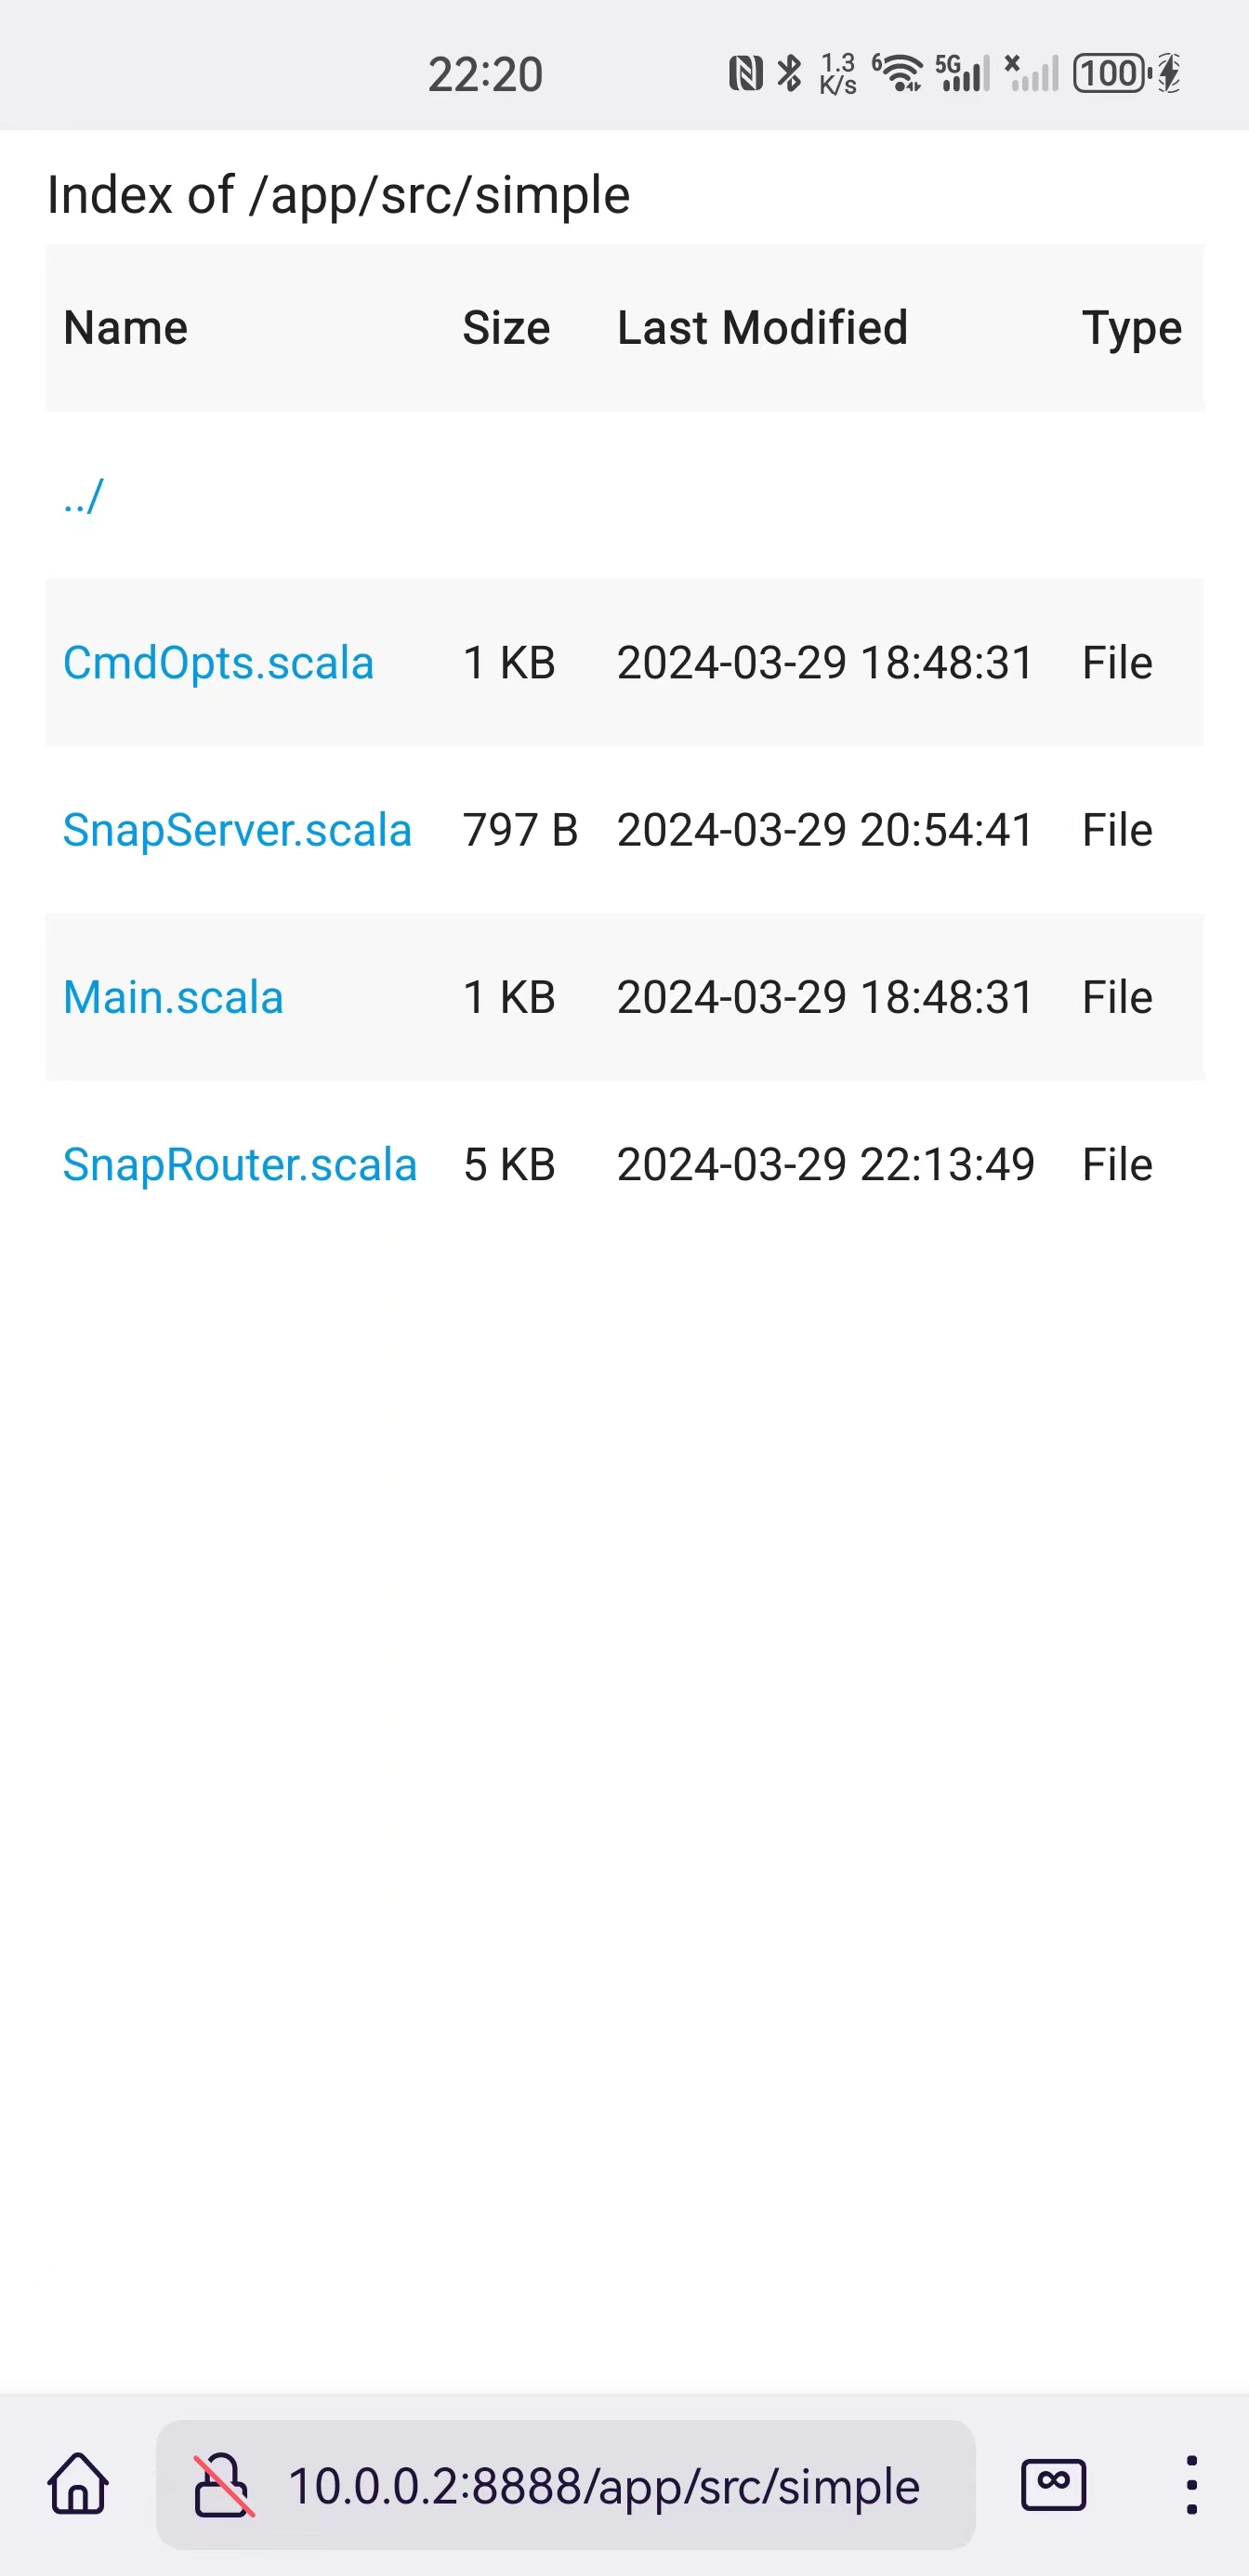
测试一下:
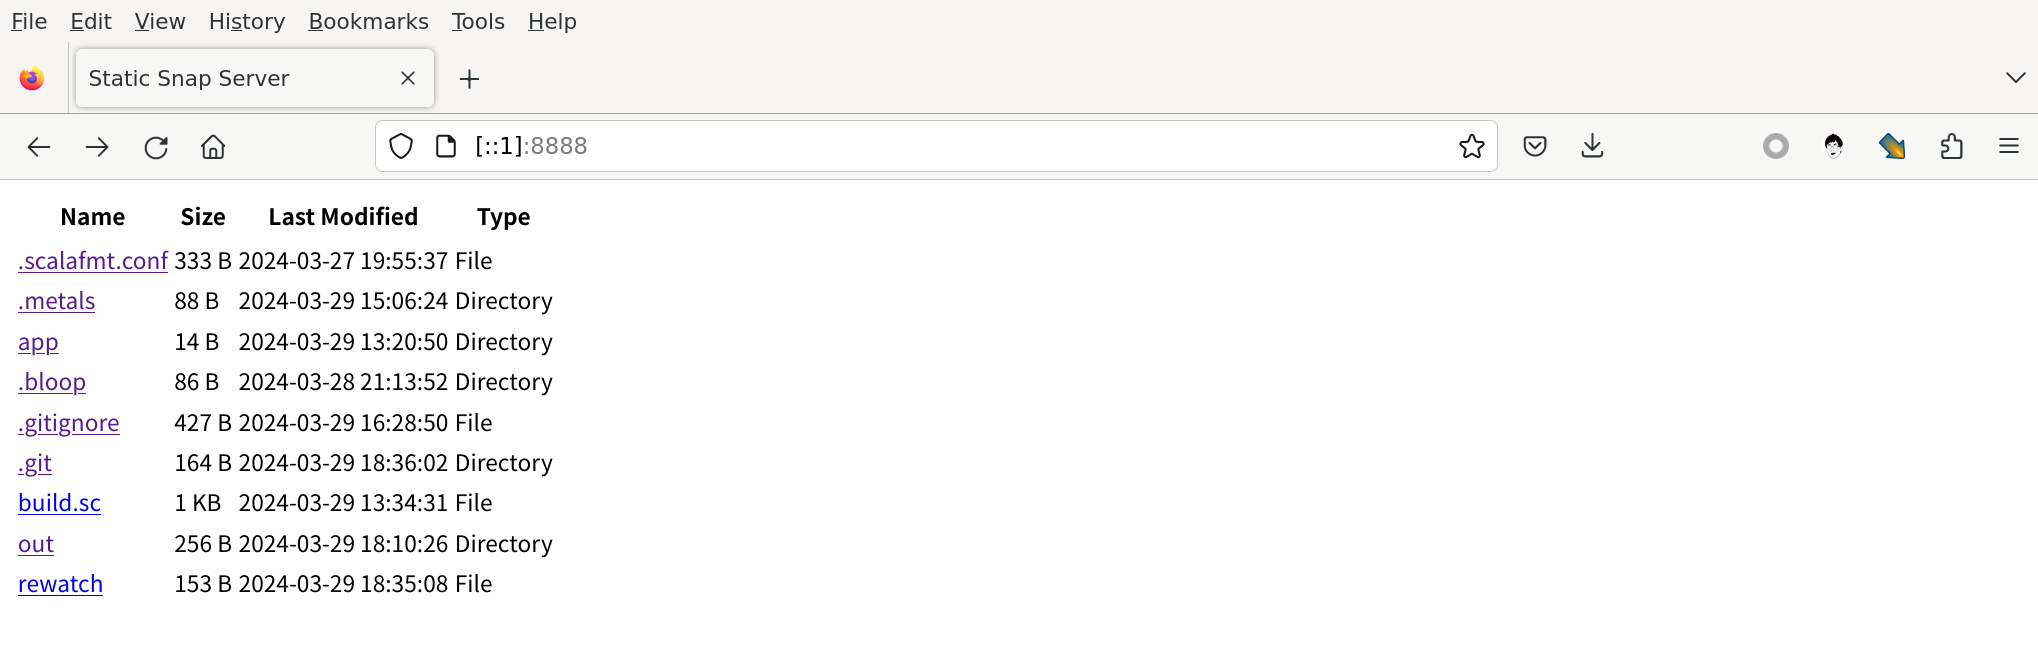

emmmmm… 看起来还是非常简陋,因为我们还没有使用样式,但是基本的信息已经有了,我们的应用终于第一次达到了一定的可用性。
我们将在下一节来美化它的外观。
至此,我们的项目结构和代码行数统计如下:
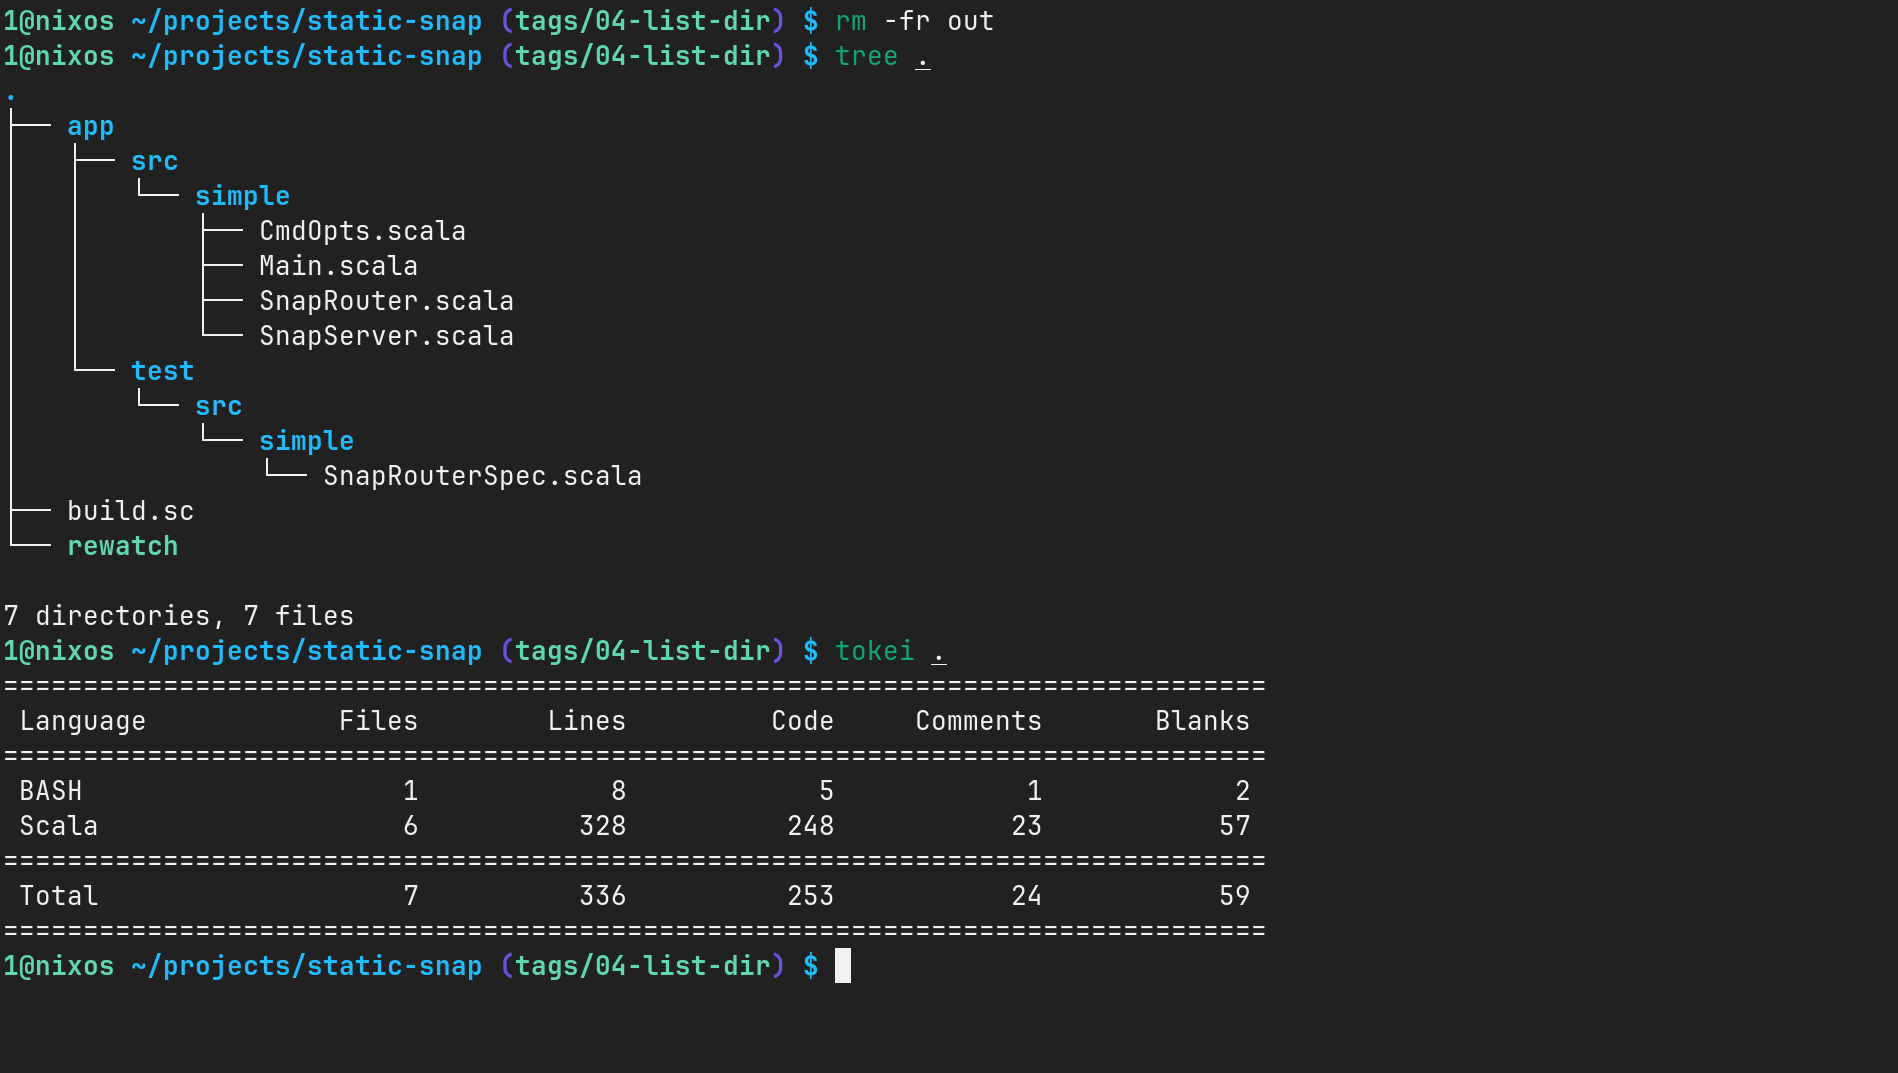
也就是说,我们折腾了这么久,居然只写了 328 行 Scala 代码,除去空行和注释,其实只有 248 行。
其中,可执行文件 rewatch 是个方便开发测试的 Shell 脚本,可以快速启动和关闭测试服务。
rewatch:
#!/usr/bin/env bash

for p in $(ps -ef | grep simple.Main | grep static-snap | grep -v grep | awk '{print $2}')
do
  kill -9 $p
done

mill -w app.run .
本节所有代码都可以在 github 仓库的 04-list-dir tag 上找到:https://github.com/weiwen99/static-snap/tree/04-list-dir .
引入 UI 库优化界面
本节我们尝试调整页面 UI 以提高可用性。
首先引入流行的 CSS 库 Materialize:
app/src/simple/SnapRouter.scala:
html(
      lang := "zh-CN",
      head(
+        link(rel     := "stylesheet", href  := "https://cdn.bootcdn.net/ajax/libs/materialize/1.0.0/css/materialize.min.css"),
+        link(
+          rel        := "stylesheet",
+          href       := "https://fonts.googleapis.com/icon?family=Material+Icons"
+        ),
+        script(src   := "https://cdn.bootcdn.net/ajax/libs/materialize/1.0.0/js/materialize.min.js"),
      )
)
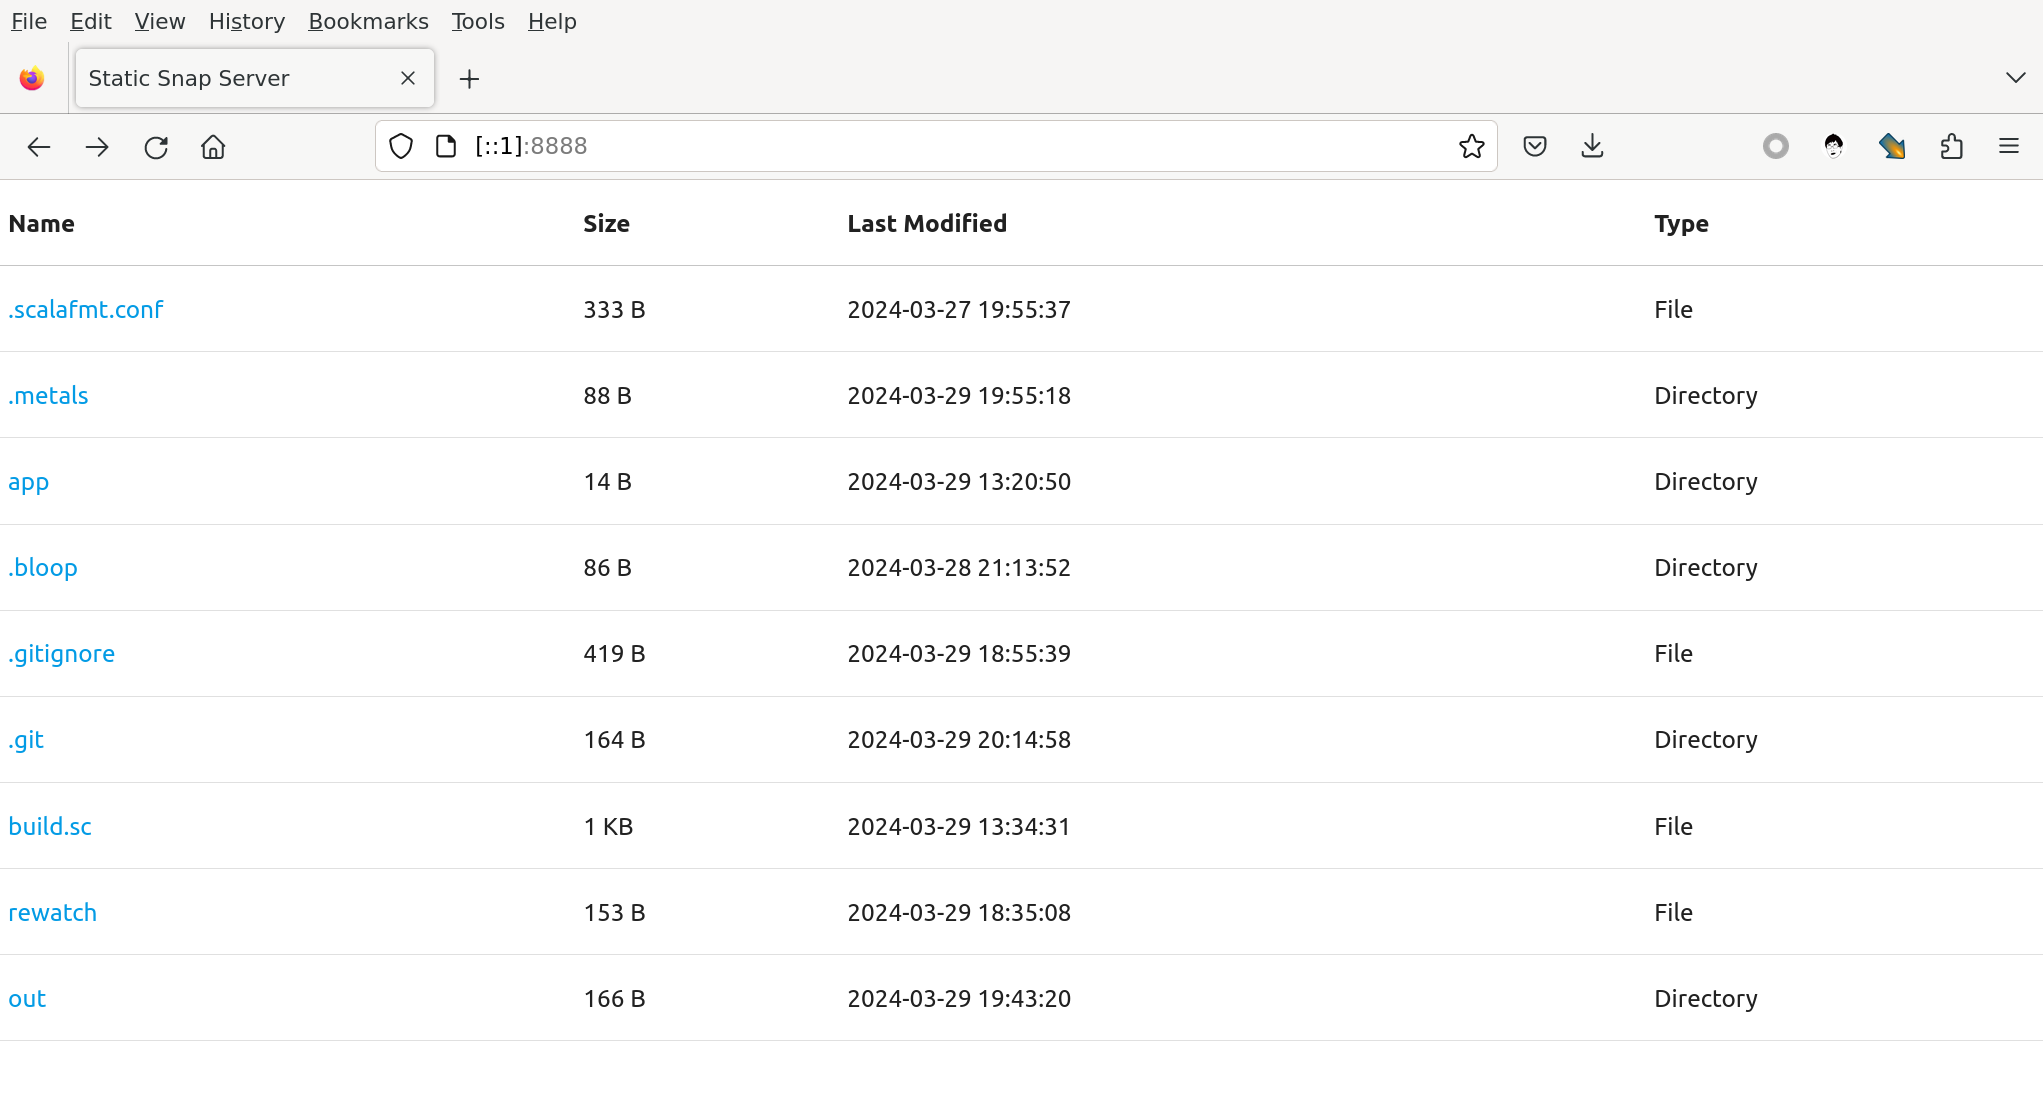
芜湖,直接起飞!它甚至能很好地适配移动端设备!这一下子让我有点措手不及。本来上一节我是用 table 随便写的,想着本节好好下工夫重新写界面,写得好看些。现在看来,完全没必要了。
直接下课!
不过下课之前,我们先找点事情做做。首先是给表格加上 Materialize 的 striped 两个类。
      table(
+        cls := "striped",
        tr(th("Name"), th("Size"), th("Last Modified"), th("Type")),
        if (path != root) tr(td(a(href := "../", "../"))) else tr(),
        tbody(trs)
      )
效果:
其次,我们最好不要从 CDN 上下载静态文件。因为我们这个服务的主要使用场景,更多的是在内网浏览和下载文件而已,没有必要引入外网的依赖。
那么我们需要从本地 HTTP Service 提供静态资源文件服务。首先引入以下静态资源文件(你也可以从我们的 github repo 上直接复制):
1@nixos ~/projects/static-snap (main*?) $ tree app/resources
app/resources
├── css
└── static
    ├── css
    │   └── materialize.min.css
    ├── font
    │   ├── flUhRq6tzZclQEJ-Vdg-IuiaDsNc.woff2
    │   └── google-fonts-icon.css
    └── js
        └── materialize.min.js

6 directories, 4 files
更新 SnapServer, 让 HTTP Service 提供以双下划线 __ 静态资源文件服务。之所以采用 /__/statics/css/ 这样的 URL 路径而不是常见的
/statics/css/, 主要是尽量避免和要提供服务的根目录下的目录产生冲突。这个问题我们之前在第二节讨论过。
app/src/simple/SnapServer.scala:
package simple

import cats.effect._
import cats.effect.kernel.Async
import com.comcast.ip4s.{Host, Port}
import fs2.io.file.Files
import fs2.io.net.Network
import org.http4s.HttpRoutes
import org.http4s.ember.server.EmberServerBuilder
import org.http4s.server.{Router, Server}
import org.http4s.server.staticcontent._

object SnapServer {

  def build[F[_]: Async: Files: Network](routes: HttpRoutes[F], host: Host, port: Port): Resource[F, Server] = {
    val resourceStaticRoutes = ResourceServiceBuilder("/static").withPathPrefix("/static").toRoutes
    val router               = Router("/" -> routes, "__" -> resourceStaticRoutes).orNotFound
    EmberServerBuilder
      .default[F]
      .withHttpApp(router)
      .withHost(host)
      .withPort(port)
      .withHttp2
      .build

  }
}
最后一步,把静态资源文件的引用从 CDN 改为本服务。
app/src/simple/SnapRouter.scala:
html(
  lang := "zh-CN",
  head(
    meta(charset := "utf-8"),
    meta(name    := "viewport", content := "width=device-width, initial-scale=1.0, user-scalable=no, maximum-scale=1, minimum-scale=1"),
    link(rel     := "stylesheet", href  := "/__/static/css/materialize.min.css"),
    link(rel     := "stylesheet", href  := "/__/static/font/google-fonts-icon.css"),
    script(src   := "/__/static/js/materialize.min.js"),
    tags2.title("Static Snap Server")
  ),
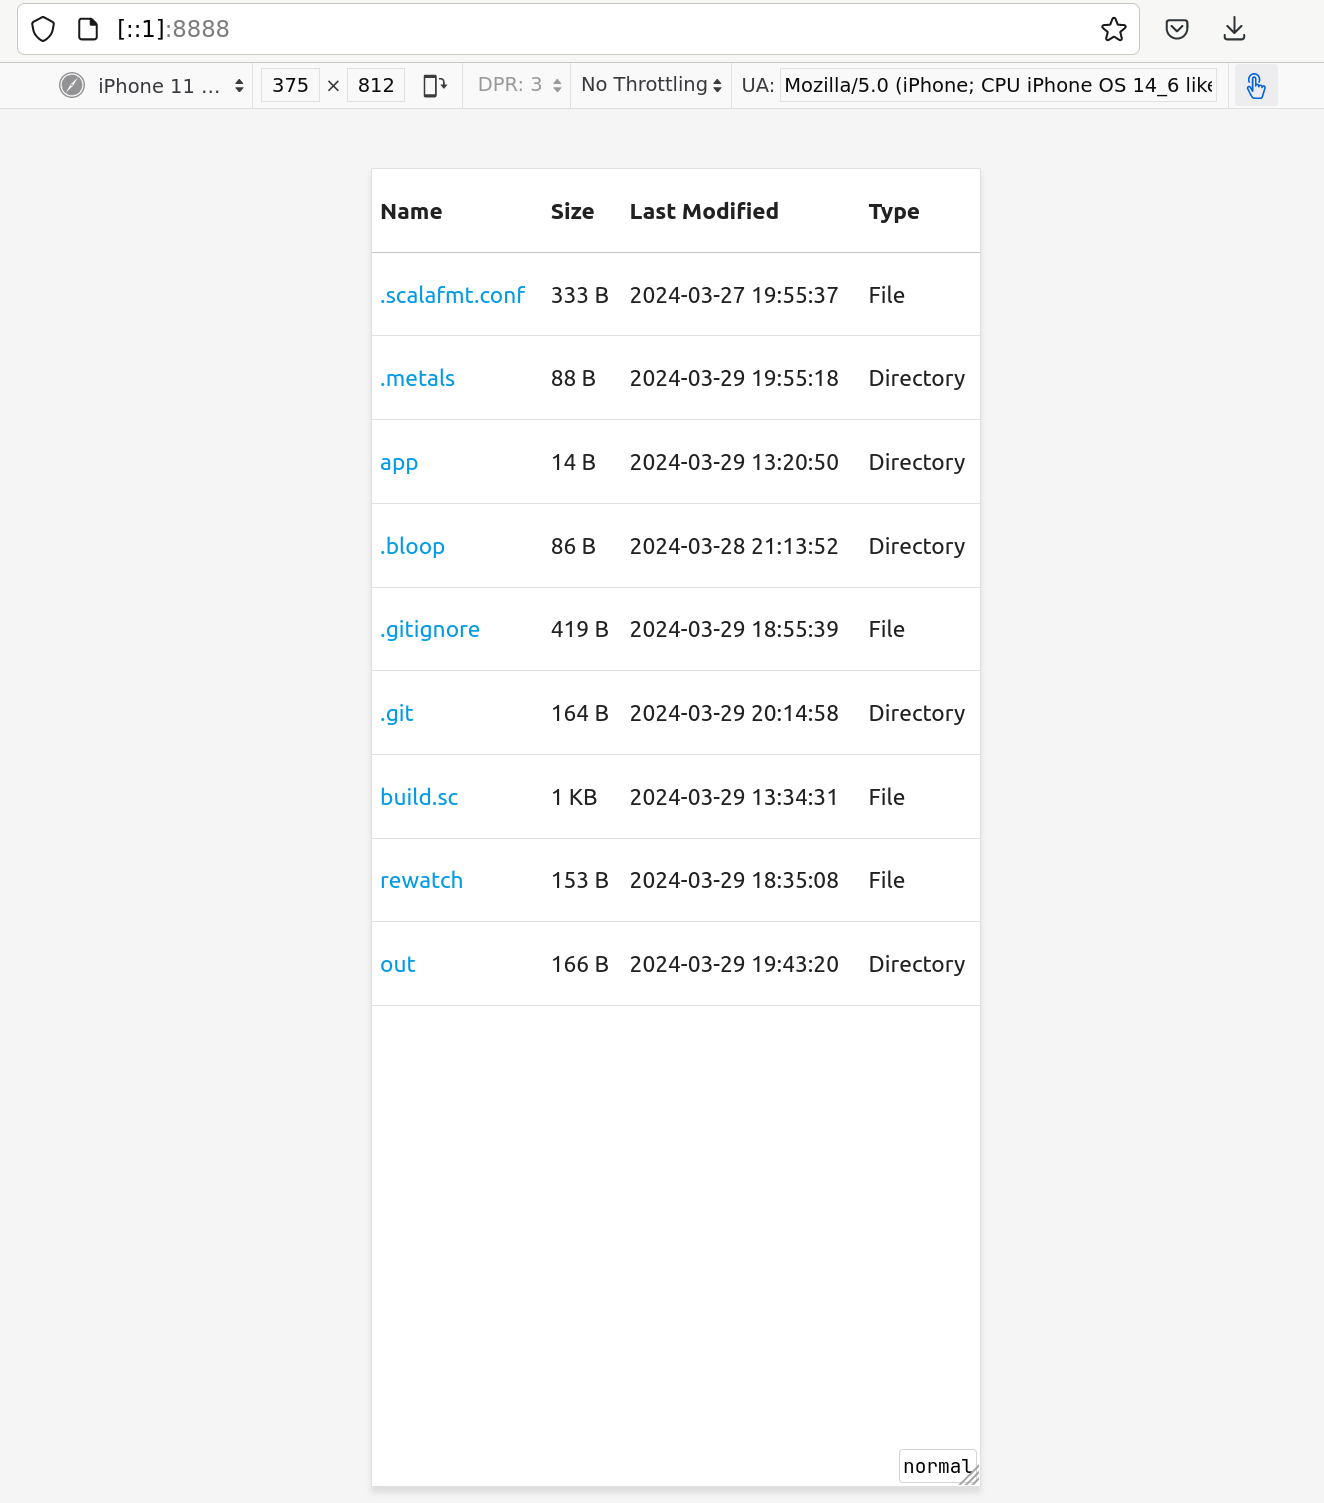
重启服务测试成功。
在移动设备上,页面左右两边留一点空间看起来会更舒适:
app/src/simple/SnapRouter.scala:
-      table(
-        cls := "striped",
-        tr(th("Name"), th("Size"), th("Last Modified"), th("Type")),
-        if (path != root) tr(td(a(href := "../", "../"))) else tr(),
-        tbody(trs)
+      body(
+        style := "padding: 0 1em 0 1em;",
+        table(
+          cls := "striped",
+          tr(th("Name"), th("Size"), th("Last Modified"), th("Type")),
+          if (path != root) tr(td(a(href := "../", "../"))) else tr(),
+          tbody(trs)
+        )
以上代码也修复了此前 HTML 页面没有 body 标签的问题。
可以给页面加上当前目录,作为标题。
app/src/simple/SnapRouter.scala:
       }
+    val displayedDir            = s"/${root.relativize(path)}"
     html(
       lang := "zh-CN",
       head(
         script(src   := "/__/static/js/materialize.min.js"),
-        tags2.title("Static Snap Server")
+        tags2.title(displayedDir)
       ),
       body(
         style := "padding: 0 1em 0 1em;",
+        h6(s"Index of $displayedDir"),
         table(
           cls := "striped",
效果:
本节所有代码和变更可以在 github repo 的 05-add-materializecss tag 上找到:https://github.com/weiwen99/static-snap/tree/05-add-materializecss .
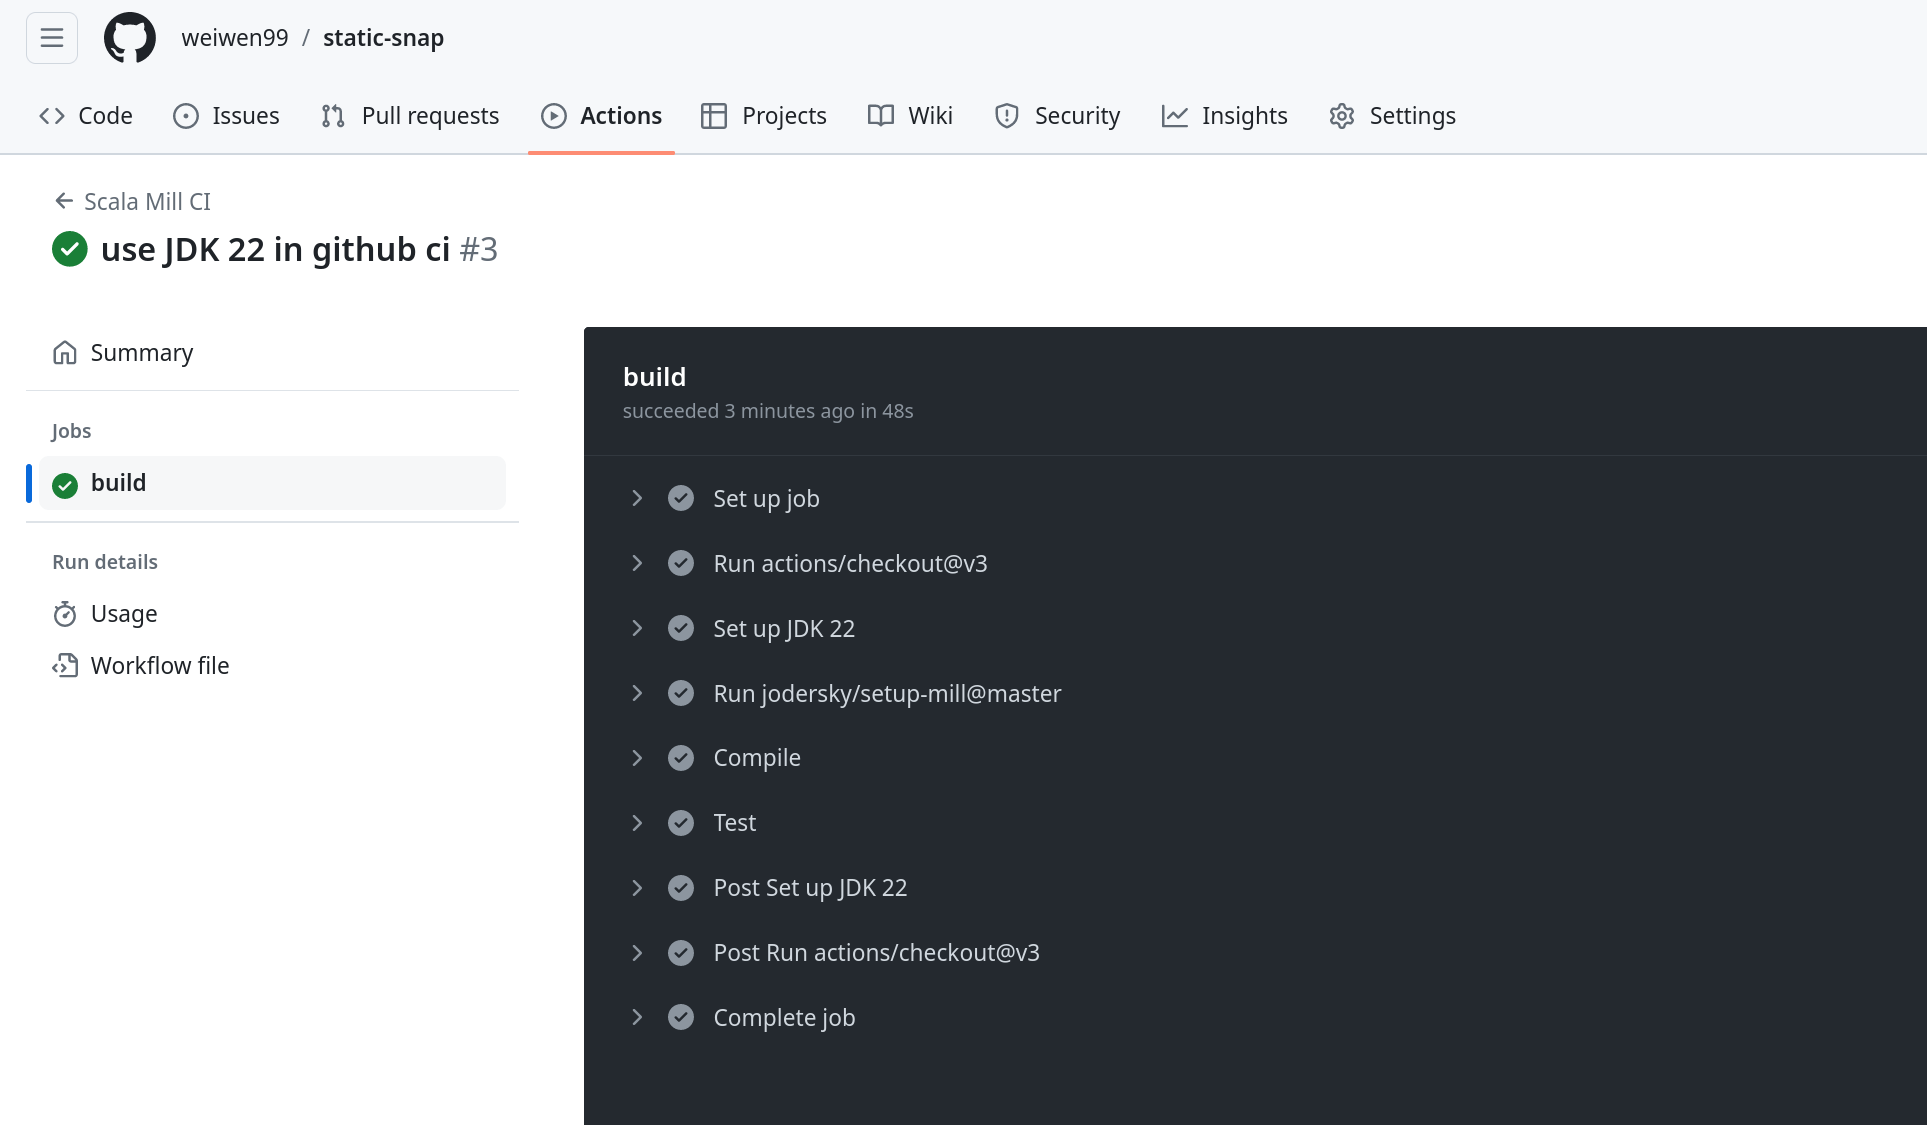
配置 gihub workflow
话不多说,直接引入文件 .github/workflows/scala.yml 即可。
.github/workflows/scala.yml:
name: Scala Mill CI

on:
  push:
    branches: [ "*" ]
  pull_request:
    branches: [ "main" ]

permissions:
  contents: read

jobs:

  build:

    runs-on: ubuntu-latest

    steps:

    - uses: actions/checkout@v3

    - name: Set up JDK 22
      uses: actions/setup-java@v3
      with:
        java-version: '22'
        distribution: 'temurin'

    - uses: jodersky/setup-mill@master
      with:
        mill-version: 0.11.7

    - name: Compile
      run: mill __.compile

    - name: Test
      run: mill __.test
这个 CI 用力 JDK 22 和 mill 0.11.7, 会在任何 git push 和 git pull request 时自动触发。执行的动作是 mill __.compile 和 mill __.test .
可以去 github 页面 https://github.com/weiwen99/static-snap/actions 查看 CI 任务详情。
实现文件排序
为了实现页面上文件的排序功能,我们需要增加额外的业务逻辑。我们之前把文件列表功能写在 SnapRouter 里,这是不利于工程上维护的。为了使得项目
代码结构更为合理,大部分的业务逻辑应该从 SnapRouter 中抽离出来。
于是我们考虑把文件的信息用 case class FileMeta 来表示,而排序,搜索之类的功能在 FileService 中实现。
先来实现一个全新的 FileMeta.
app/src/simple/FileMeta.scala:
package simple

import java.net.URLEncoder
import java.nio.charset.StandardCharsets
import java.nio.file.{Files, Path}
import java.nio.file.attribute.{BasicFileAttributes, FileTime}
import java.time.{ZonedDateTime, ZoneId}
import java.time.format.DateTimeFormatter

/** 文件元信息
  *
  * @param root
  *   根目录
  * @param path
  *   文件路径
  */
final case class FileMeta(root: Path, path: Path) {

  import FileMeta.*

  // 目录名或者文件名
  val name: String = path.getParent().relativize(path).toString

  // 文件属性集
  val attrs: BasicFileAttributes = Files.readAttributes(path, classOf[BasicFileAttributes])

  // 是否是目录
  val isDirectory: Boolean = attrs.isDirectory()

  // 文件最后访问时间
  val lastAccessTime: ZonedDateTime = attrs.lastAccessTime().toZonedDateTime

  // 文件最后修改时间
  val lastModifiedTime: ZonedDateTime = attrs.lastModifiedTime().toZonedDateTime

  // 文件创建时间
  val creationTime: ZonedDateTime = attrs.creationTime().toZonedDateTime

  // 相对于根目录的路径
  val relativeToRoot: Path        = root.relativize(path)

  // 文件大小,单位 Byte
  val size = attrs.size()

  // 人类可读的文件大小
  val humanSize: String = size match {
    case s if s < 1024L                 => s"$s B"
    case s if s < 1024L * 1024L         => s"${s / 1024L} KB"
    case s if s < 1024L * 1024L * 1024L => s"${s / 1024L / 1024L} MB"
    case s                              => s"${s / 1024L / 1024L / 1024L} GB"
  }

  // 文件类型
  val `type`: String = if (isDirectory) "Directory" else "File"

  // URL 编码后的路径,用于超链接. 将路径中的每个部分进行 URL 编码,避免 x/y/z -> x%2Fy%2Fz
  val href: String =
    "/" + relativeToRoot.toString.split("/").map(URLEncoder.encode(_, StandardCharsets.UTF_8)).mkString("/")
}

object FileMeta {

  private val zoneId: ZoneId = ZoneId.systemDefault()

  private[FileMeta] val formatter: DateTimeFormatter = DateTimeFormatter.ofPattern("yyyy-MM-dd HH:mm:ss")

  // 将 FileTime 转换为 ZonedDateTime
  extension (fileTime: FileTime) {
    def toZonedDateTime: ZonedDateTime = fileTime.toInstant().atZone(zoneId)
  }

  // 生成适合显示的时间日期
  extension (zonedDateTime: ZonedDateTime) {
    def formatted: String = formatter.format(zonedDateTime)
  }
}
接下来是 FileService. 这个文件我们暂时没有增加新的功能,只有一个简单的方法。
app/src/simple/FileService.scala:
package simple

import java.nio.file.{Files, Path}

import scala.jdk.CollectionConverters.*

class FileService(root: Path) {

  def listDir(path: Path): List[FileMeta] = {
    Files
      .list(path)
      .toList()
      .asScala
      .toList
      .map { d => FileMeta(root = root, path = d) }
  }
}
现在可以在 SnapRouter 中重写 listDir() 方法,并删去其他不必要的部分了。
app/src/simple/SnapRouter.scala:
+import simple.FileMeta.*

private def listDir(path: NioPath): TypedTag[String] = {
    val simpleDirName = s"/${root.relativize(path)}"
    val trs           = FileService(root).listDir(path).map { f =>
      tr(
        td(a(href := f.href, f.name)),
        td(f.`type`),
        td(f.humanSize),
        td(f.lastModifiedTime.formatted),
        td(f.lastAccessTime.formatted),
        td(f.creationTime.formatted)
      )
    }
    html(
      lang := "zh-CN",
      head(
        meta(charset := "utf-8"),
        meta(name    := "viewport", content := "width=device-width, initial-scale=1.0, user-scalable=no, maximum-scale=1, minimum-scale=1"),
        link(rel     := "stylesheet", href  := "/__/static/css/materialize.min.css"),
        link(rel     := "stylesheet", href  := "/__/static/font/google-fonts-icon.css"),
        script(src   := "/__/static/js/materialize.min.js"),
        tags2.title(simpleDirName)
      ),
      body(
        style := "padding: 0 1em 0 1em;",
        h6(s"Index of $simpleDirName"),
        table(
          cls := "striped",
          tr(th("Name"), th("Type"), th("Size"), th("Last Modified"), th("Last Access"), th("Creation Time")),
          if (path != root) tr(td(a(href := "../", "../"))) else tr(),
          tbody(trs)
        )
      )
    )
  }

-  // 将路径中的每个部分进行 URL 编码,避免 x/y/z -> x%2Fy%2Fz
-  private def urlEncodePath(path: NioPath): String =
-    path.toString.split("/").map(java.net.URLEncoder.encode(_, StandardCharsets.UTF_8)).mkString("/")
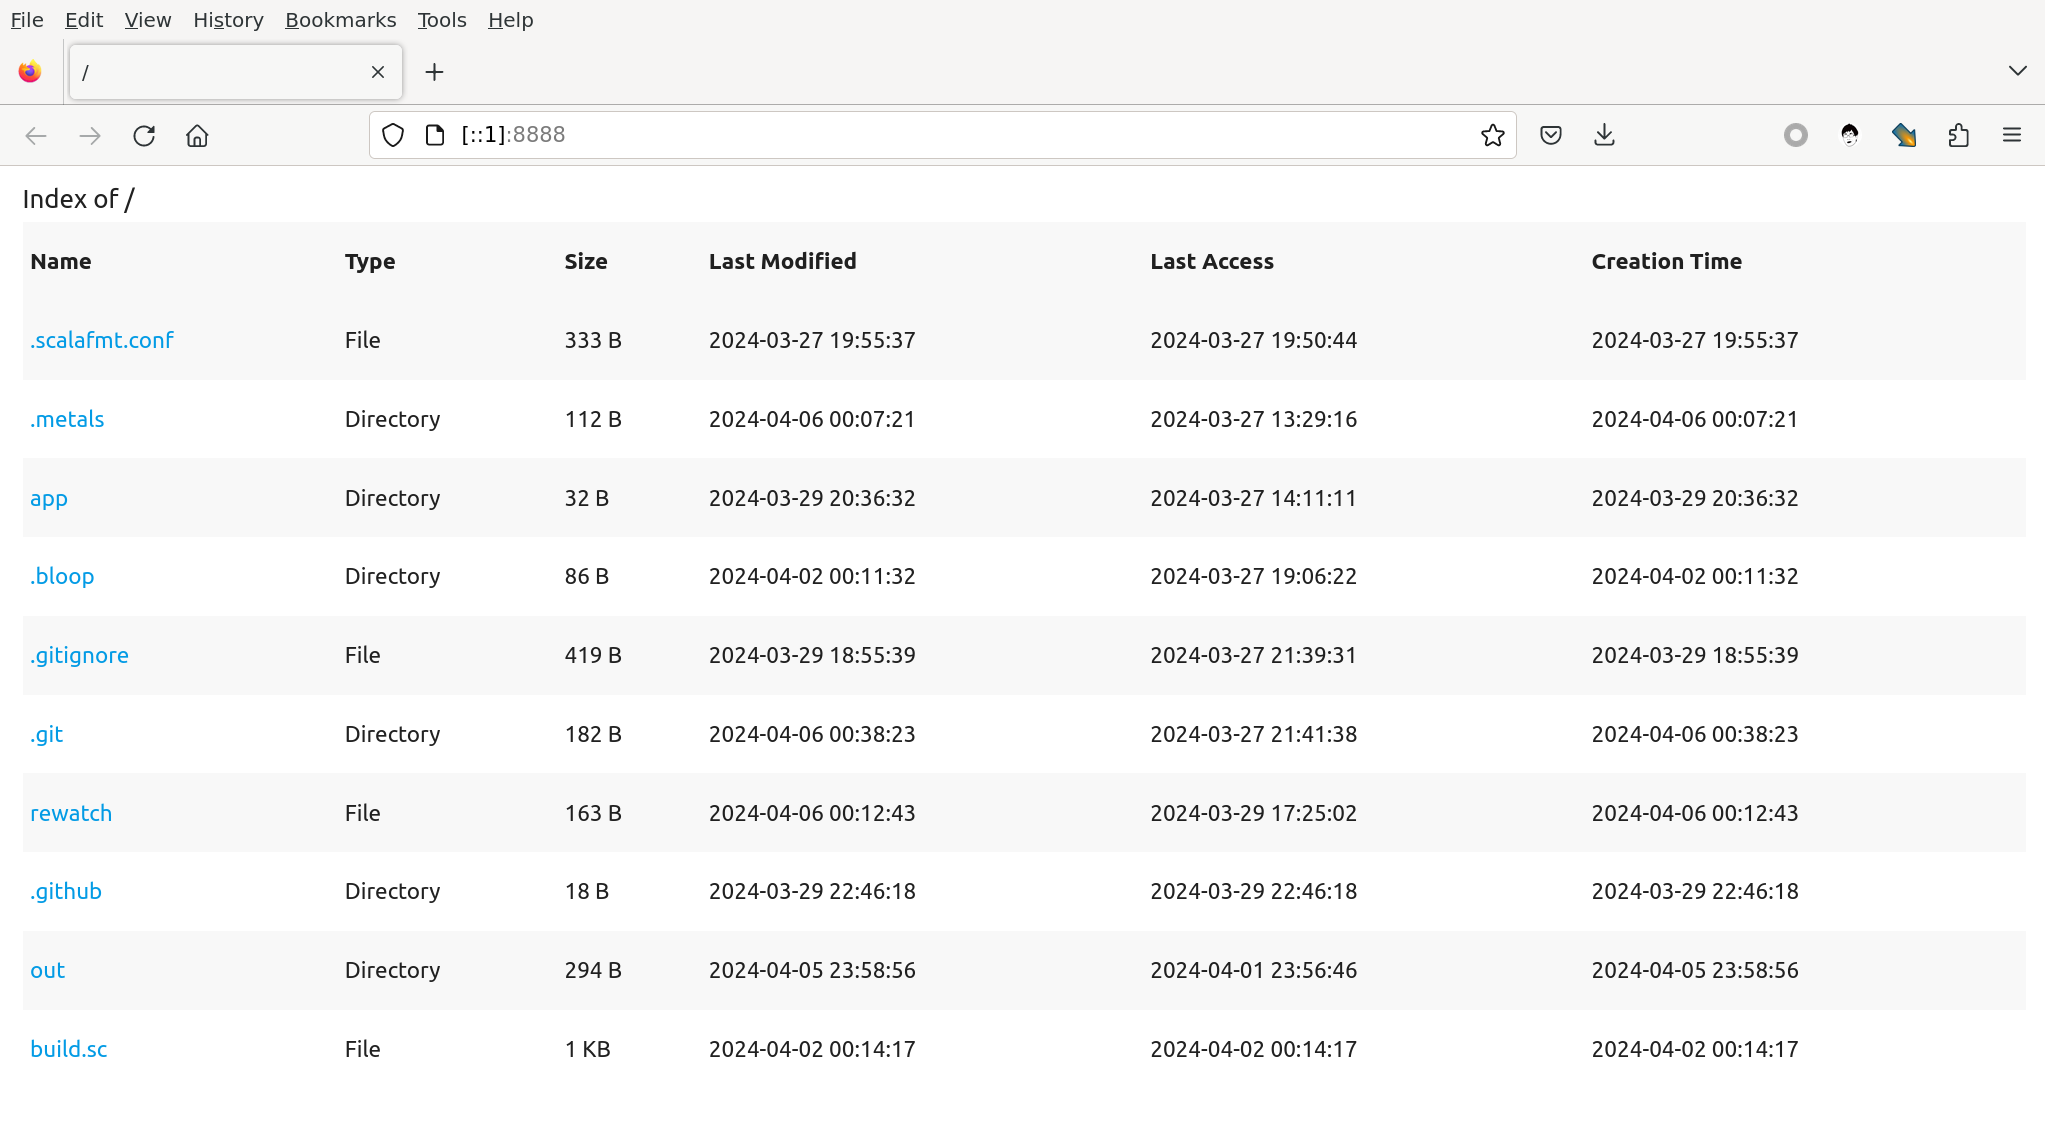
请注意,我们重构的同时,也增加了 "Last Access" 和 "Creation Time" 两列。
重新运行我们的服务,得到新增两列的新界面:
现在可以考虑排序的实现了。最简单的排序应该支持两个参数:排序的字段 column 和排序的升降 order. 一个自然的想法是用 URL 的 query string 来传递这两个参数。我们可以设计形如 /app/src/simple?sort=Name:Desc 的 API, 来表示按文件名降序排列。
可以先做一个基本的实现规划:
- 我们首先定义
SortColumn和SortOrder, - 想办法让
http4s的 API 能接收并解析这两个参数, - 在
FileService里实现排序的逻辑, - 在 API 实现里调用排序的逻辑,
- 改进页面,让表头支持可以快捷的排序操作。
先考虑排序字段的问题。理论上讲,我们可以直接用 String 来定义这个字段,但这样不够严谨,需要手动处理错误的 API 参数输入。如果我们把 SortColumn
定义成枚举,那么这个参数在 API 层就能得到校验,如果用不支持排序的字段请求 API, 将自动得到一个 400 Bad Request 的 HTTP Response.
app/src/simple/Sort.scala:
package simple

import scala.util.Try

import cats.implicits.*

enum SortOrder:
  case Asc  extends SortOrder
  case Desc extends SortOrder

enum SortColumn:
  case Name         extends SortColumn
  case Size         extends SortColumn
  case Type         extends SortColumn
  case LastModified extends SortColumn
  case LastAccess   extends SortColumn
  case Creation     extends SortColumn

final case class SortBy(column: SortColumn, order: SortOrder)

object SortBy {

  def parseString(s: String): Either[String, SortBy] = {
    s.split(":").toList match {
      case column :: order :: Nil =>
        val r = for {
          column <- Try(SortColumn.valueOf(column)).toEither.leftMap(_.getMessage())
          order  <- Try(SortOrder.valueOf(order)).toEither.leftMap(_.getMessage())
        } yield SortBy(column, order)
        r
      case _                      => Left("Invalid SortBy format")
    }
  }
}
我们写一个对 parseString() 的单元测试:
app/test/src/simple/QuerySpec.scala:
package simple

import org.scalatest.matchers.should
import org.scalatest.wordspec.AnyWordSpec

class QuerySpec extends AnyWordSpec with should.Matchers {

  "SortBy" should {
    "parse valid string" in {
      SortBy.parseString("Name:Asc") shouldBe Right(SortBy(SortColumn.Name, SortOrder.Asc))
      SortBy.parseString("Name:Desc") shouldBe Right(SortBy(SortColumn.Name, SortOrder.Desc))
      SortBy.parseString("LastModified:Desc") shouldBe Right(SortBy(SortColumn.LastModified, SortOrder.Desc))
    }
    "parse invalid string" in {
      SortBy.parseString("Name:Invalid") shouldBe Left("enum simple.SortOrder has no case with name: Invalid")
      SortBy.parseString("Name:Invalid:Ext") shouldBe Left("Invalid SortBy format")
    }
  }
}
可以执行 mill app.test 来运行我们的测试。
接下来我们让 mainR 这个 API 能接收这个参数。
app/src/simple/SnapRouter.scala:
+import org.http4s.dsl.impl.OptionalQueryParamDecoderMatcher

given QueryParamDecoder[SortBy] =
  QueryParamDecoder[String].emap(s => SortBy.parseString(s).leftMap(t => ParseFailure(t, t)))

object OptionalSortByQueryParamMatcher extends OptionalQueryParamDecoderMatcher[SortBy]("sort")

class SnapRouter[F[_]: Async: Files](root: NioPath, metaPrefix: String) extends Http4sDsl[F] with StrictLogging {
  // 列出目录内容或者返回文件
  - private val mainR = HttpRoutes.of[F] { case request @ GET -> path =>
  + private val mainR = HttpRoutes.of[F] { case request @ GET -> path :? OptionalSortByQueryParamMatcher(sortByOpt) =>
  +    logger.debug("got sort parameter: {}", sortByOpt)
这里我们让 query string 参数 sort 是可选的,接受以后只打印日志。运行测试一下:

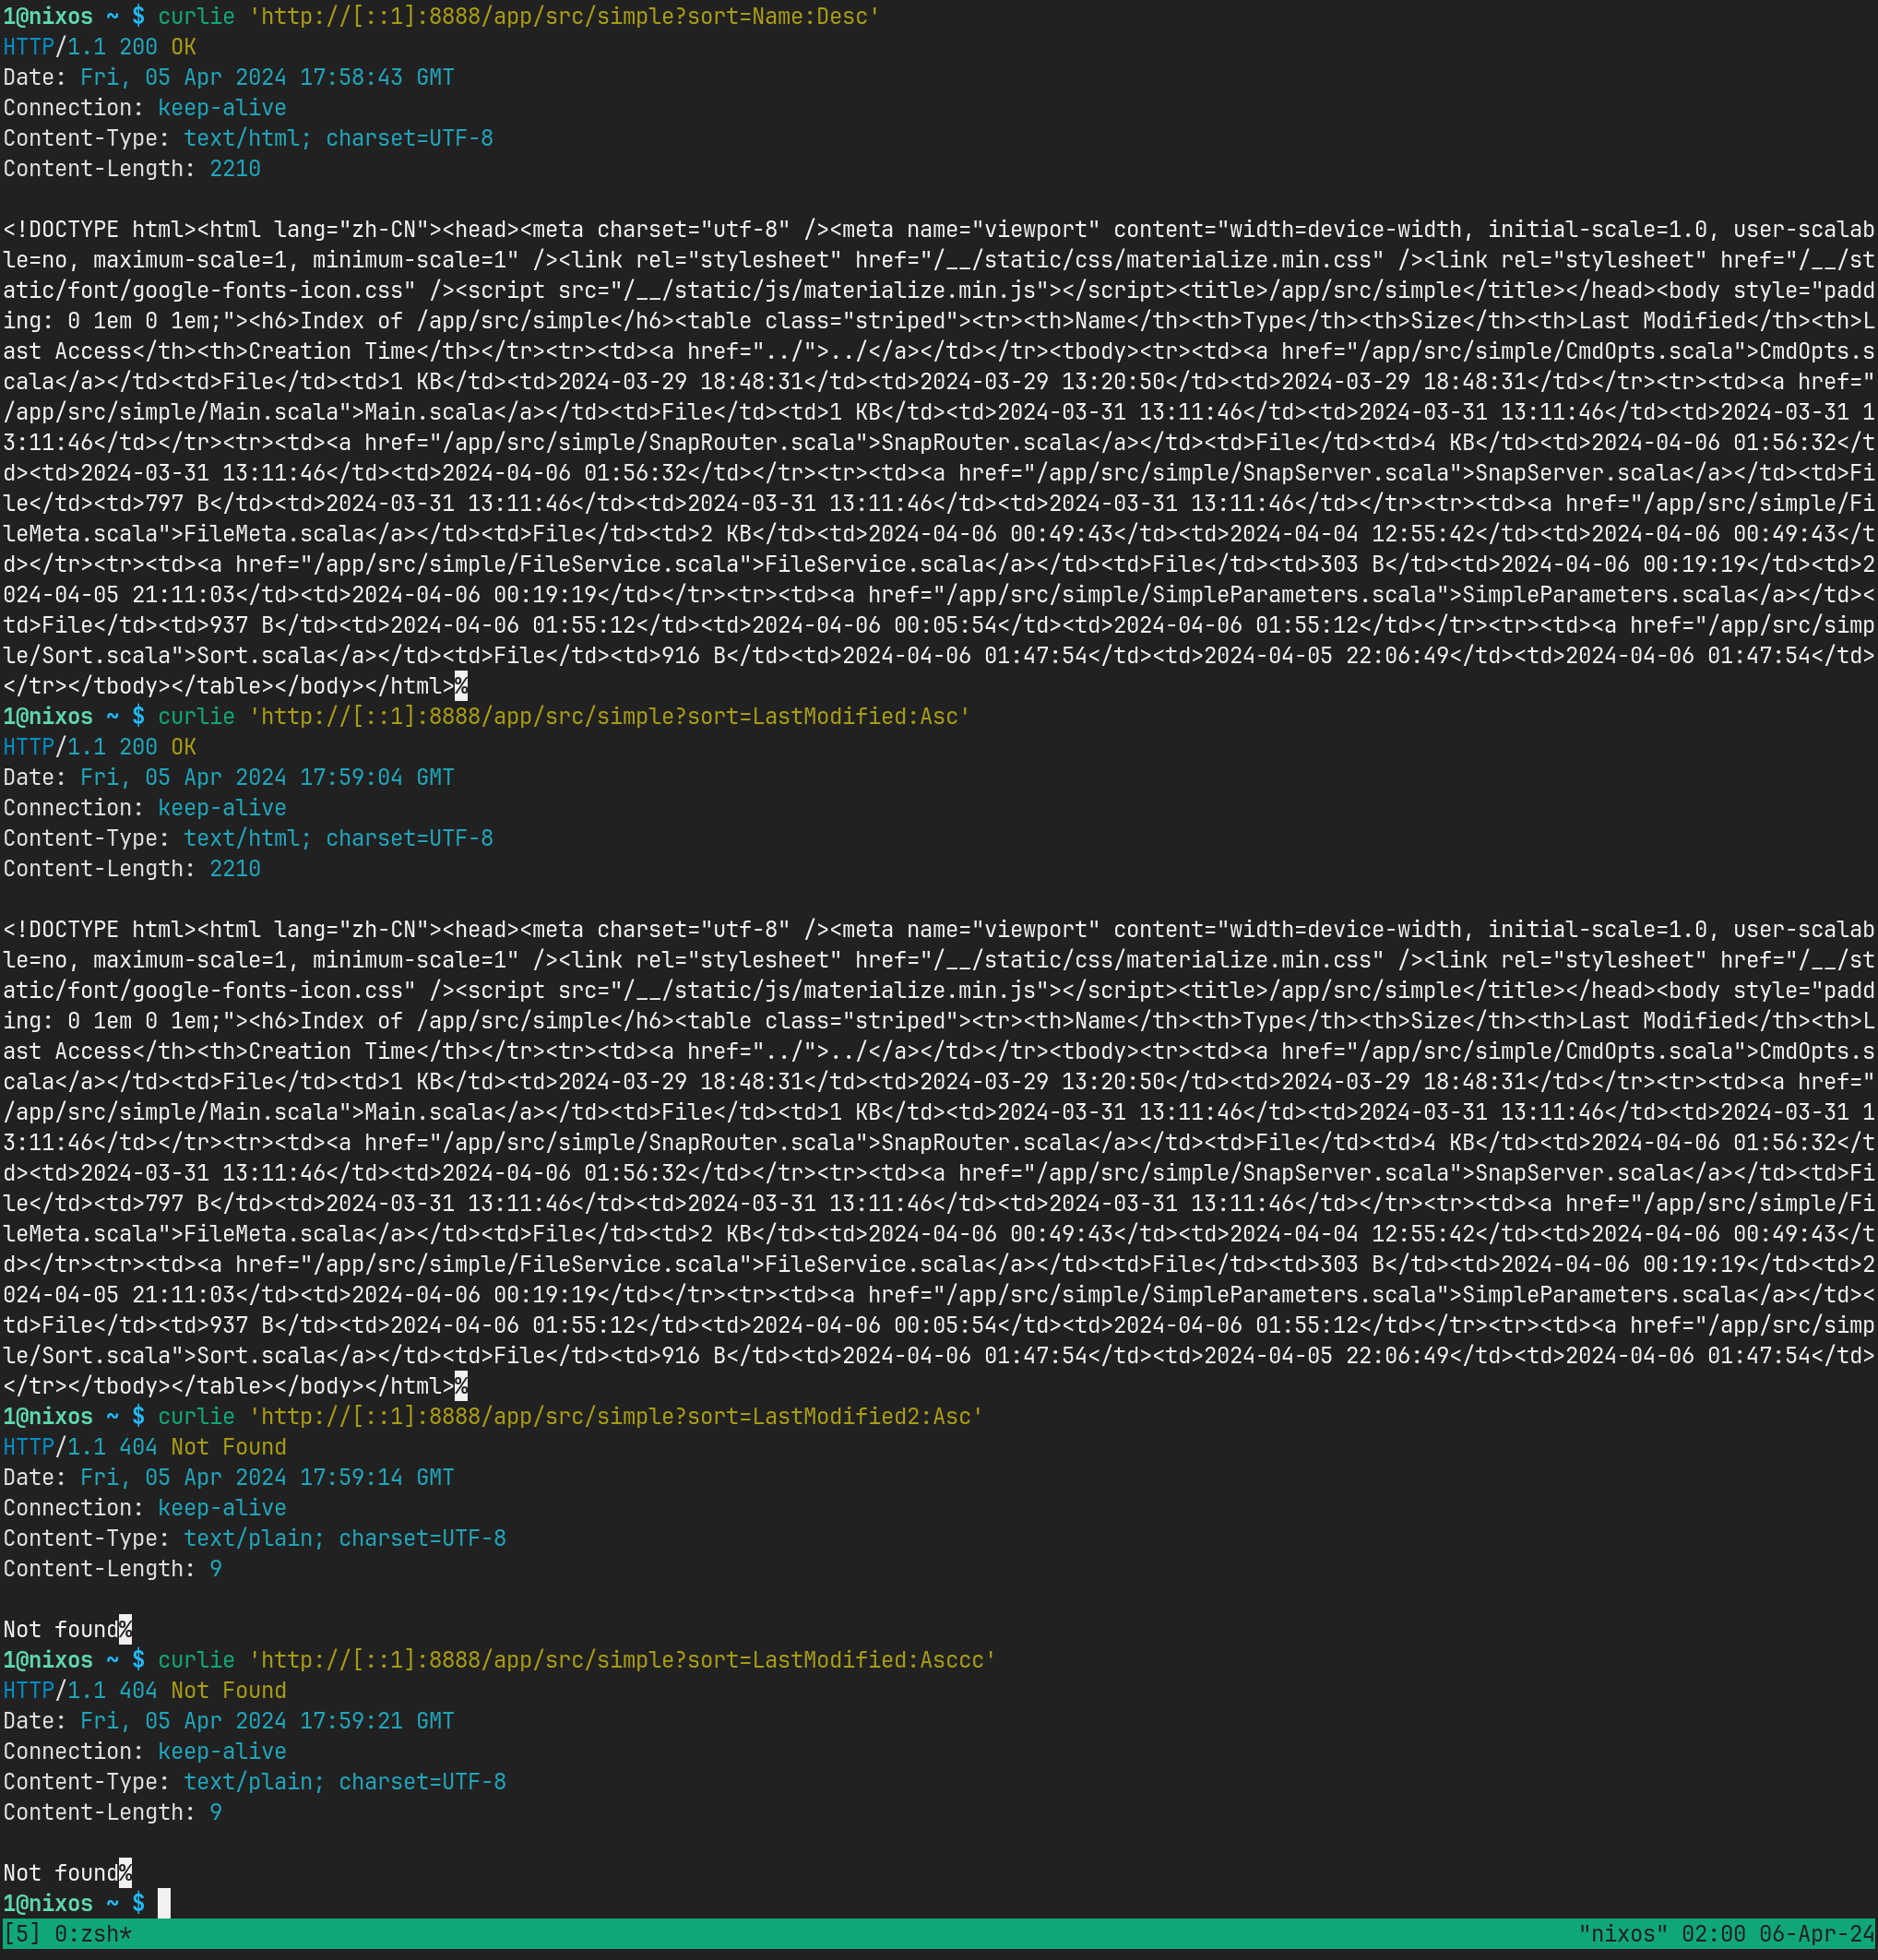
另外容易发现我们不写 sort 这参数的时候, sortByOpt 的值会是 None . 这完全符合我们的预期。
接下来我们在 FileService 重载 listDir() 方法,实现排序的逻辑。
app/src/simple/FileService.scala:
package simple

import java.nio.file.{Files, Path}

import scala.jdk.CollectionConverters.*

class FileService(root: Path) {

  def listDir(path: Path): List[FileMeta] = {
    Files
      .list(path)
      .toList()
      .asScala
      .toList
      .map { d => FileMeta(root = root, path = d) }
  }

  // TODO: 避免 sortBy.order = Desc 时的双重遍历
  def listDir(path: Path, sortBy: SortBy): List[FileMeta] = {
    val files = listDir(path)
    val rs1   = sortBy.column match
      case SortColumn.Name         => files.sortBy(_.name)
      case SortColumn.Size         => files.sortBy(_.size)
      case SortColumn.Type         =>  files.sortBy(f => (f.`type`, f.name))
      case SortColumn.LastModified => files.sortBy(_.lastModifiedTime)
      case SortColumn.LastAccess   => files.sortBy(_.lastAccessTime)
      case SortColumn.Creation     => files.sortBy(_.creationTime)
    val rs2   = sortBy.order match
      case SortOrder.Asc  => rs1
      case SortOrder.Desc => rs1.reverse
    rs2
  }
}
请注意,我们对 sortBy.column 和 sortBy.order 使用了模式匹配。如果我们漏写了其中任意一个分支,Scala 编译器会警告我们 "match may not be
exhaustive" . 例如,如果我们把 case SortColumn.Creation => files.sortBy(_.creationTime) 这行删掉或者注释掉,会发现代码编辑器发出警告:
"match may not be exhaustive. It would fail on pattern case: Creation". 如果我们忽略它,直接编译代码,Scala 编译器也会发出同样的警告。另外,我们
在写这两段模式匹配代码的时候,配置妥当的代码编辑器会自动帮我们补全所有可能的匹配分支。以上这些,都是 Scala 完善的类型系统给我们带来的便利。(当
然不是说其他语言就做不到。)
app/src/simple/SnapRouter.scala:
 class SnapRouter[F[_]: Async: Files](root: NioPath, metaPrefix: String) extends Http4sDsl[F] with StrictLogging {

+  private val DEFAULT_SORT_BY: SortBy = SortBy(SortColumn.Name, SortOrder.Asc)
+
   // 列出目录内容或者返回文件
   private val mainR = HttpRoutes.of[F] { case request @ GET -> path :? OptionalSortByQueryParamMatcher(sortByOpt) =>
-    logger.debug("got sort parameter: {}", sortByOpt)
+    val sortBy           = sortByOpt.getOrElse(DEFAULT_SORT_BY)

       // 如果是目录,列出目录内容
-      case n if (java.nio.file.Files.isDirectory(n)) => Ok(listDir(nioPath))
+      case n if (java.nio.file.Files.isDirectory(n)) => Ok(listDir(nioPath, sortBy))
       // 如果是文件,返回文件内容

-  private def listDir(path: NioPath): TypedTag[String] = {
+  private def listDir(path: NioPath, sortBy: SortBy): TypedTag[String] = {
     val simpleDirName = s"/${root.relativize(path)}"
-    val trs           = FileService(root).listDir(path).map { f =>
+    val trs           = FileService(root).listDir(path, sortBy).map { f =>
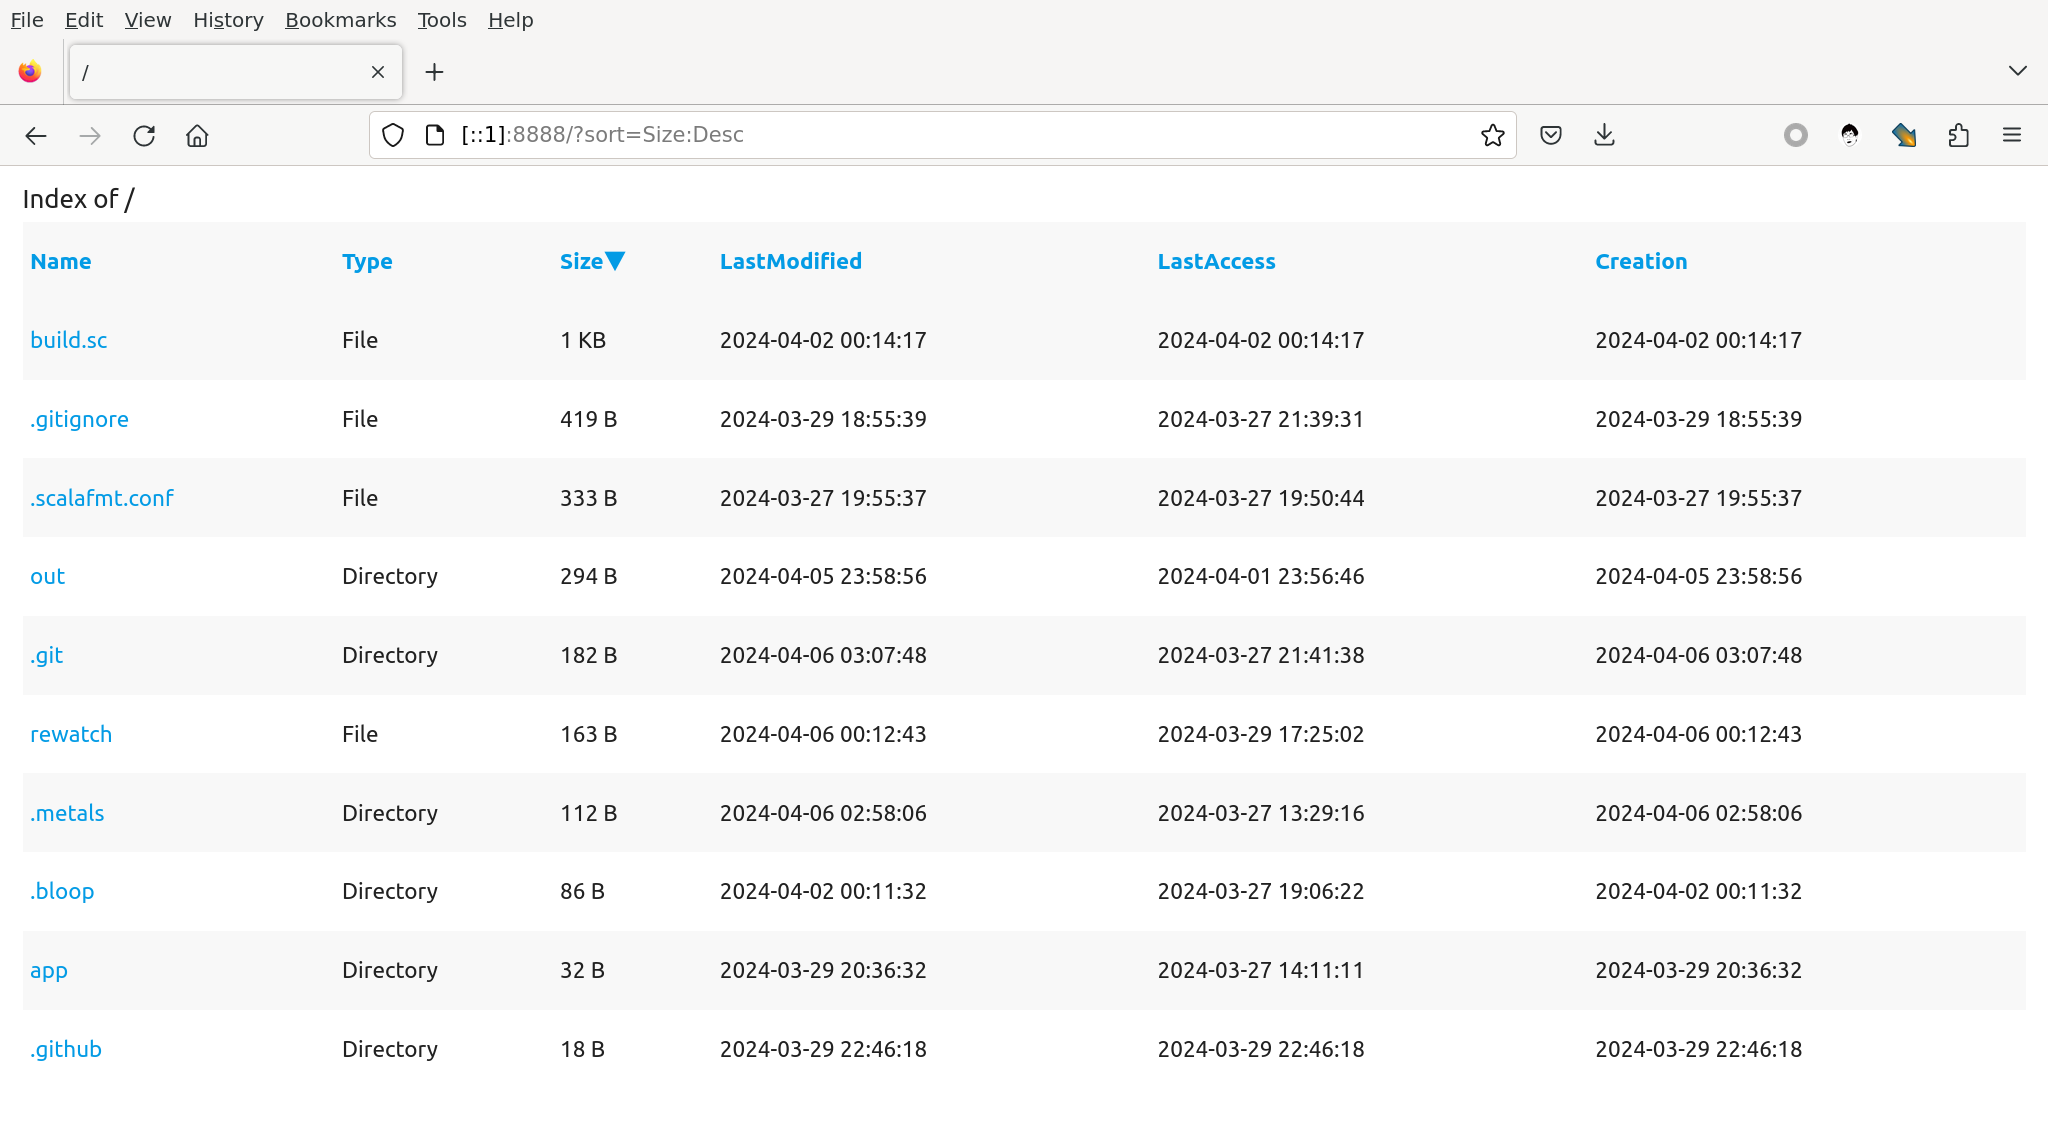
为了应用我们的新 API, 重写页面的表头,使之带超链接。
app/src/simple/SnapRouter.scala:
class SnapRouter[F[_]: Async: Files](root: NioPath, metaPrefix: String) extends
         h6(s"Index of $simpleDirName"),
         table(
           cls := "striped",
-          tr(th("Name"), th("Type"), th("Size"), th("Last Modified"), th("Last Access"), th("Creation Time")),
+          tableHeaderOf(sortBy),

def tableHeaderOf(sortBy: SortBy): TypedTag[String] = {
    val arrow                    = sortBy.order match
      case SortOrder.Asc  => "▲"
      case SortOrder.Desc => "▼"
    def thOf(column: SortColumn) =
      th(
        a(
          href := s"?sort=$column:${if sortBy.column == column && sortBy.order == SortOrder.Asc then SortOrder.Desc else SortOrder.Asc}",
          column.toString + (if sortBy.column == column then arrow else "")
        )
      )
    tr(
      List(SortColumn.Name, SortColumn.Type, SortColumn.Size, SortColumn.LastModified, SortColumn.LastAccess, SortColumn.Creation).map(thOf)
    )
  }
现在可以得到带任意字段排序的新页面了:
小结
本节我们实现了文件的排序输出和页面交互功能,为了实现这些功能,我们学习了:
Scala 3的Enumerations(枚举类型)Scala 3的extension, 用于替代Scala 2的implicit classhttp4s如何接受复杂的 Query String 参数Scala 3中如何重载方法Scalatags中如何根据比较复杂的业务逻辑生成需要的页面元素- 把相对复杂的业务逻辑从 API 层分离出来
- 调用
Java NIO2的 API 获取本地文件系统的信息
本节所有代码都可以在 https://github.com/weiwen99/static-snap/tree/07-file-sorting 找到。
构建 GraalVM Native Image
回顾我们已经有的打包编译动作,我们用 mill app.universalStage 来生成可执行 Shell 脚本和必要的一组 jar 包,而 universalStagePackageTarBzip2 之类的命令则把打包出来的脚本和 jar 包进一步打包成归档文件和不同格式的压缩包。
这样打出来的包,运行的时候,其实就是执行 java --class 这个命令。它的缺点有几个:
- 运行时依赖系统上的 JRE
- 作为命令行程序,启动速度比较慢。不过我们这个应用一般不会频繁重启,这一点应该不大
- 作为一个可执行应用程序,其安装文件包含一堆 jar 包,终究比较啰嗦
本节我们尝试把整个应用打包成 GraalVM Native Image.
Java/Scala 项目的 GraalVM Native Image 化,需要依赖 GraalVM 提供的 native-image 应用程序,一般有两种途径:直接利用系统上已经安装的 GraalVM 和
根据指定的版本即时下载 GraalVM 再使用。由于本人是 NixOS Linux 用户,由于 NixOS 的非 FHS 特性,第二种方式变得不那么方便。为了简(tou)单(lan)起
见,我们直接使用系统上的 GraalVM. 另外,mill 的第三方插件 native-image 提供了第二种方式的支持,感兴趣的话可以去
https://mill-build.com/mill/Thirdparty_Plugins.html#_native_image 找到。不论如何,对于初学者而言,我们即将展示的方式都会更加简洁和富有启发性。
首先我们需要在系统上安装 GraalVM 21+, 其文档见 https://www.graalvm.org/22.0/reference-manual/native-image .
从官方文档可以找到, native-image 的运行本质上是调用这么一个命令:
$ native-image --class-path xx:xx:xx [options] -o output MainClass
于是我们可以自己写一个名为 GraalvmNativeImageModule 的 mill module.
build.sc:
// add GraalVM native-image support, use `mill {subproject}.graalvmNativeImage` to generate native image
trait GraalvmNativeImageModule extends JavaModule {

  // GraalVM native-image executable in the system
  def graalvmNativeExecutable: T[String] = "native-image"

  // GraalVM native-image main class
  def graalvmNativeMainClass: T[String]

  // GraalVM native-image options
  def graalvmNativeImageOptions: T[Seq[String]] = T(Seq.empty[String])

  // GraalVM native-image executable script name
  def graalvmExecutableScriptName: T[String]

  // GraalVM native-image class paths
  def graalvmNativeClassPaths: T[Seq[os.Path]] = T { runClasspath().map(_.path) }

  // GraalVM native-image task
  def graalvmNativeImage: T[Unit] = T {
    val out   = T.dest / graalvmExecutableScriptName()
    val cmds1 = graalvmNativeExecutable() :: "--class-path" :: graalvmNativeClassPaths().mkString(":") :: Nil
    val cmds2 = "-o" :: out.toString :: graalvmNativeMainClass() :: Nil
    val cmds  = cmds1 ++ graalvmNativeImageOptions() ++ cmds2
    graalvmNativeImageOptions() ++
      List(
        "-o",
        out.toString,
        graalvmNativeMainClass()
      )
    T.log.info(s"""executing: ${cmds.mkString(" ")}""")
    val r     = os.proc(cmds).call()
    if (r.exitCode == 0) {
      T.log.info(s"generated GraalVM native image: $out")
      val size     = os.size(out)
      val sizeInKB = size / 1024.0
      val sizeInMB = sizeInKB / 1024.0
      T.log.info(s"""generated GraalVM native image size: $size Bytes ≈ ${"%.3f".format(sizeInKB)} KB ≈ ${"%.3f".format(sizeInMB)} MB""")
    } else {
      T.log.error("got non ZERO cmd result when call native-image")
    }
  }
}
然后将它应用在 app 子项目上。
build.sc:
-object app extends ScalaModule with ScalafmtModule with JavaAppPackagingModule {
+object app extends ScalaModule with ScalafmtModule with JavaAppPackagingModule with GraalvmNativeImageModule {
+
+  def graalvmNativeMainClass: T[String] = T("simple.Main")
+
+  def graalvmNativeImageOptions: T[Seq[String]] = T(
+    Seq(
+      "--verbose",
+      "--static",
+      "--initialize-at-build-time",
+      "--no-fallback",
+      "-H:+UnlockExperimentalVMOptions",
+      "-H:IncludeResources=.*/(.*.css)|(.*.js)$",
+      "-H:-UnlockExperimentalVMOptions"
+    )
+  )
+
+  // Simple Scala Static Snap Server: s5
+  def graalvmExecutableScriptName: T[String] = T("s5")
其中,关键的 graalvmNativeImageOptions 参数解释如下:
--static用于生成静态链接的可执行文件--initialize-at-build-time和--no-fallback是必须的,具体原因我们这里不去细究-H:IncludeResources=.*/(.*.css)|(.*.js)$是为了把必要的静态资源文件包含进去,否则我们将会得到一个没有任何样式的文件
本文旨在探索如何充分整合利(bai)用(piao) Scala 和 JVM 生态,GraalVM Native Image 的参数选项不是本文的讨论范畴,如果有需要,请到官网翻阅文档。
生成出来的可执行文件被命名为 s5, 由 Simple Scala Static Snap Server 硬凑而来。因为 static-snap 作为命令行程序,嫌长了点,而 s3 已经
被 AWS 用去了, s4 又显得不够厉害,于是我们强行凑一个 s5 好了。其实如果你喜欢,直接用 sssss 也是可以的。
万事俱备,现在直接执行 mill app.graalvmNativeImage 编译打包命令。
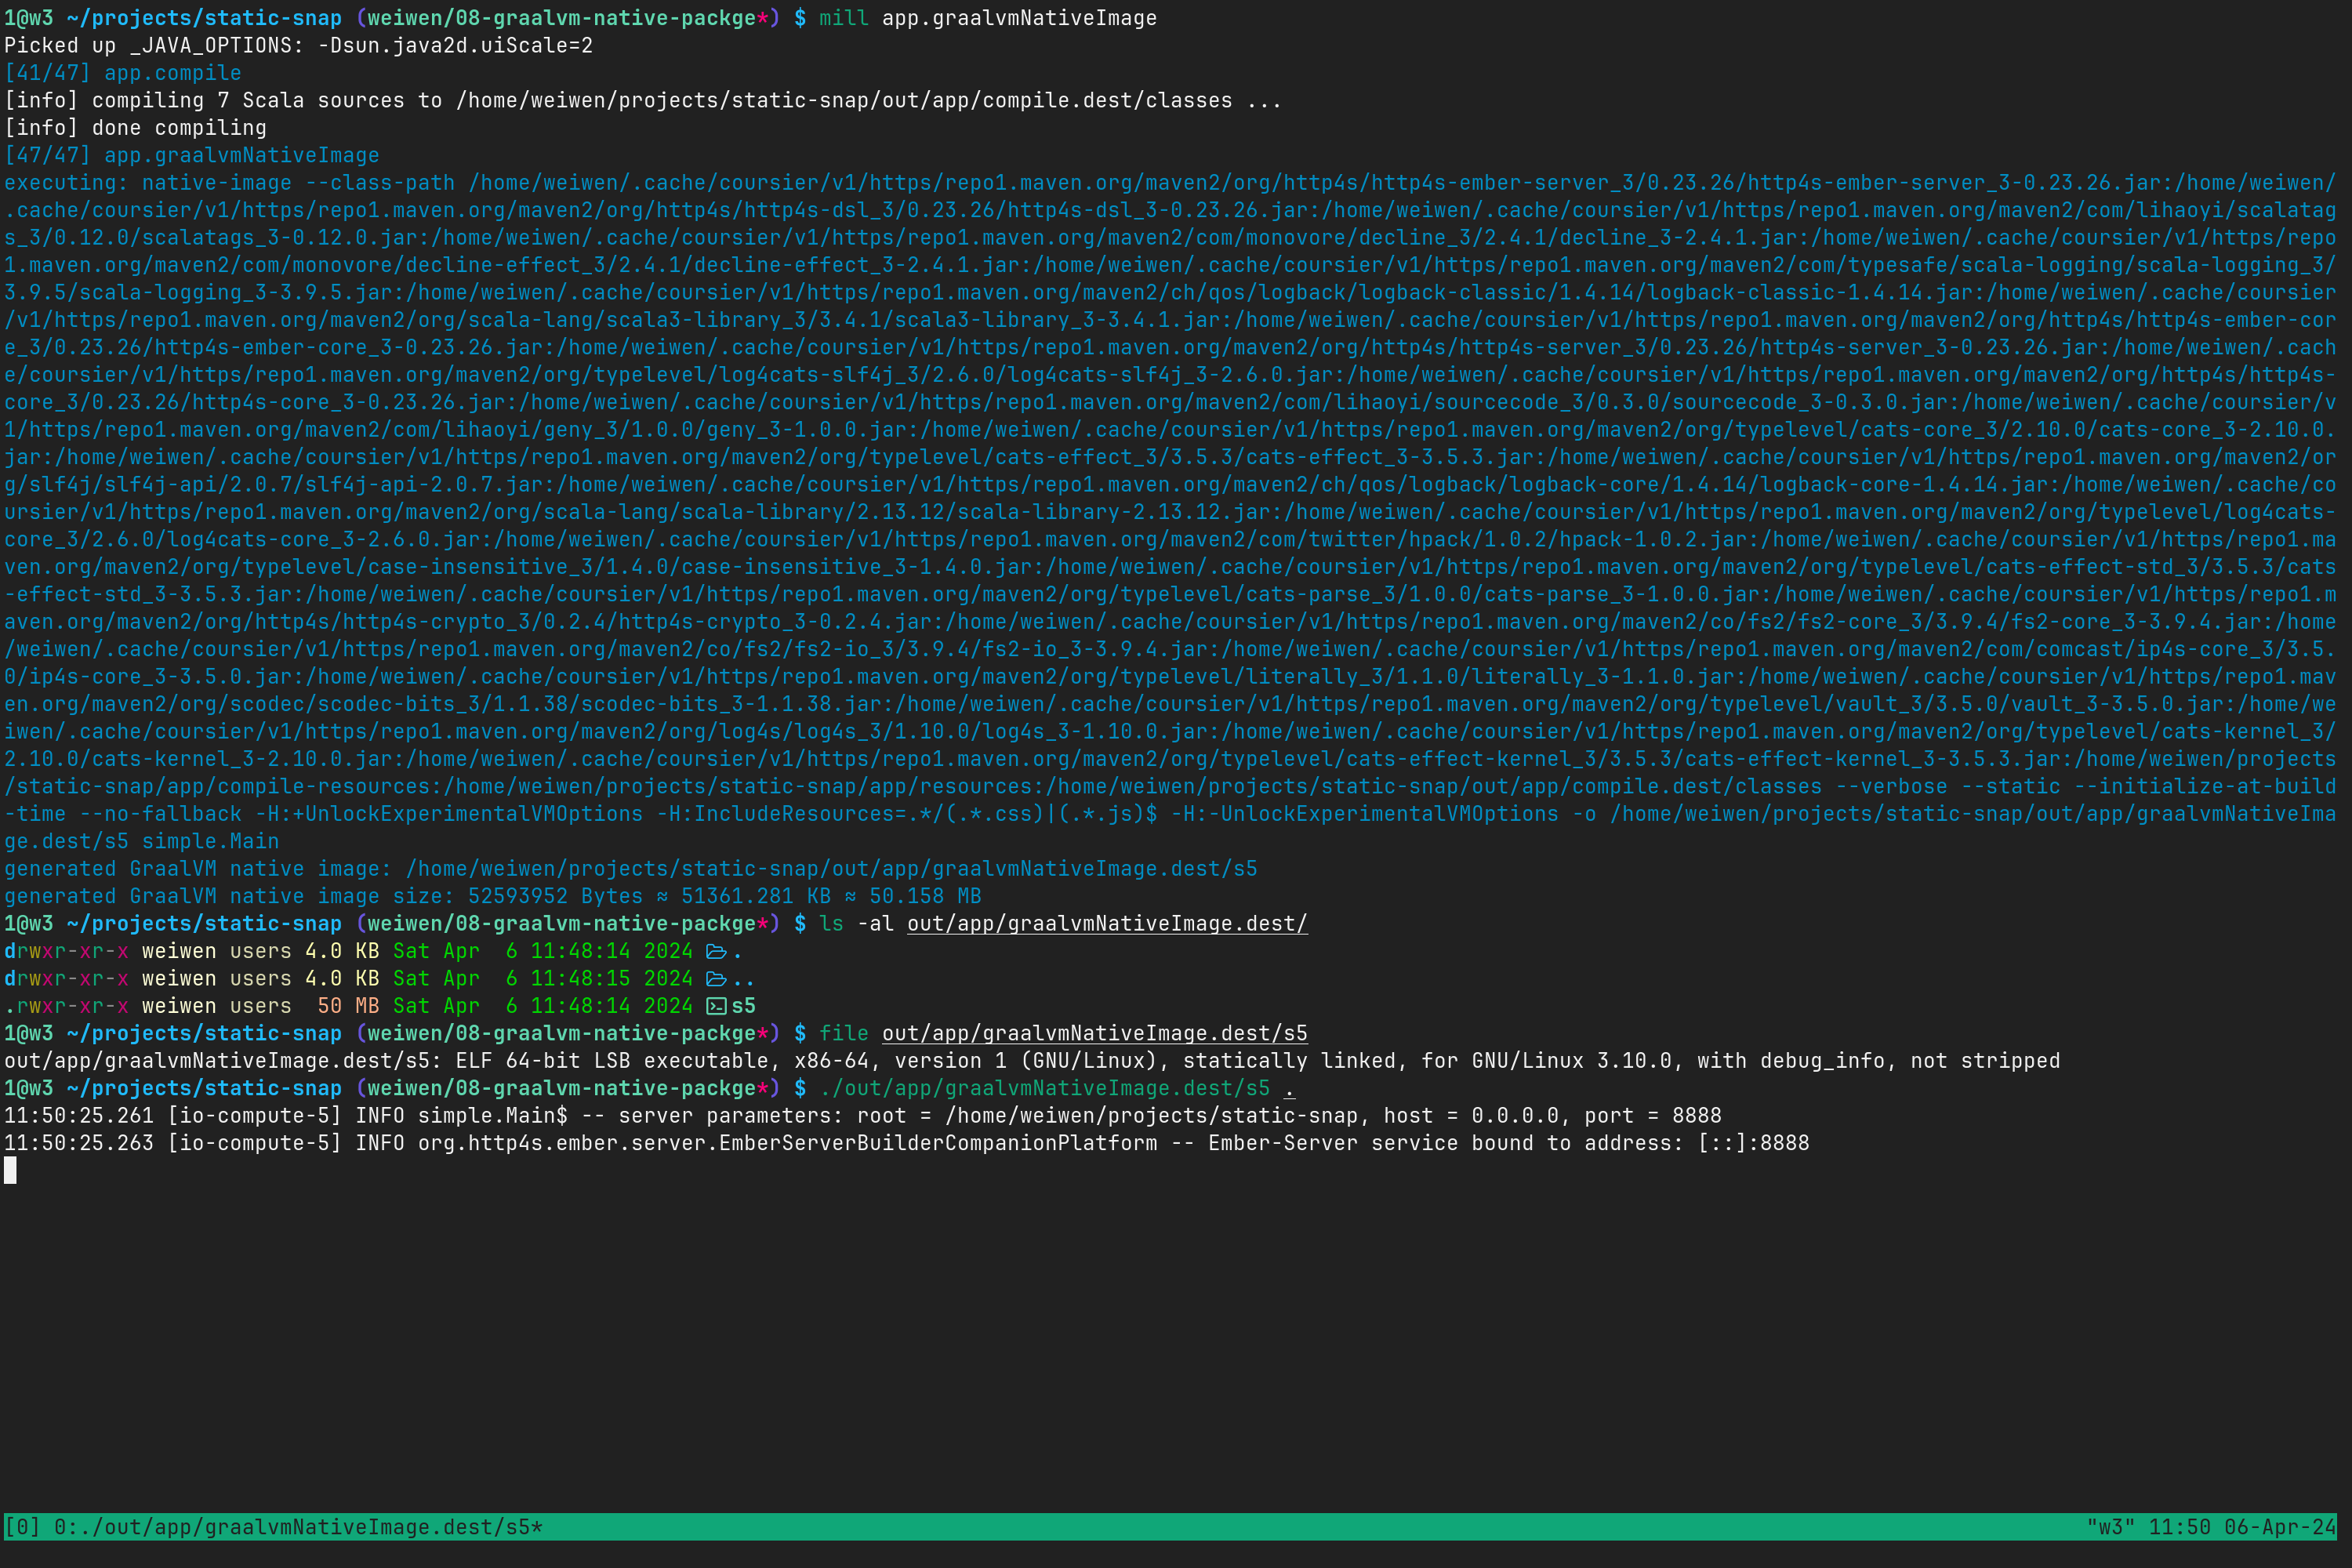
特别注意到:
1@nixos ~/projects/static-snap (weiwen/08-graalvm-native-packge*) $ file ./out/app/graalvmNativeImage.dest/s5
./out/app/graalvmNativeImage.dest/s5: ELF 64-bit LSB executable, x86-64, version 1 (GNU/Linux), statically linked, for GNU/Linux 3.10.0, with debug_info, not stripped
这是一个静态链接的可执行文件,命令行输出显示了它的适用范围。这样我们安装到系统上的时候,只需要直接复制这个文件就行了。
小结
本节我们事实上实现了一个可用的 GraalVM Native Image mill Plugin, 调用系统的 native-image 来构建静态链接可执行文件。
本节所有阶段性代码都可以在 https://github.com/weiwen99/static-snap/tree/08-graalvm-native-image 找到。
构建 Github 发布工作流
上一节我们成功地把代码编译成可以执行的实用程序,本节就可以在此基础上构建一个从开发到 Github 发布的工作流。
你可能已经注意到我们的项目版本号是固定写死的 0.0.1-SNAPSHOT . 让我们先把项目版本化。
一般而言,大多数构建工具都会配合 git 来做项目的版本管理,我们用的 mill 也不例外。 versionFile 是一个非常简单实用的 mill plugin, 提供了我们需要的基础功能。
先引入这个插件。
build.sc:
import $ivy.`com.lihaoyi::mill-contrib-versionfile:`
import mill.contrib.versionfile.VersionFileModule

object versionFile extends VersionFileModule {
  def millSourcePath = millOuterCtx.millSourcePath
}
写一个初始版本号到 version 这个文本文件中去。
1@nixos ~/projects/static-snap (feature/09-github-release-workflow*?) $ echo '0.0.1-SNAPSHOT' > version
1@nixos ~/projects/static-snap (feature/09-github-release-workflow*?) $ cat version
0.0.1-SNAPSHOT
我们来遛一遛这个新玩具:
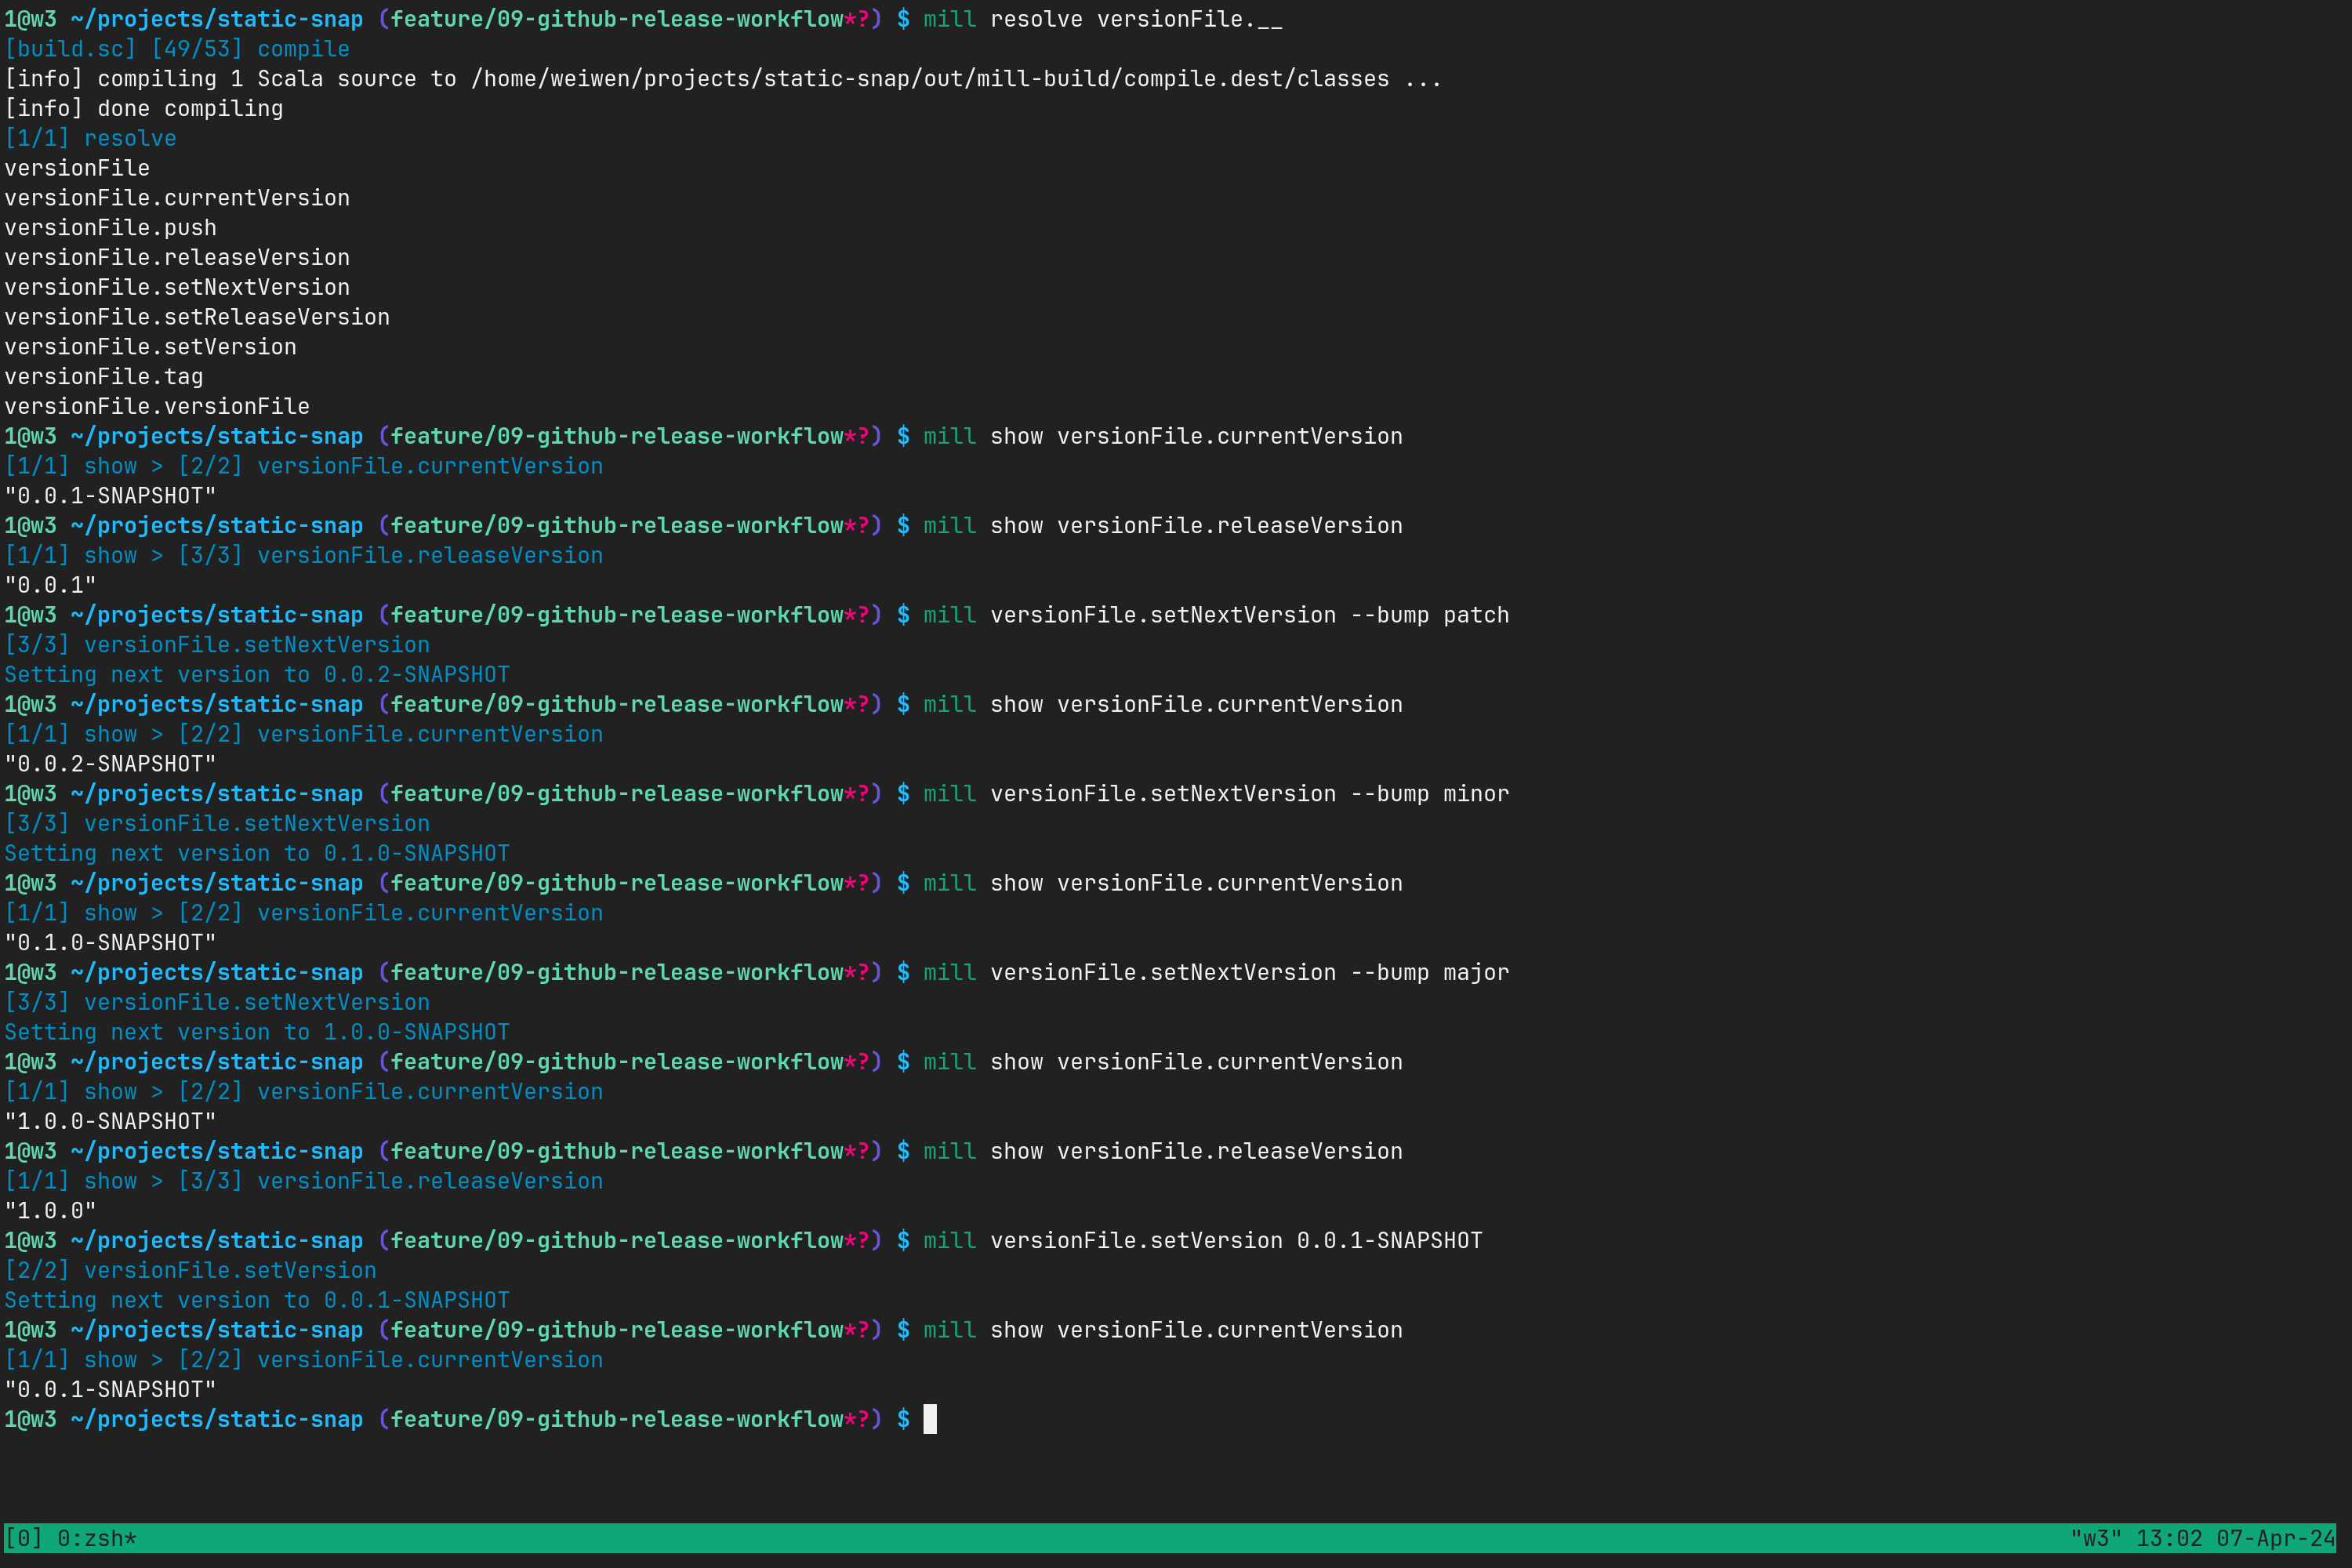
可见 version file 的工作原理其实就是把版本号写入文本文件 version, 其版本命名遵循语义化版本(Semantic versioning).
我们考虑如下的发布工作流:
- 本地,代码格式化:
mill __.reformat - 本地,清理:
mill clean - 本地,校验:
mill __.test - 本地,确定一个将要发布的版本号
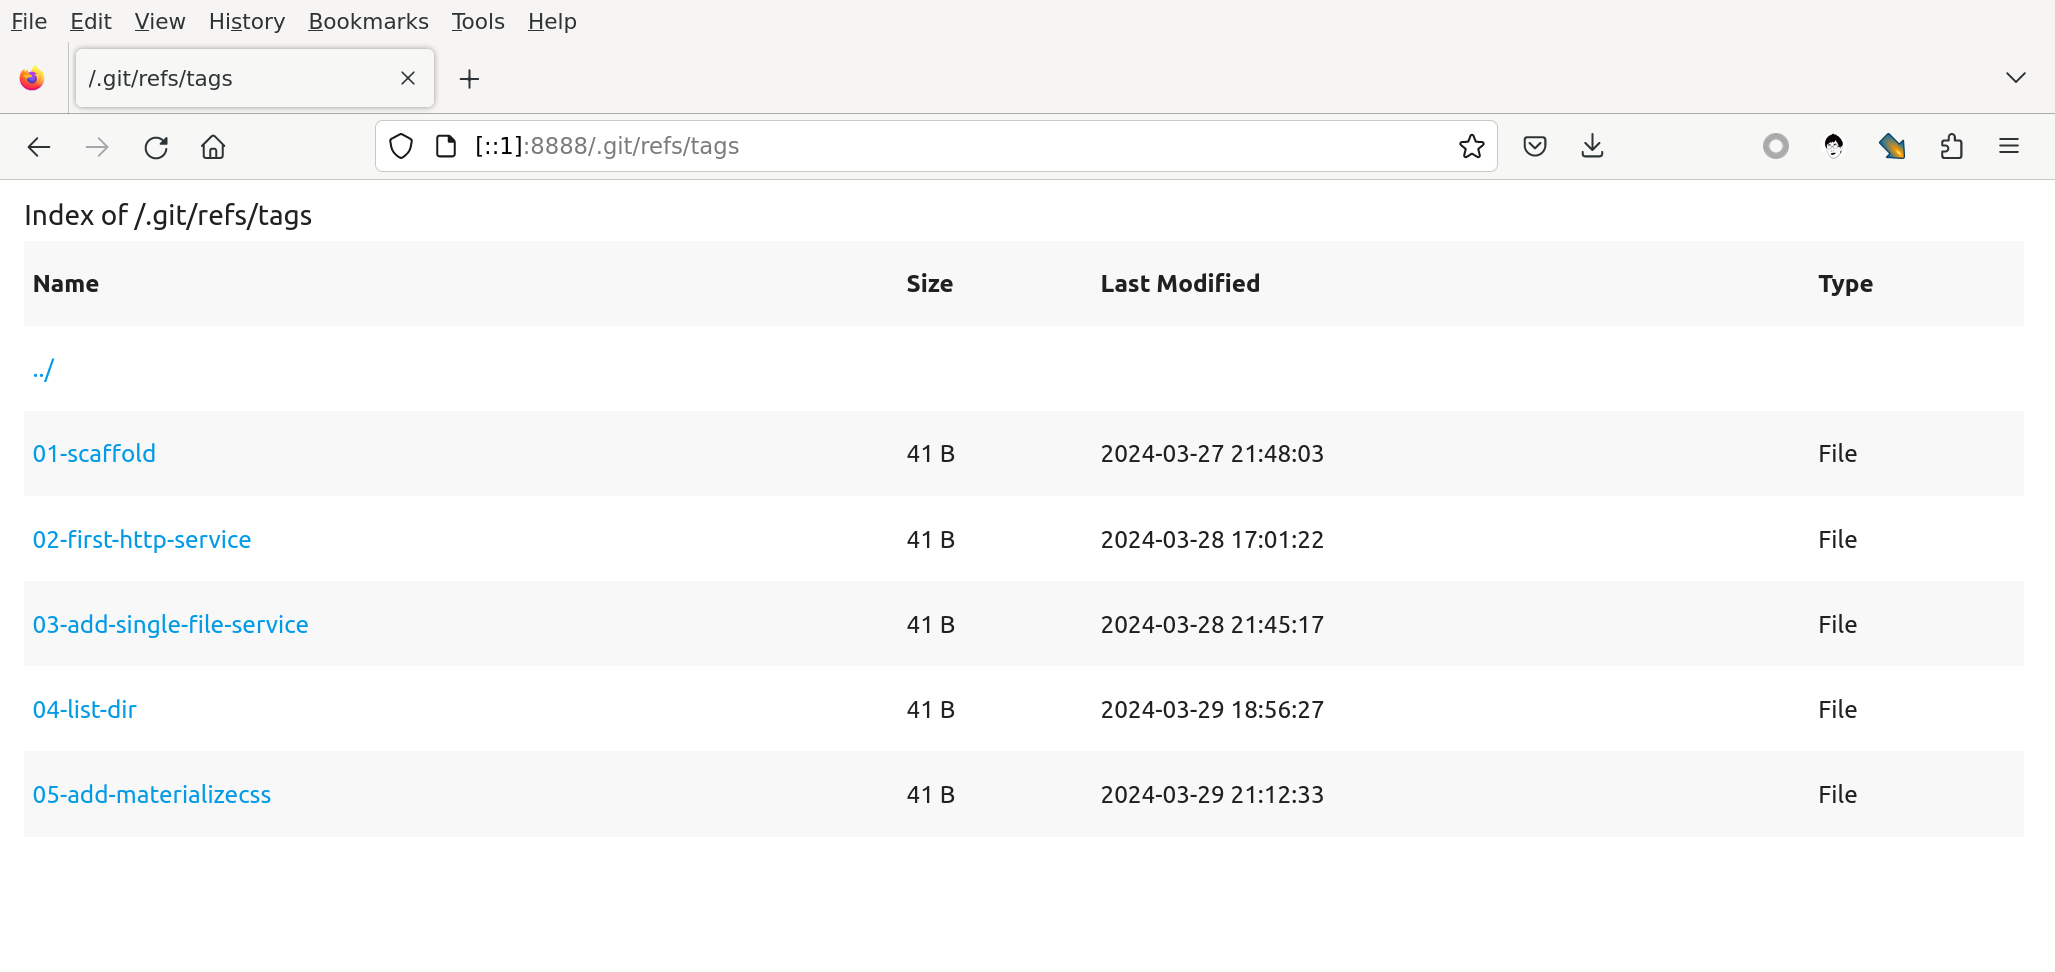
RELEASE_VERSION - 本地,打一个 git tag
v{RELEASE_VERSION} - 本地,git push tag
v{RELEASE_VERSION}到 Github - Github, 自动触发发布构建的 github action, 生成 Github Release Draft(
v{RELEASE_VERSION}), 以及可供下载的附件(Assets) - 本地,生成下一个版本号
NEXT_VERSION, 这是个 snapshot 版本,以-SNAPSHOT结尾 - 本地,打一个 git tag
v{NEXT_VERSION} - 本地,git push tag
v{NEXT_VERSION}到 Github - Github, 自动触发发布构建的 github action, 生成 Github Release Draft(
v{NEXT_VERSION}), 以及可供下载的附件(Assets) - 浏览器页面,检查 Github Release Draft
v{RELEASE_VERSION}和v{NEXT_VERSION}, 酌情发布为正式版本
请注意,这只是一个可能比较适合单人开发的开源软件的发布工作流,不同的项目性质、团队结构、迭代需求、权限管理要求等等诸多因素综合起来,可能会需要不 同的工作流。本节仅仅是一个满足我们当前需求的例子,旨在说明事情的大概思路和可行性。
在开始之前,我们先做一些简单的调整。
build.sc:
object app extends ScalaModule with ScalafmtModule with JavaAppPackagingModule with GraalvmNativeImageModule {

+  // Simple Scala Static Snap Server: s5
+  val appName = "s5"
+
   // Define the main class
   def mainClass = Some("simple.Main")

+  def executableScriptName = T(appName)
+
+  def packageName: T[String] = appName + "-" + packageVersion()
+
   // Define the top-level directory name for the archived package
   def topLevelDirectory = Some(packageName())

   // Define the version of the package
-  def packageVersion = "0.0.1-SNAPSHOT"
+  def packageVersion = T { "v" + versionFile.currentVersion().toString }

+  def maintainer: T[String] = "weiwen99 <weiwen@weiwen.org>"

-  // Simple Scala Static Snap Server: s5
-  def graalvmExecutableScriptName: T[String] = T("s5")
+  def graalvmExecutableScriptName: T[String] = T(appName)
 }
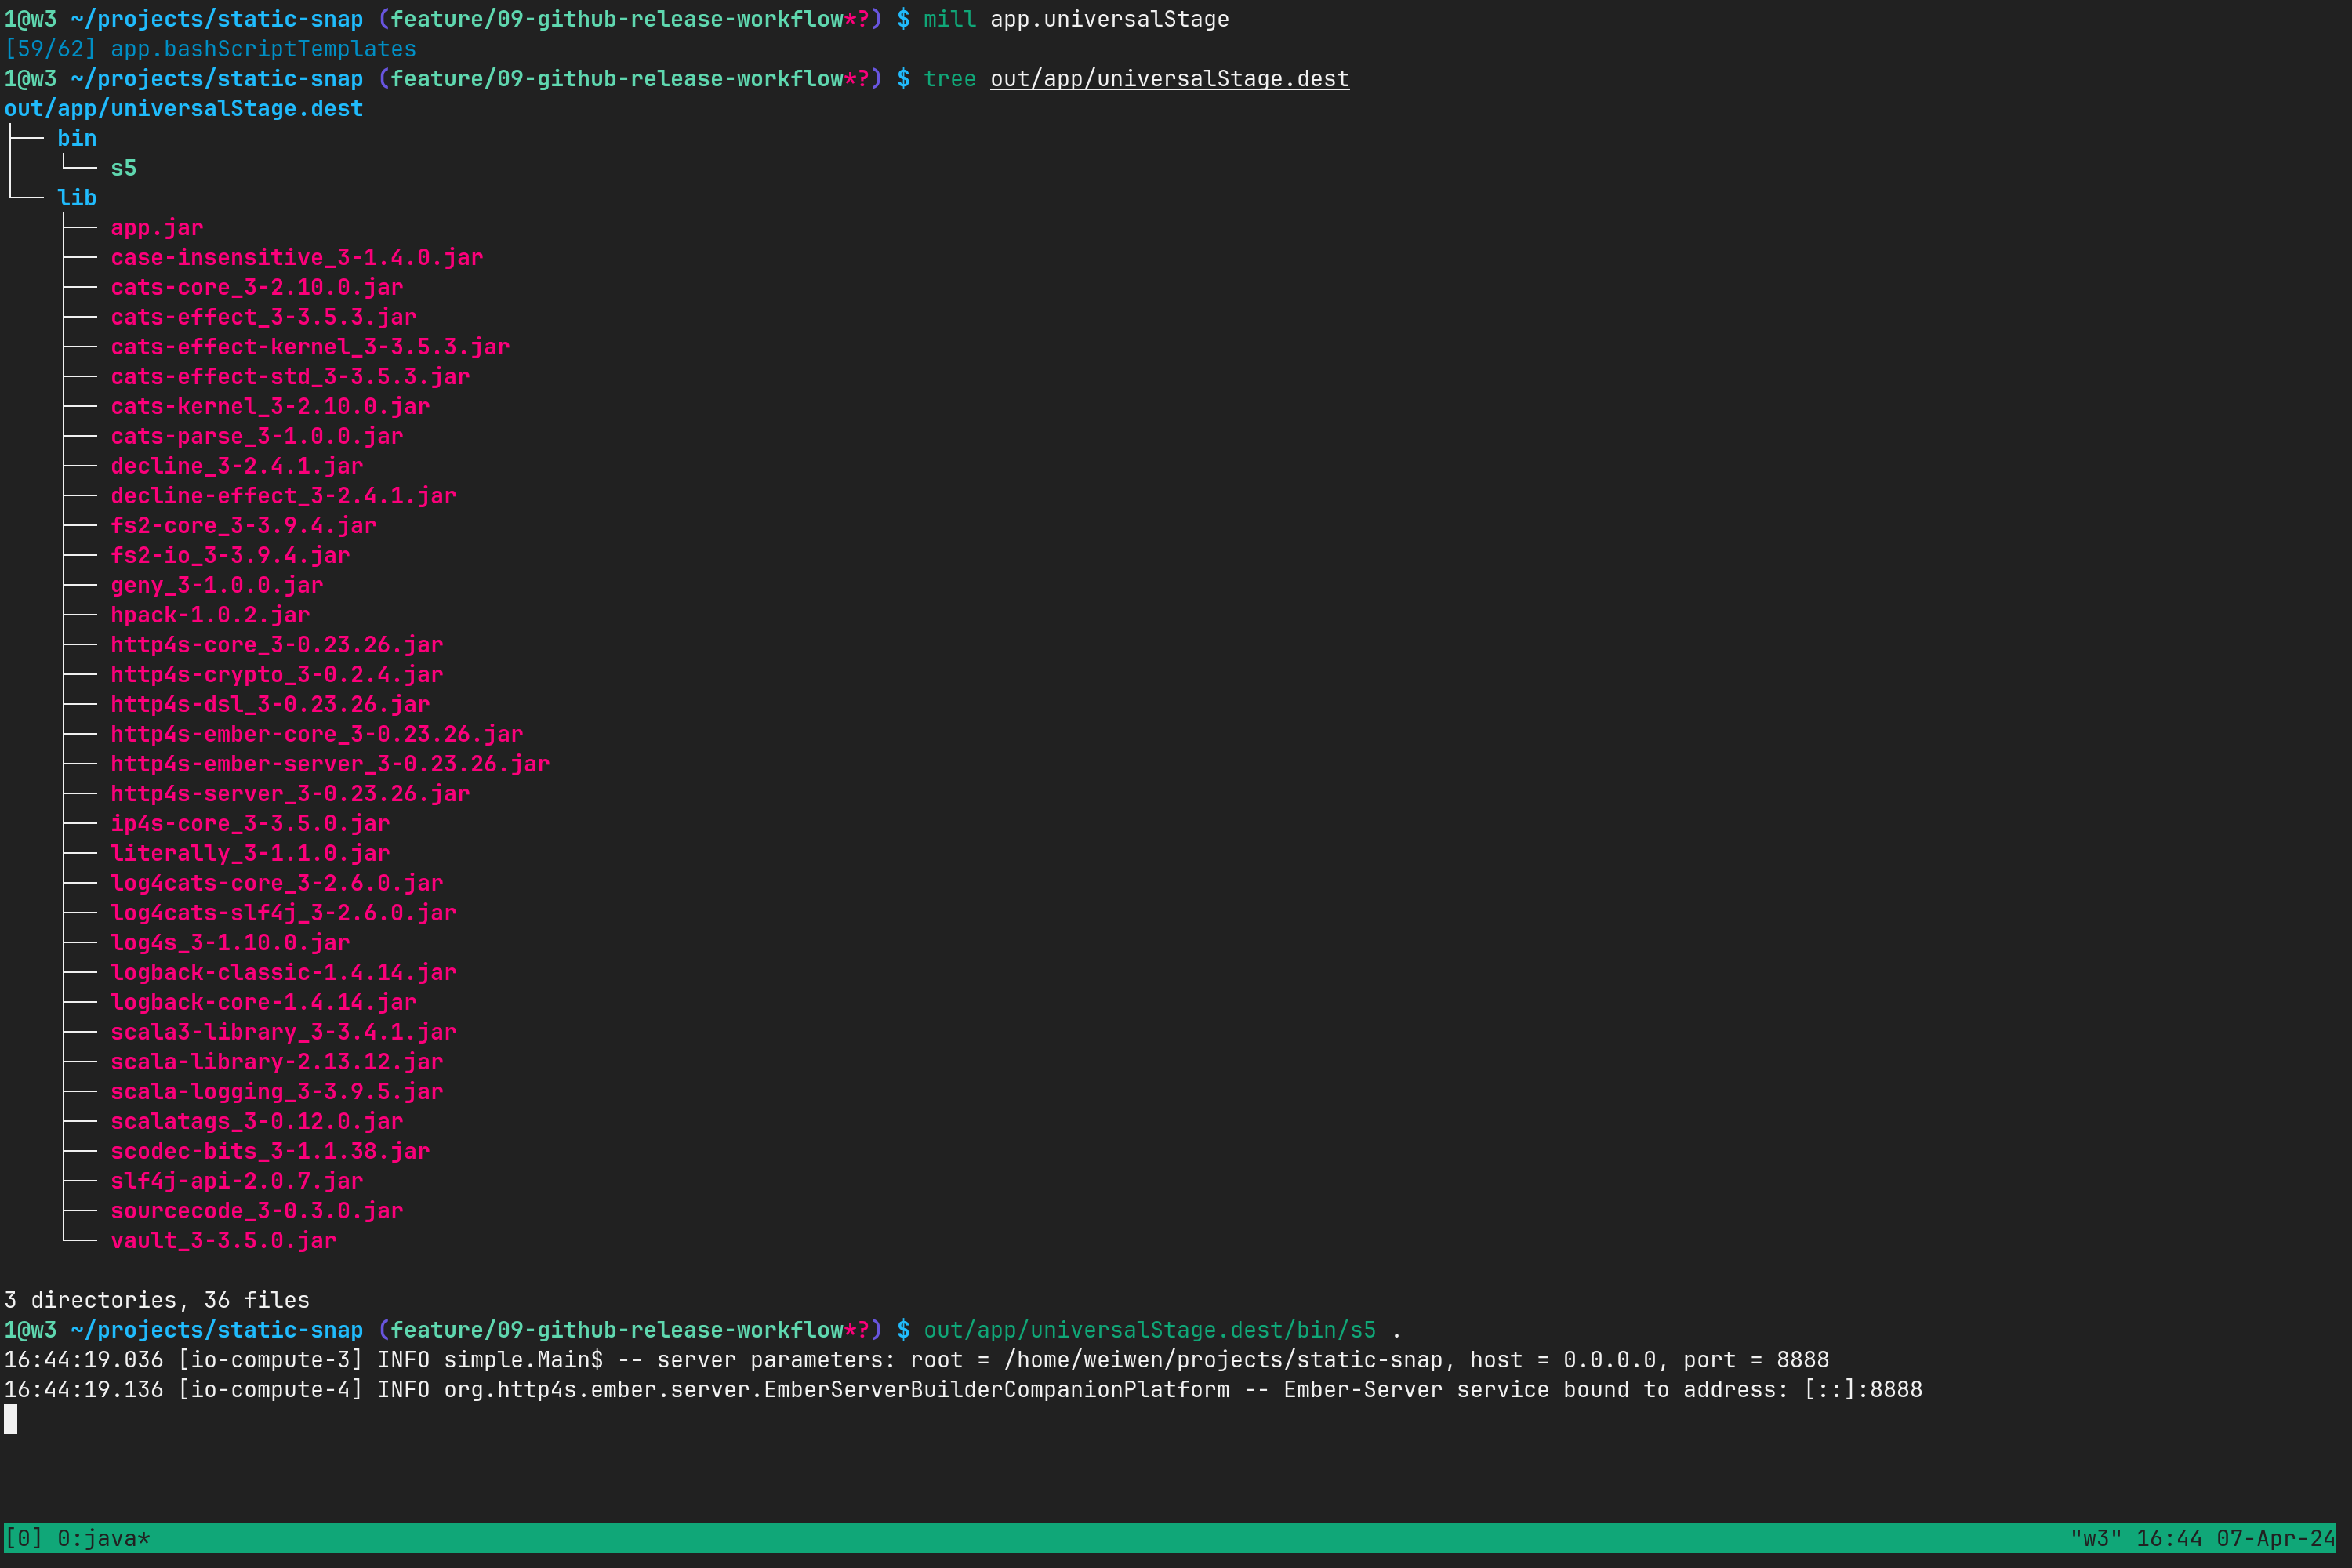
上述更改主要把包名和可执行文件从 app 改为 s5, 为了便于发布以后可供下载的文件更好读。
检验一下:
考虑创建一个 release Shell 脚本文件,来处理我们的本地发布工作流,一个 .github/workflows/release.yml 来响应 Github 端的构建任务。
release:
#!/usr/bin/env sh

set -e

RELEASE_VERSION=""

NEXT_BUMP="patch"

while [[ $# -gt 0 ]]; do
  case $1 in
    -v|--version)
      RELEASE_VERSION="$2"
      shift # past argument
      shift # past value
      ;;
    -b|--bump)
      if [[ $2 == 'patch' || $2 == 'minor' || $2 == 'major' ]]; then
        NEXT_BUMP="$2";
      fi
      shift # past argument
      shift # past value
      ;;
    -*|--*)
      echo "Unknown option $1"
      exit 1
      ;;
    *)
      shift # past argument
      ;;
  esac
done

echo "release process started."

# 格式化 Scala 代码
mill __.reformat
echo "code reformated."

mill clean

mill __.test

if [[ $RELEASE_VERSION != "" ]]; then
  # 设置 release 版本。这个版本号会写入 version 文件。
  mill versionFile.setVersion --version $RELEASE_VERSION
else
  # 设置 release 版本。这个版本号会写入 version 文件。
  # 例如,如果当前版本是 0.1.0-SNAPSHOT,那么设置 release 版本后,version 文件的内容会变成 0.1.0
  mill versionFile.setReleaseVersion
  # 读取 version 文件中的发布版本号, 去掉双引号
  RELEASE_VERSION=$(mill show versionFile.currentVersion | awk -F'"' '{print $2}')
fi

TAG=v$RELEASE_VERSION

echo "set release version to $RELEASE_VERSION, git tag to $TAG"

git commit -am "release $TAG"
git tag -f $TAG
git push -f origin
git push origin -f $TAG

mill versionFile.setNextVersion --bump $NEXT_BUMP

# 读取 version 文件中的下一个版本号, 去掉双引号
NEXT_VERSION=$(mill show versionFile.currentVersion | awk -F'"' '{print $2}')
TAG=v$NEXT_VERSION

echo "set version to $NEXT_VERSION, git tag to $TAG ."

git commit -am "snapshot version $TAG"
git tag -f $TAG
git push -f origin $TAG
git push -f

echo "release completed. the released version is $RELEASE_VERSION, next version is $NEXT_VERSION."
echo "check https://github.com/weiwen99/static-snap/actions for build status."
echo "check https://github.com/weiwen99/static-snap/releases for draft release status."
echo "the release will be available for download after the build is completed (it might take a few minutes)."

exit 0
需要赋予可执行权限:
1@nixos ~/projects/static-snap (feature/09-github-release-workflow*?) $ chmod u+x release
1@nixos ~/projects/static-snap (feature/09-github-release-workflow*?) $ file release
release: a sh script, Unicode text, UTF-8 text executable
可执行脚本 release 接受两个可选参数 --version(-v) 和 --bump(-b) :
--version(-v): 指定RELEASE_VERSION. 如果不指定,则通过mill versionFile.setReleaseVersion读取version文件记录的版本号并转化为发布版本号(即去掉-SNAPSHOT后缀)。--bump(-b): 指定下一个版本号的跳跃级别,有patch,minor和major三种可选,默认为patch. 具体请参见 Semantic versioning.
.github/workflows/release.yml:
name: Release

on:
  push:
    # Sequence of patterns matched against refs/tags
    tags:
    # Push events to matching v*, i.e. v1.0, v20.15.10
    - 'v*'
    # Ignore push events to matching v*-SNAPSHOT, uncomment this line if you want to ignore push events to matching v*-SNAPSHOT
    # - '!v*-SNAPSHOT'

jobs:

  build:

    runs-on: ubuntu-latest

    steps:

    - uses: actions/checkout@v4

    - uses: graalvm/setup-graalvm@v1
      with:
        java-version: '22'
        distribution: 'graalvm-community'
        github-token: ${{ secrets.GITHUB_TOKEN }}

    - name: Setup Mill
      run: |
        mkdir -pv ~/.local/bin
        curl -L https://github.com/com-lihaoyi/mill/releases/download/0.11.7/0.11.7 > ~/.local/bin/mill
        chmod +x ~/.local/bin/mill
        echo "export PATH=\$HOME/.local/bin:\$PATH" >> $GITHUB_PATH

    - name: Get Version
      id: get_version
      run: echo "VERSION=${GITHUB_REF/refs\/tags\//}" >> $GITHUB_OUTPUT

    - name: Test
      run: mill __.test

    # to cache the stage directory for the next step
    - name: Universal Staging
      run: mill app.universalStage

    - name: Build Universal Packages
      run: |
        mill app.universalStagePackageTarZstd
        mill app.universalStagePackageTarBzip2
        mill app.universalStagePackageTarGzip

    - name: Build GraalVM Native Image
      run: |
        mill app.graalvmNativeImage
        cd out/app/graalvmNativeImage.dest/
        tar jcpvf s5-graalvm-native-image-${{ steps.get_version.outputs.VERSION }}.tar.bz2 s5

    - name: Release
      uses: softprops/action-gh-release@v2
      with:
        draft: true
        files: |
          out/app/universalStagePackageTarZstd.dest/s5-${{ steps.get_version.outputs.VERSION }}.tar.zstd
          out/app/universalStagePackageTarBzip2.dest/s5-${{ steps.get_version.outputs.VERSION }}.tar.bz2
          out/app/universalStagePackageTarGzip.dest/s5-${{ steps.get_version.outputs.VERSION }}.tar.gz
          out/app/graalvmNativeImage.dest/s5-graalvm-native-image-${{ steps.get_version.outputs.VERSION }}.tar.bz2
我们在每次发布的下载列表中提供了 GraalVM Native Image 的压缩包,还有以 jar + Shell script 组成的 universal 压缩包(有 .tar.zstd, .tar.ba2, .tar.gz 三种格式)。
请注意,我们使用了 tar jcpvf s5-graalvm-native-image-${{ steps.get_version.outputs.VERSION }}.tar.bz2 s5 把编译生成的 GraalVM Native Image 压
缩成 .tar.bz2, 这一步可以把 50MB 左右的可执行文件压缩到 14.5MB 左右。对于供下载的文件而言,这个体积的减小是非常有价值的。
下面这几行指定了触发发布构建的条件是有以 v 开头的 git tags 被推送到 github 上:
on:
  push:
    tags:
    - 'v*'
如果不希望以 -SNAPSHOT 结尾的 tag 被推送时引发任务,可以加上 '!v*-SNAPSHOT' 这个正则表达式进行过滤。
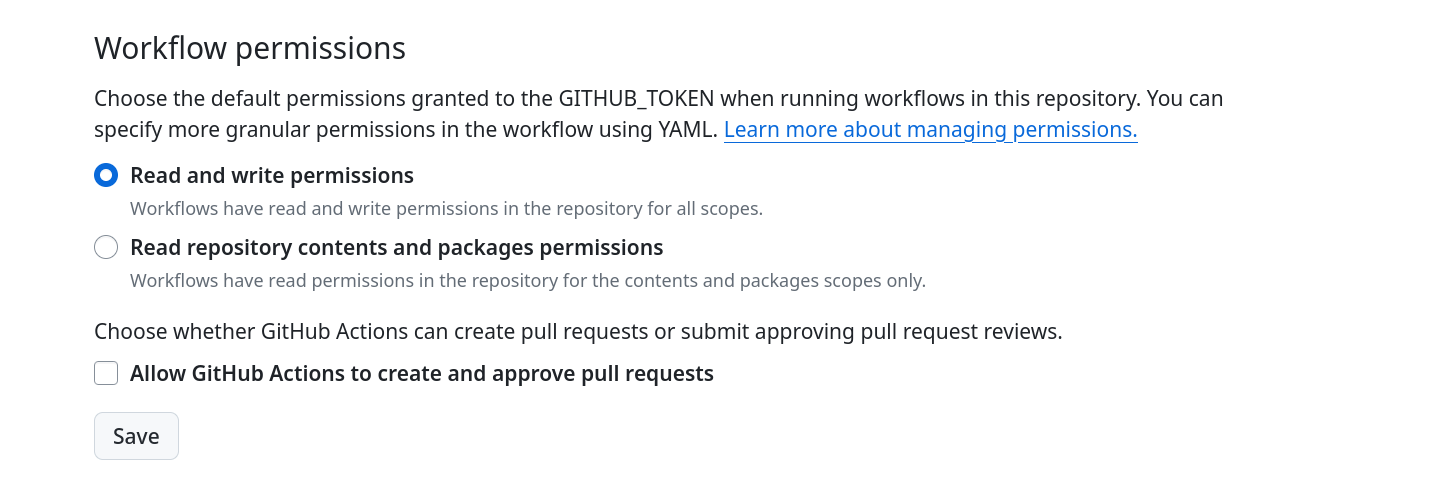
因为我们的 workflow 需要上传附件,所有需要打开 Github 上 Workflow permissions 的写权限。在页面
https://github.com/weiwen99/static-snap/settings/actions 上的 Workflow permissions 一节中,把 Read and write permissions 选中保存即可。
万事俱备!我们来发布第一个版本 v0.0.1:
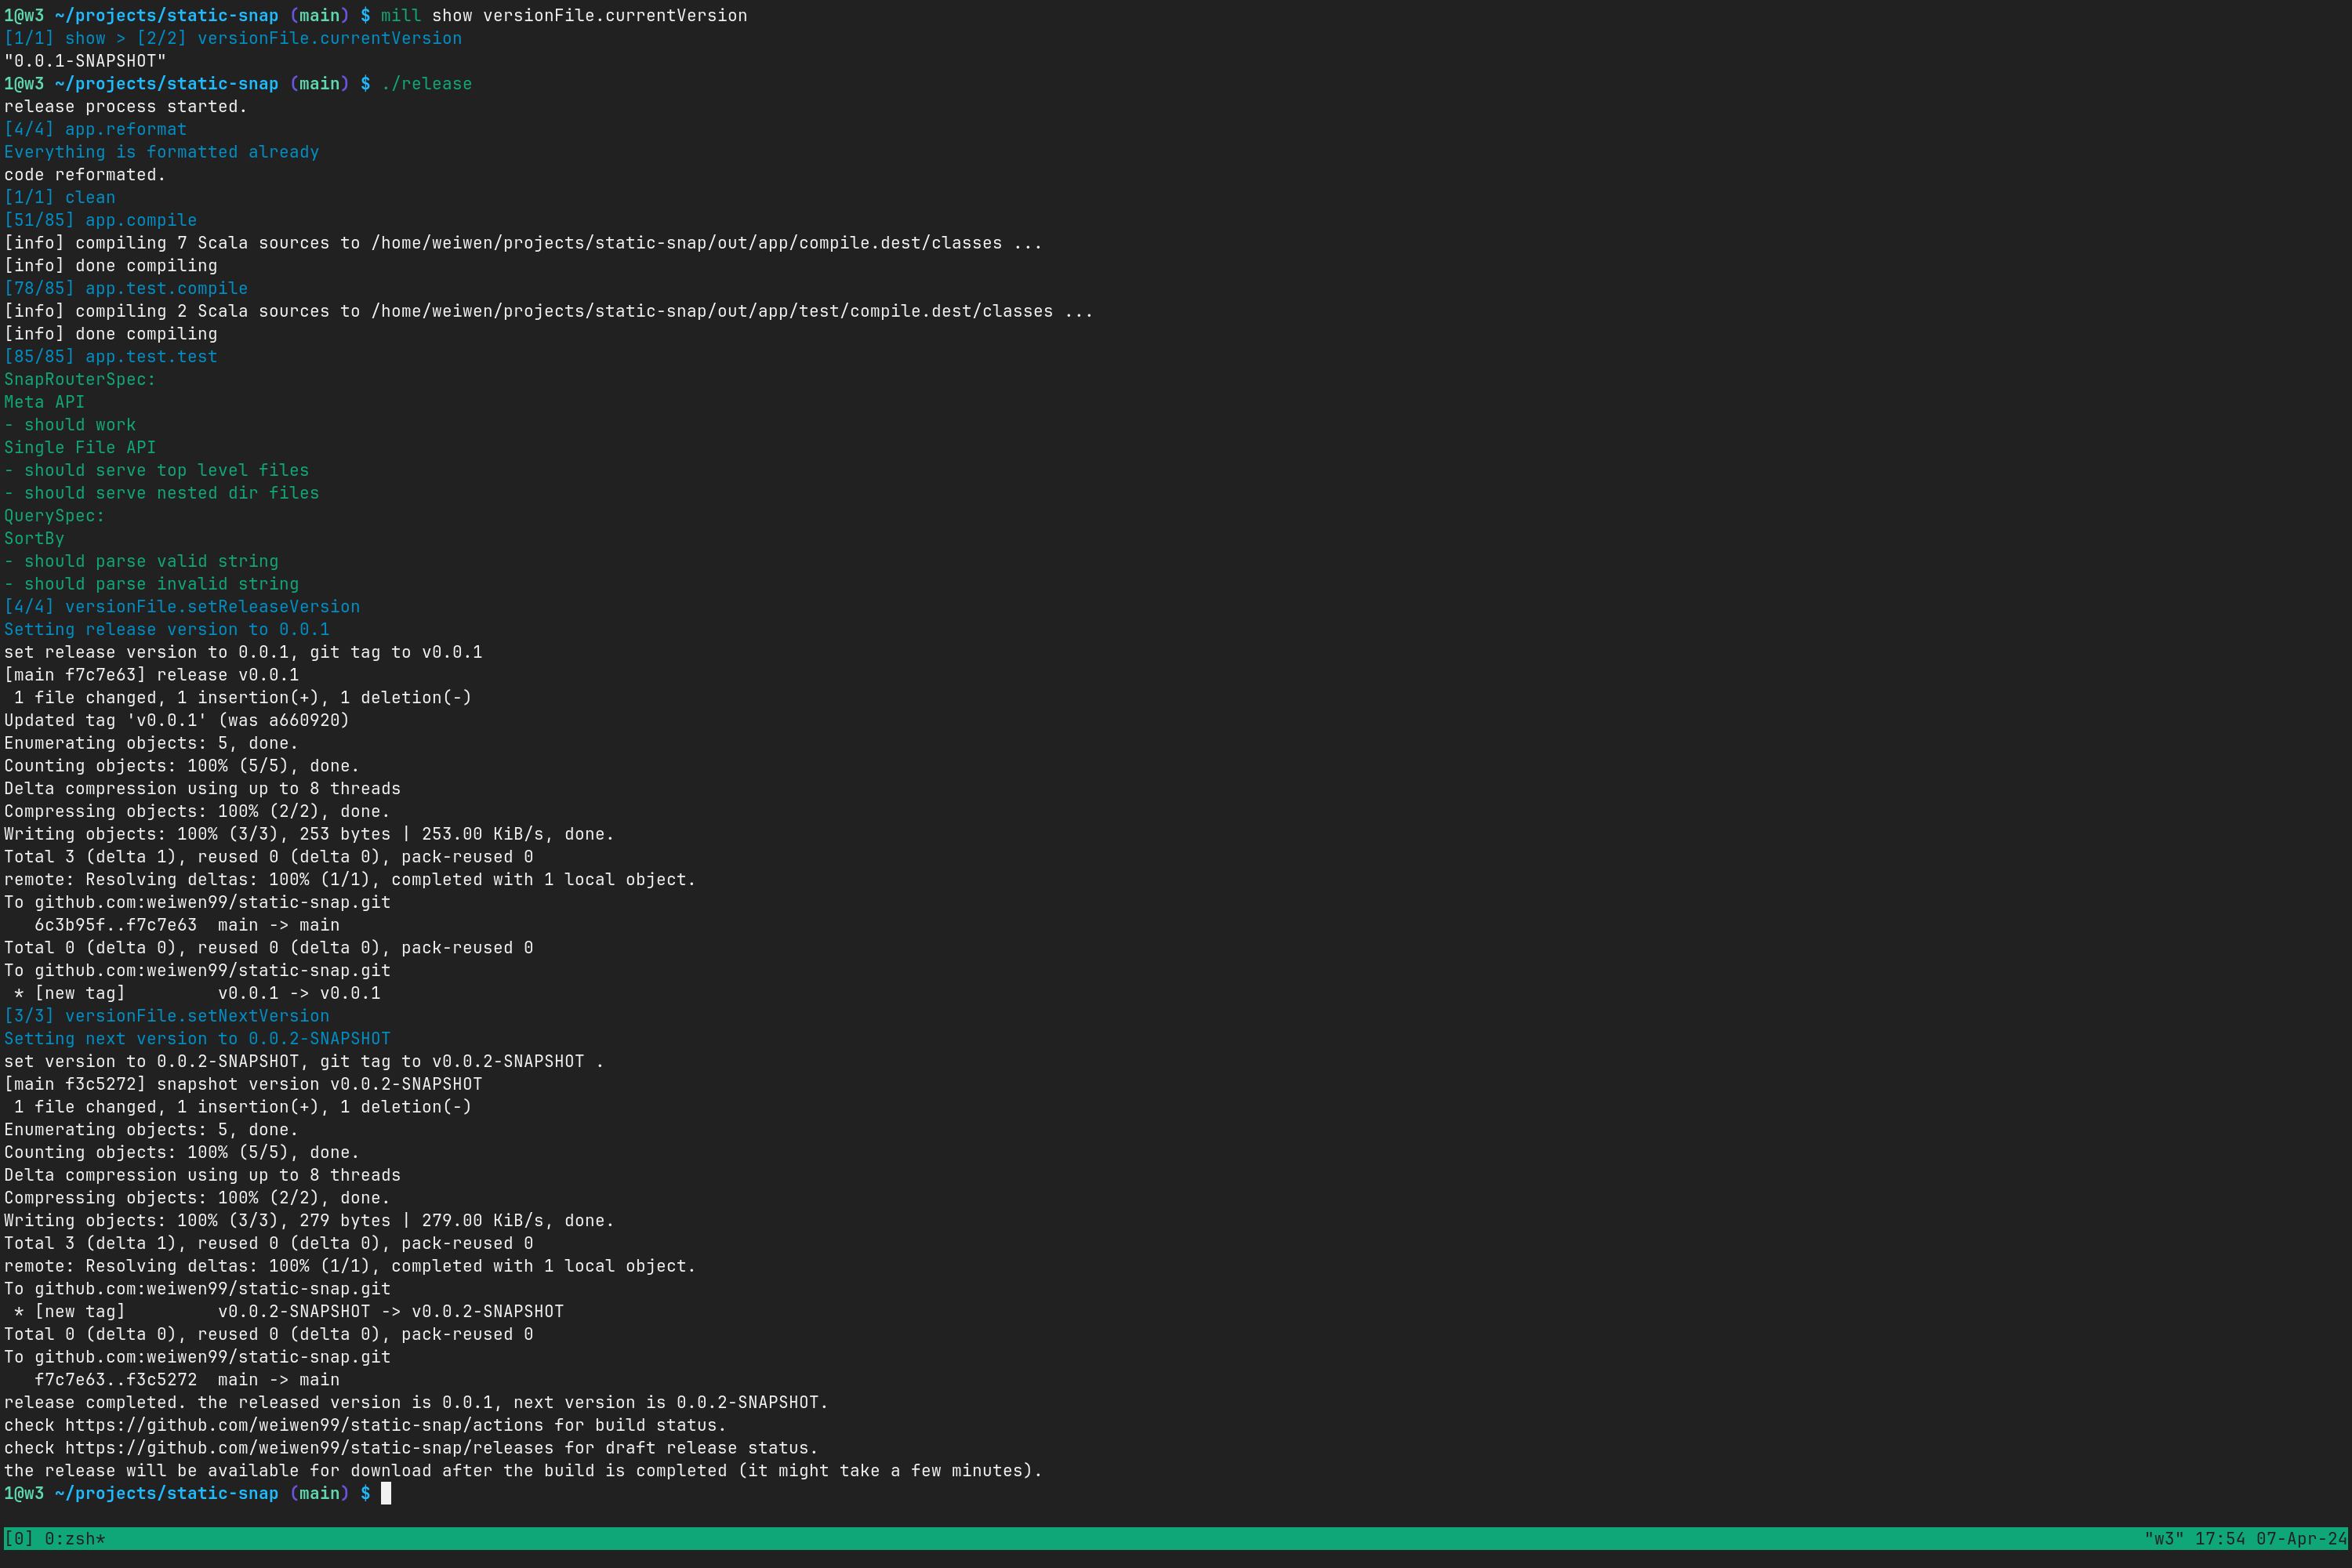
我们可以通过日志很清楚看到,这个脚本执行的时候按顺序做了以下步骤:
- 代码格式化:
mill __.reformat - 代码清理:
mill clean - 单元测试:
mill __.test - 从项目(文件
version) 中读出当前版本号0.0.1-SNAPSHOT - 打了一个 git tag
v0.0.1 - git push tag
v0.0.1到 Github - 生成下一个版本号
0.0.2-SNAPSHOT - 打了一个 git tag
v0.0.2-SNAPSHOT - git push tag
v0.0.2-SNAPSHOT到 Github
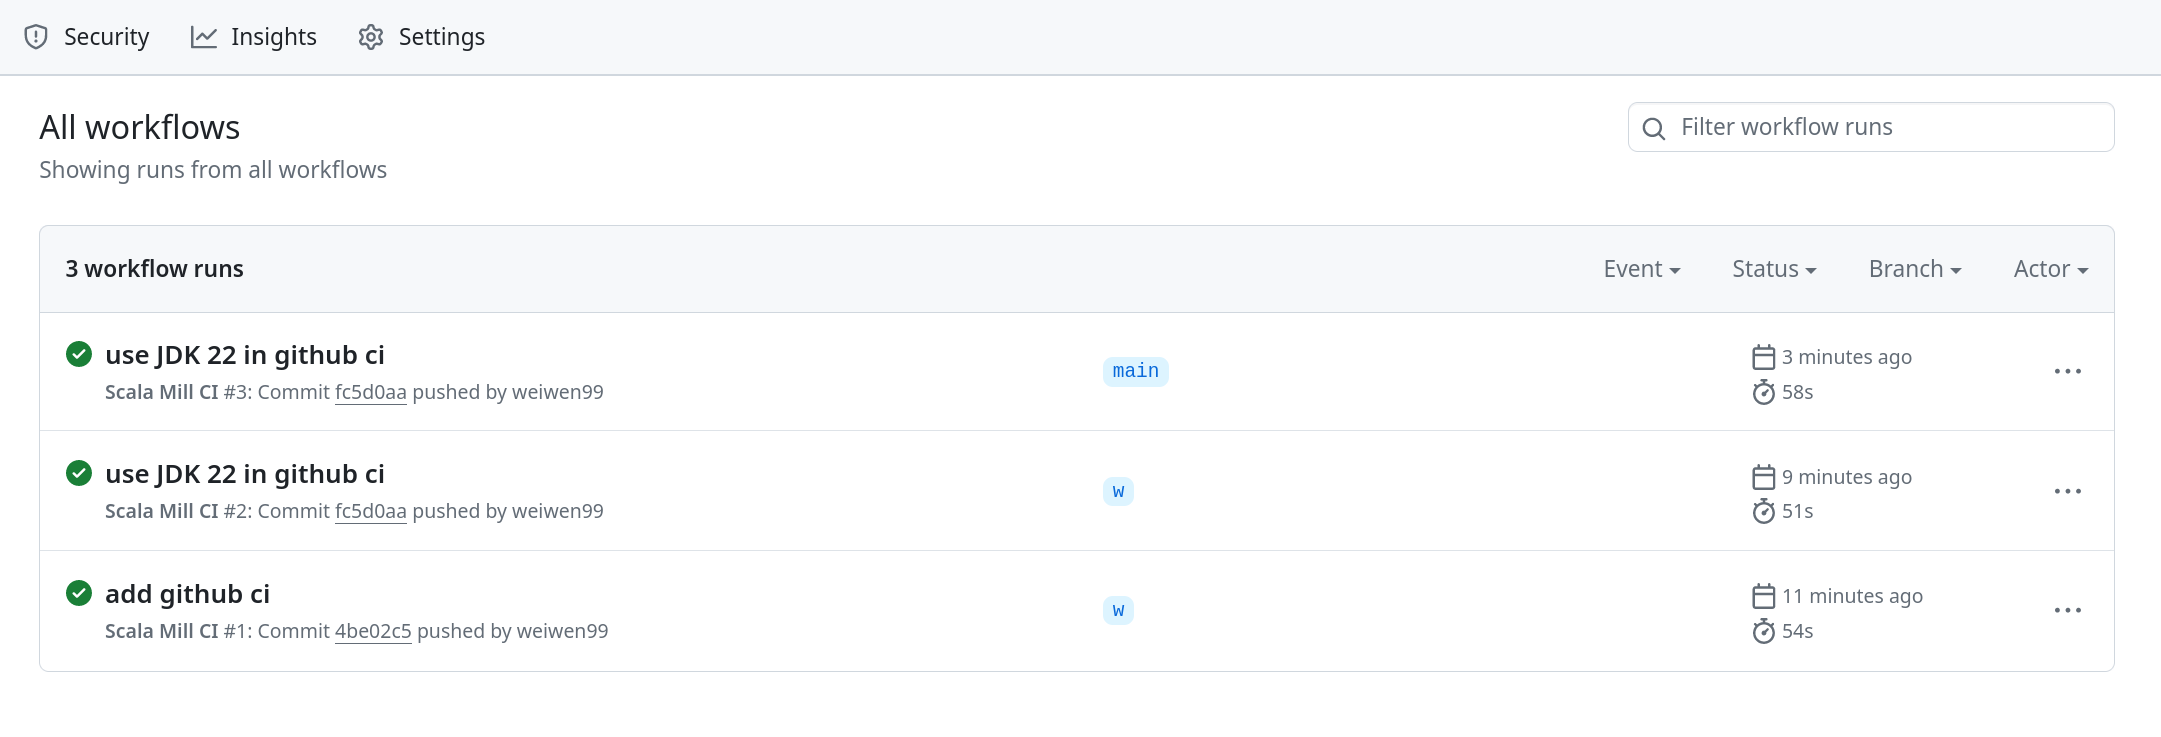
因为刚才运行的脚本先后 push git tag v0.0.1 和 v0.0.2-SNAPSHOT 到 Github, 所以 Github 上会触发两次 Release Draft 构建。我们可以在页面 https://github.com/weiwen99/static-snap/actions 上浏览所有的构建任务。
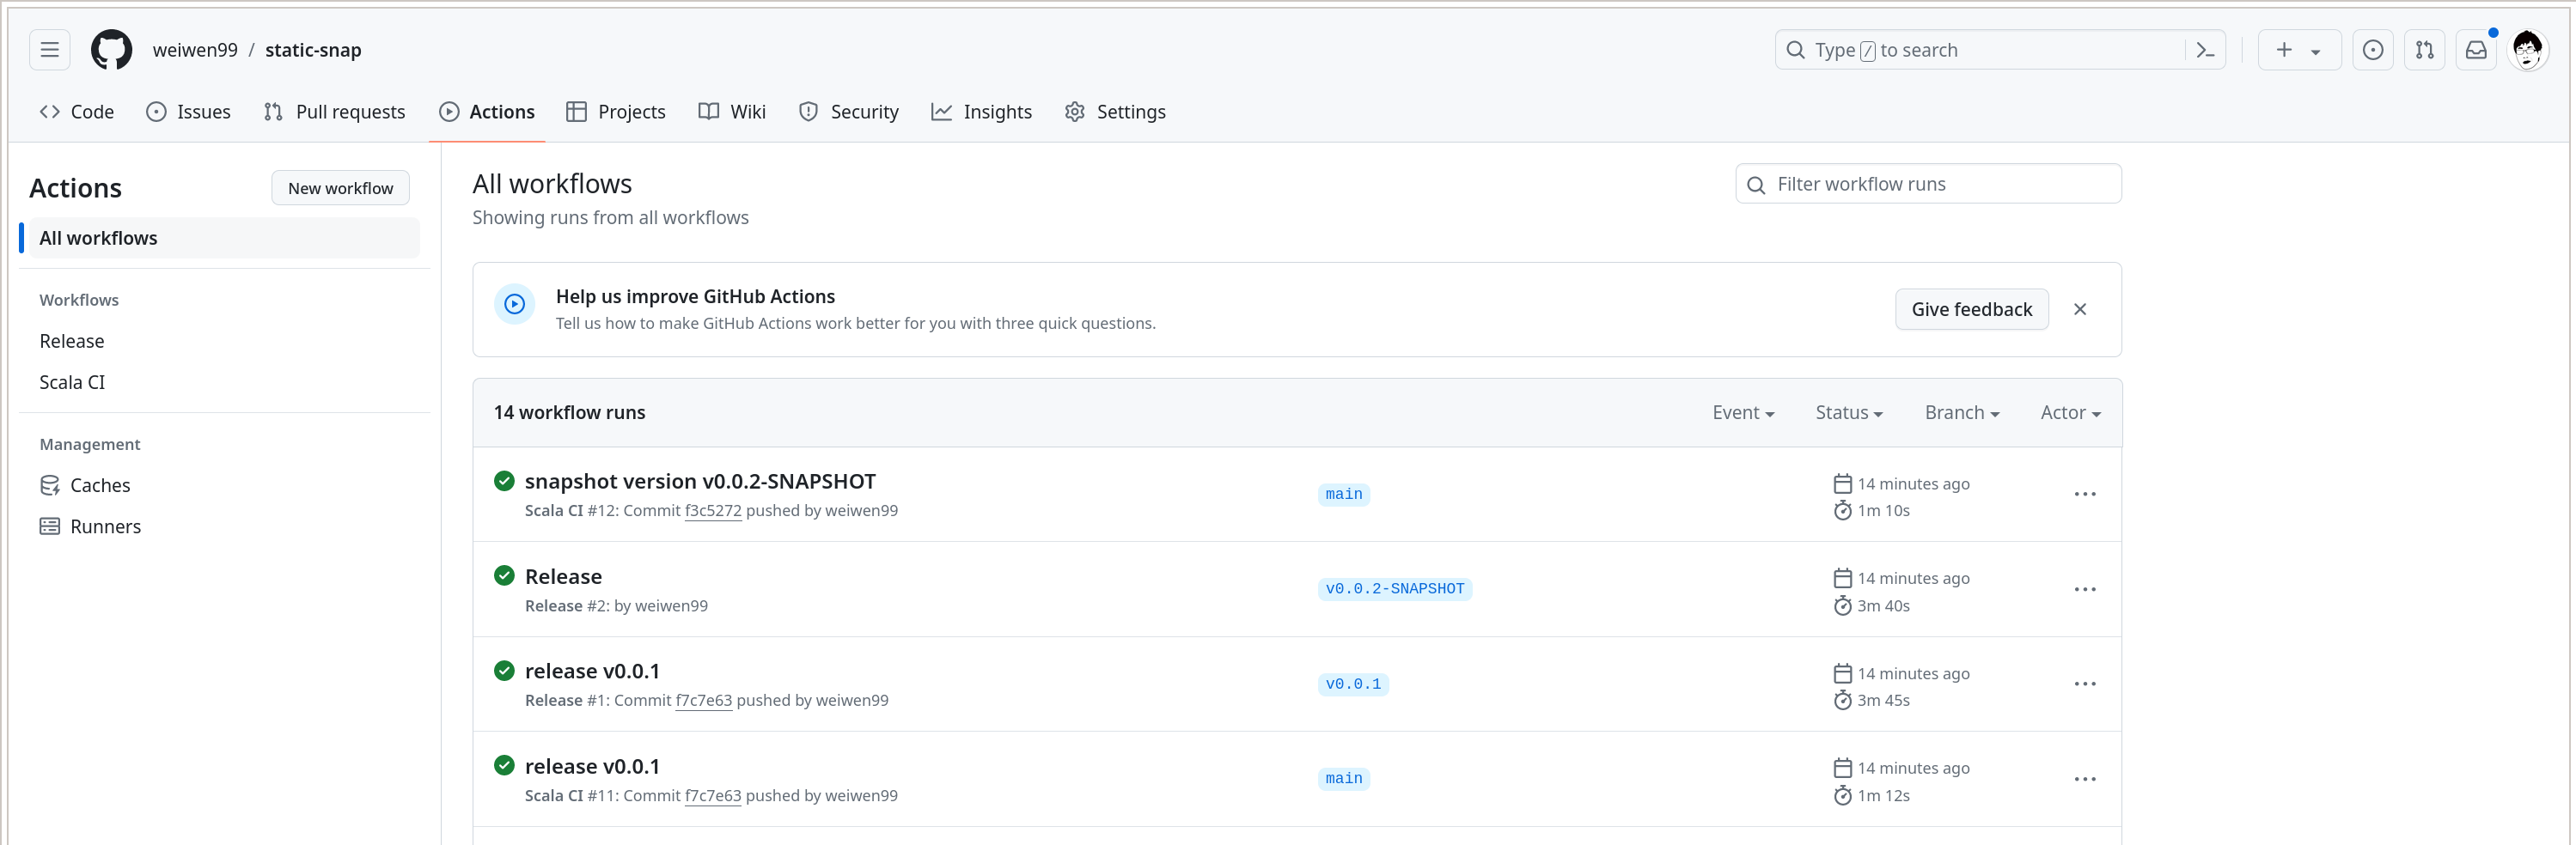
可以看到有 4 个 workflow 被触发,其中两个是 Scala CI, 两个是我们刚配置好的 Release.
而 release v0.0.1 的详情如下:
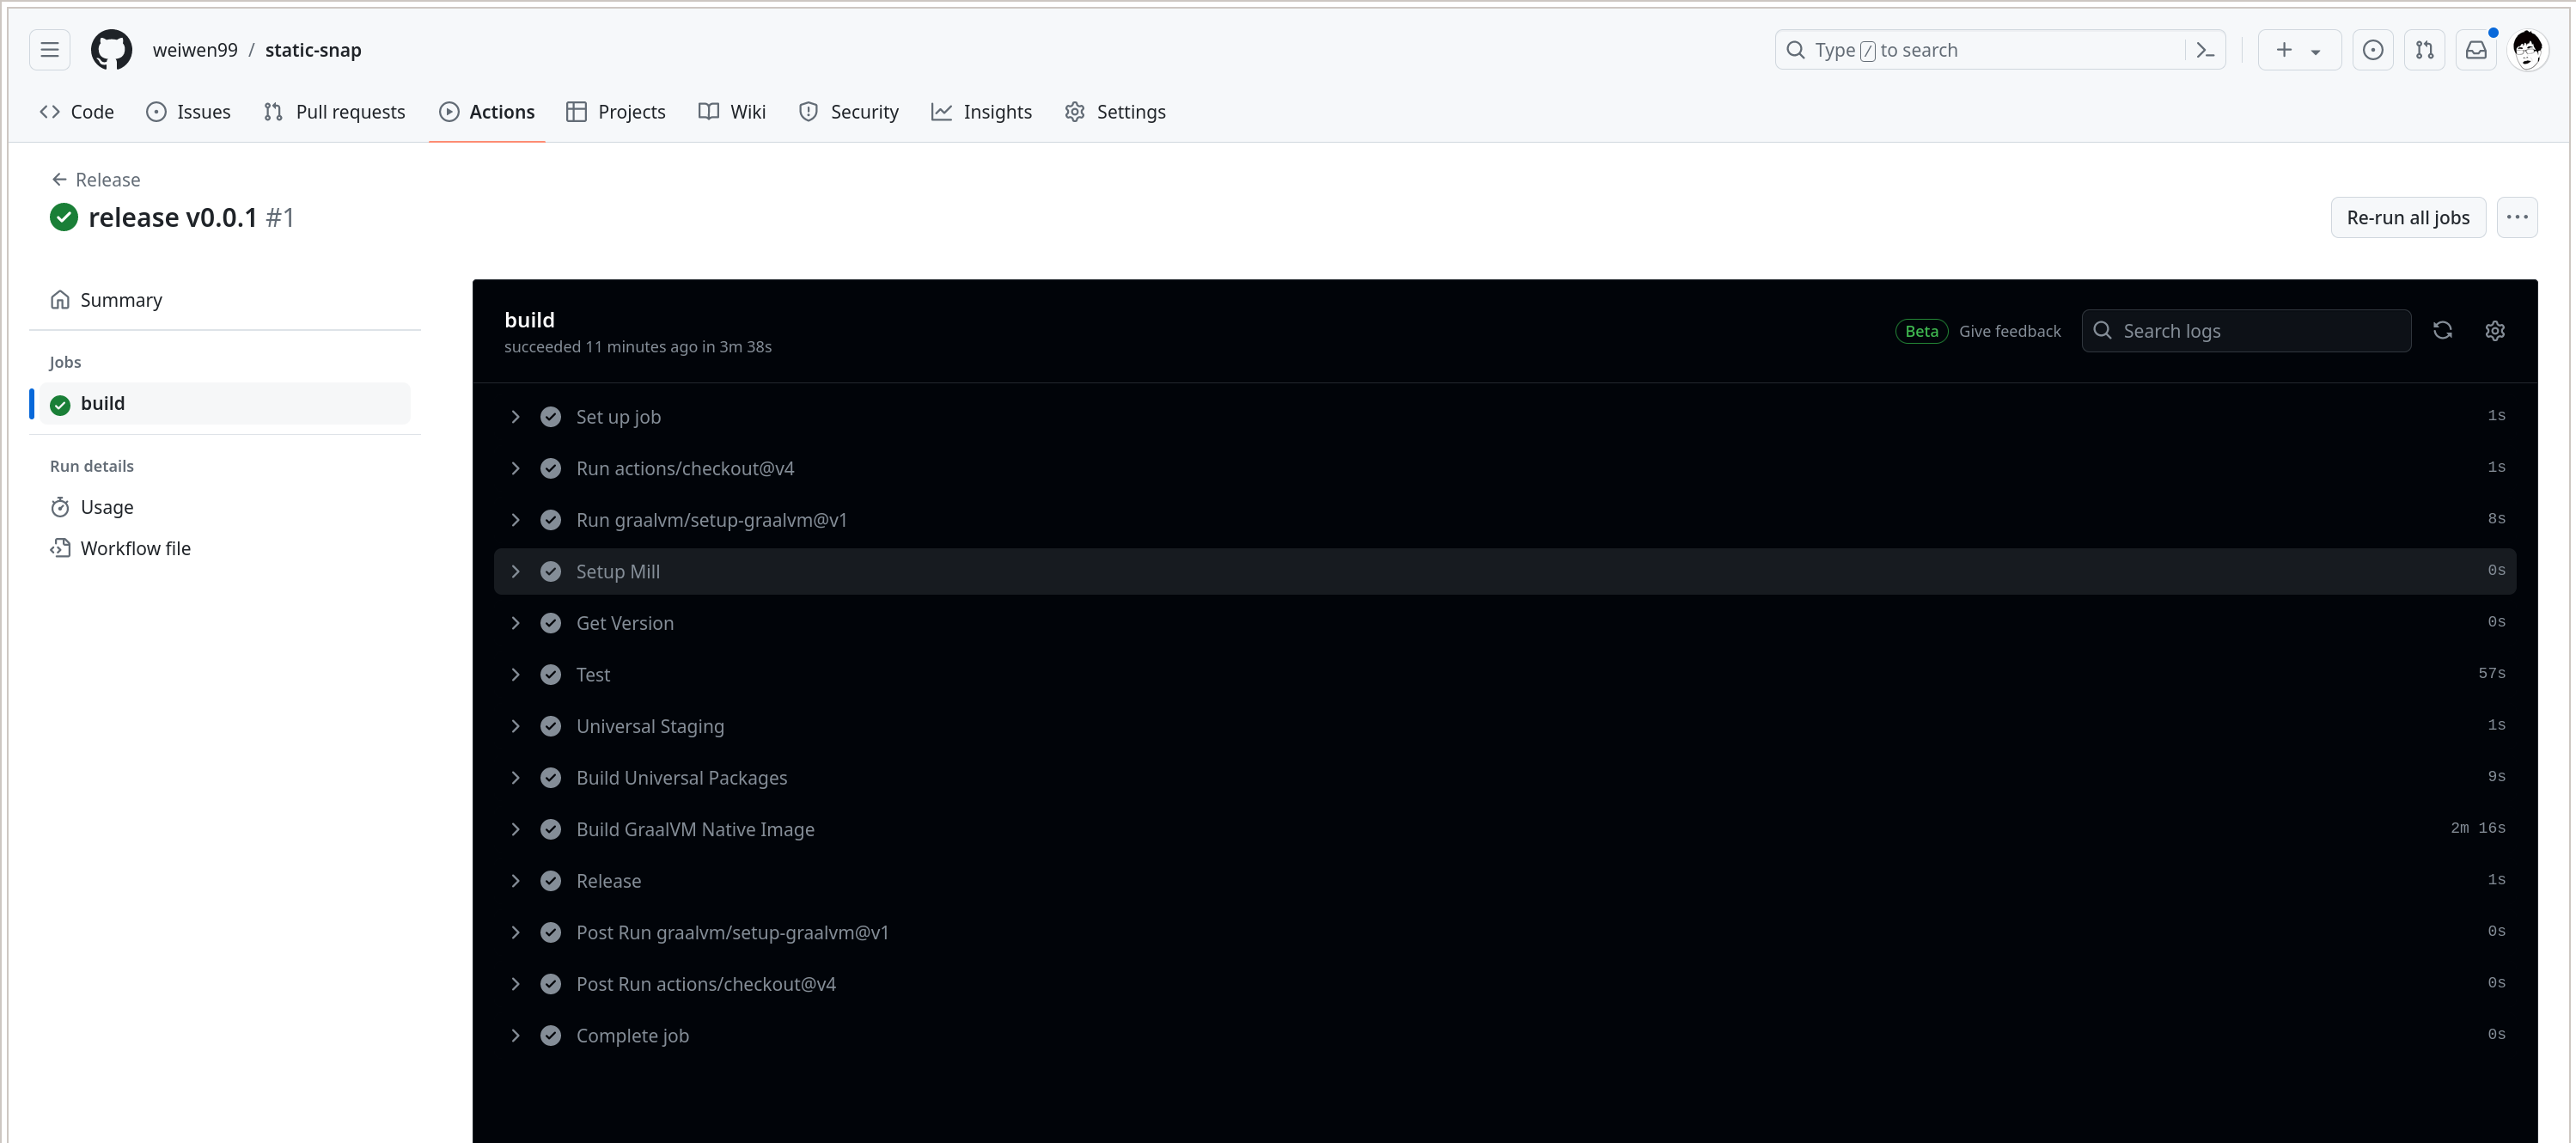
Workflow 中每一步的执行细节都可以展开来查看详细日志输出。我的的 release v0.0.1 一共耗时 3m 38s, 其中大部分时间花在了 Build GraalVM Native Image 这一步上了。
等这些 workflow 被成功执行完成以后,我们可以在 Release 页面 https://github.com/weiwen99/static-snap/releases 查看当前所有的发布:
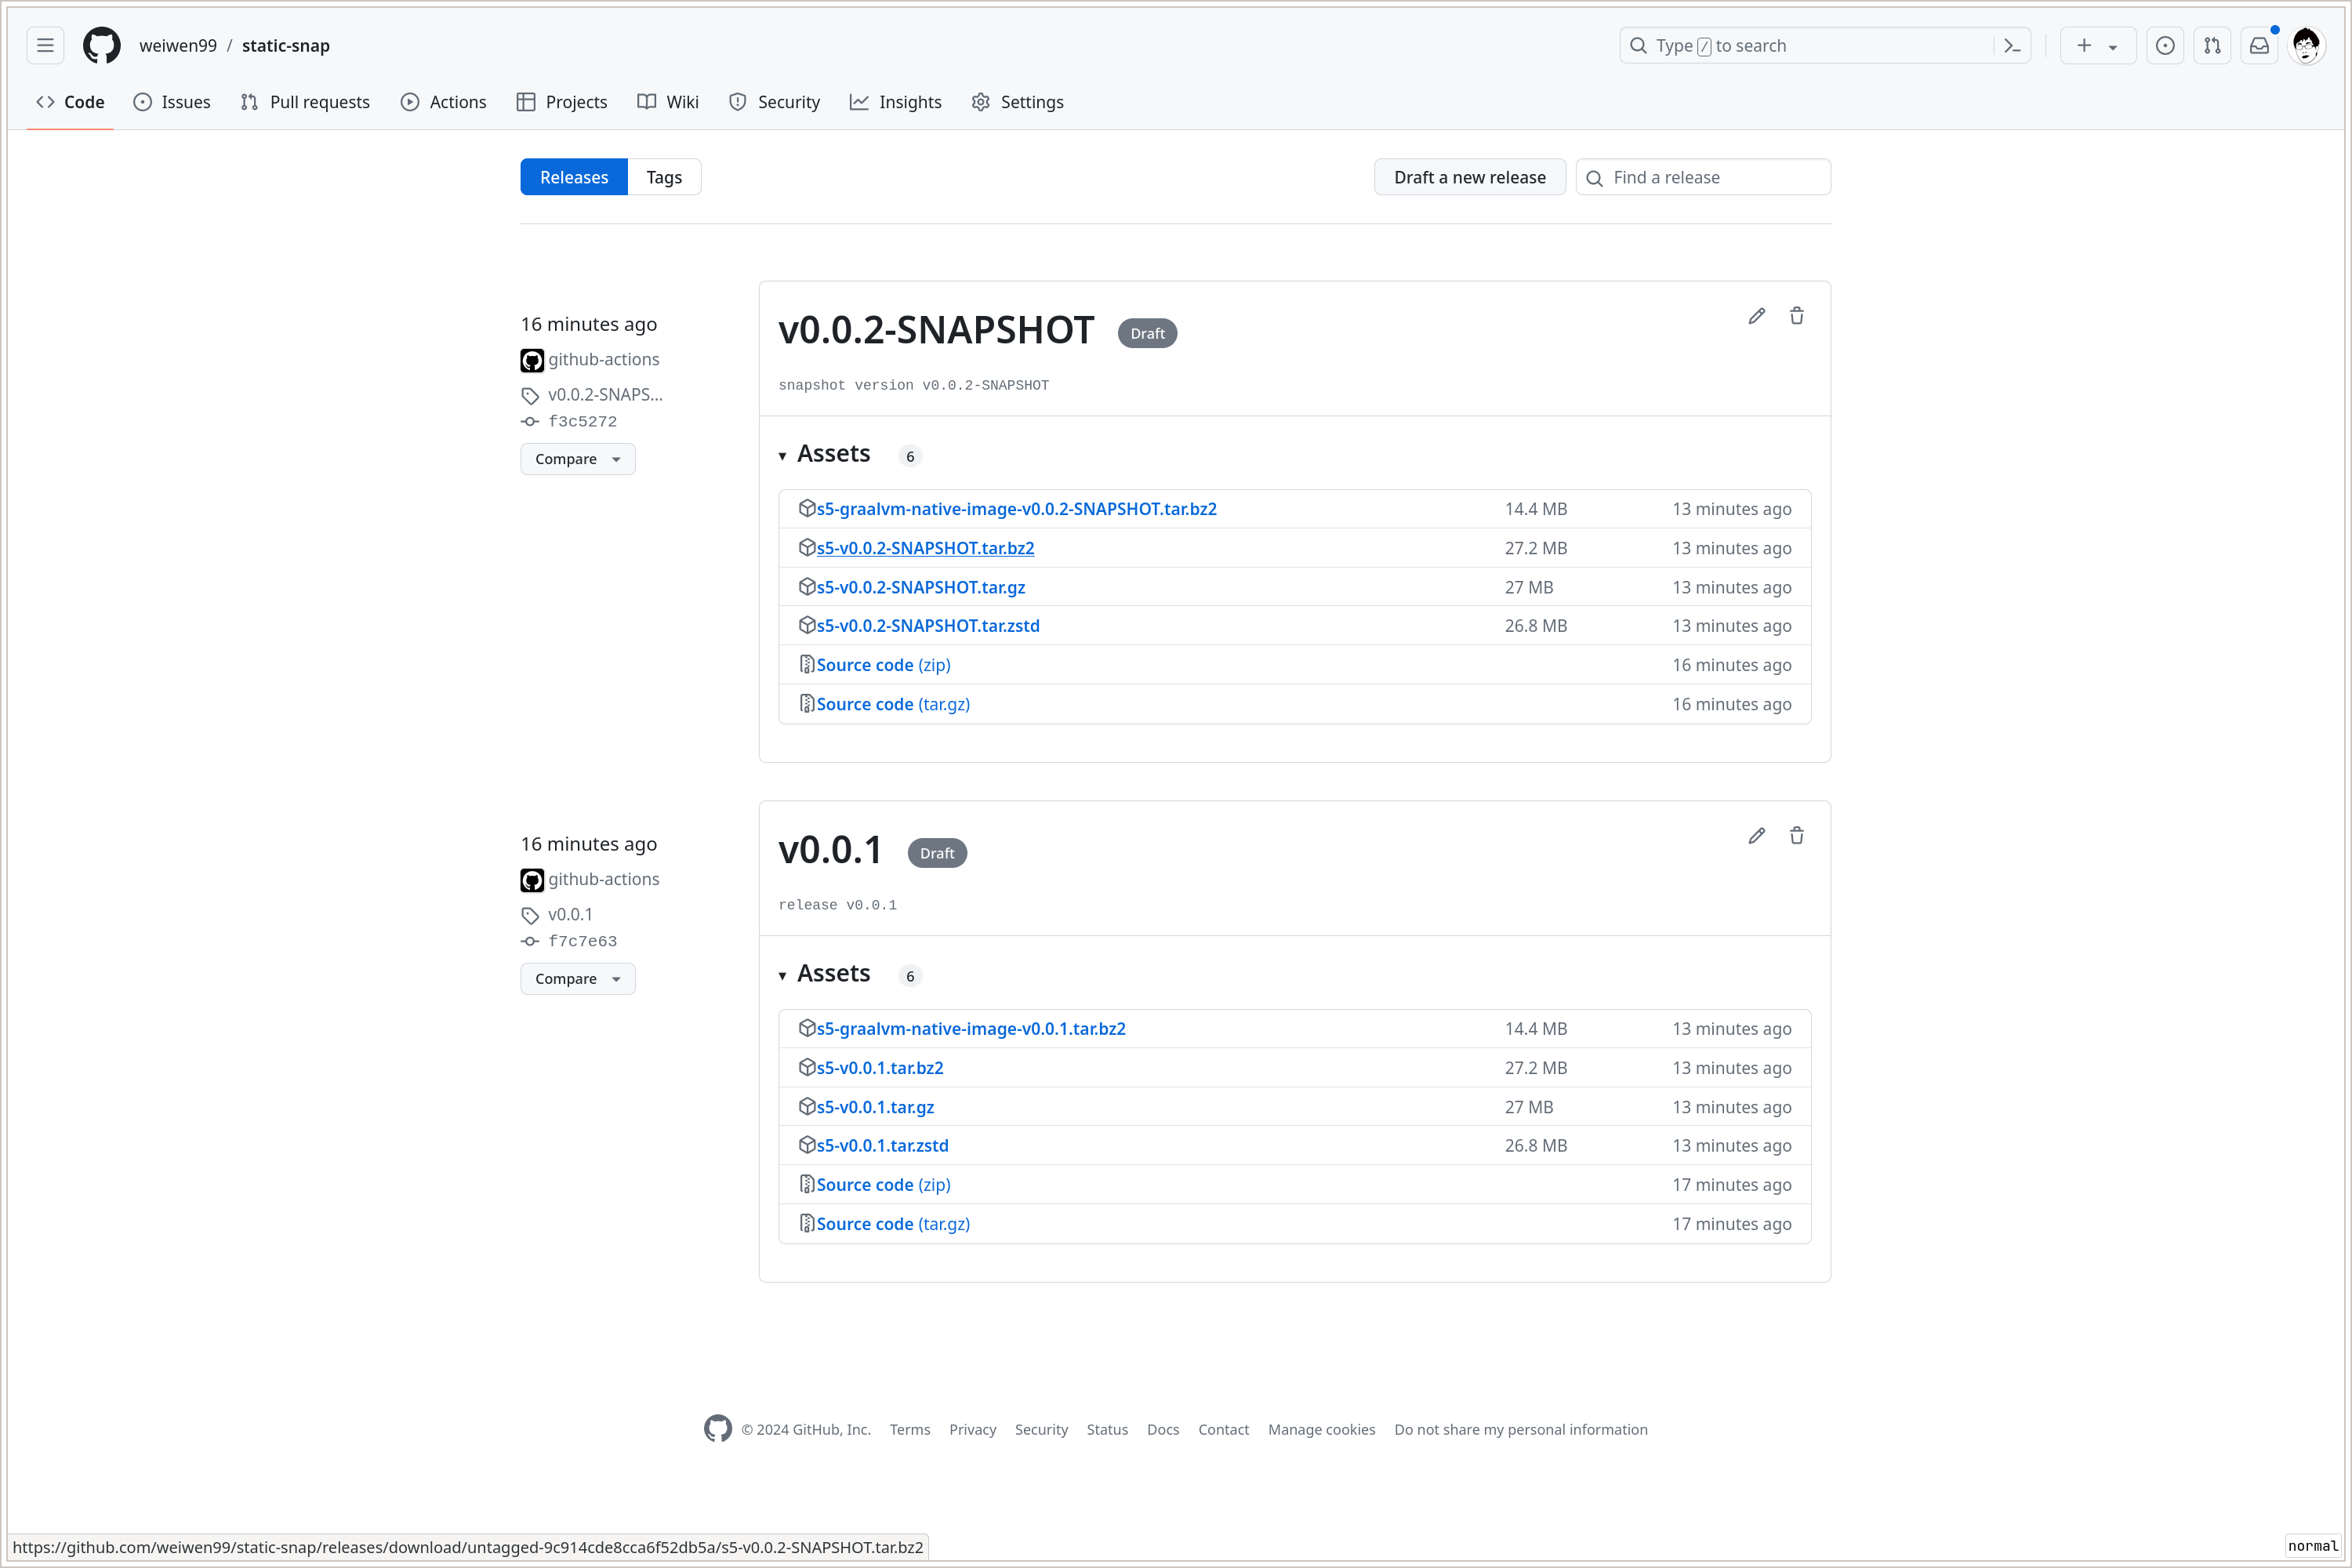
可以看到我们一共有两个 Release Draft v0.0.1 和 0.0.2-SNAPSHOT, 因为它们都还是 Draft 状态,对外(非项目维护者)不可见。检查它们的 Assets,
下载回来测试运行是没问题的。其中特别值得注意的是 s5-graalvm-native-image-v0.0.1.tar.bz2 这个包,下载下来解开,得到的 s5 就是个实用的可执行文
件, 直接复制到系统的 PATH 路径中就算安装完成。
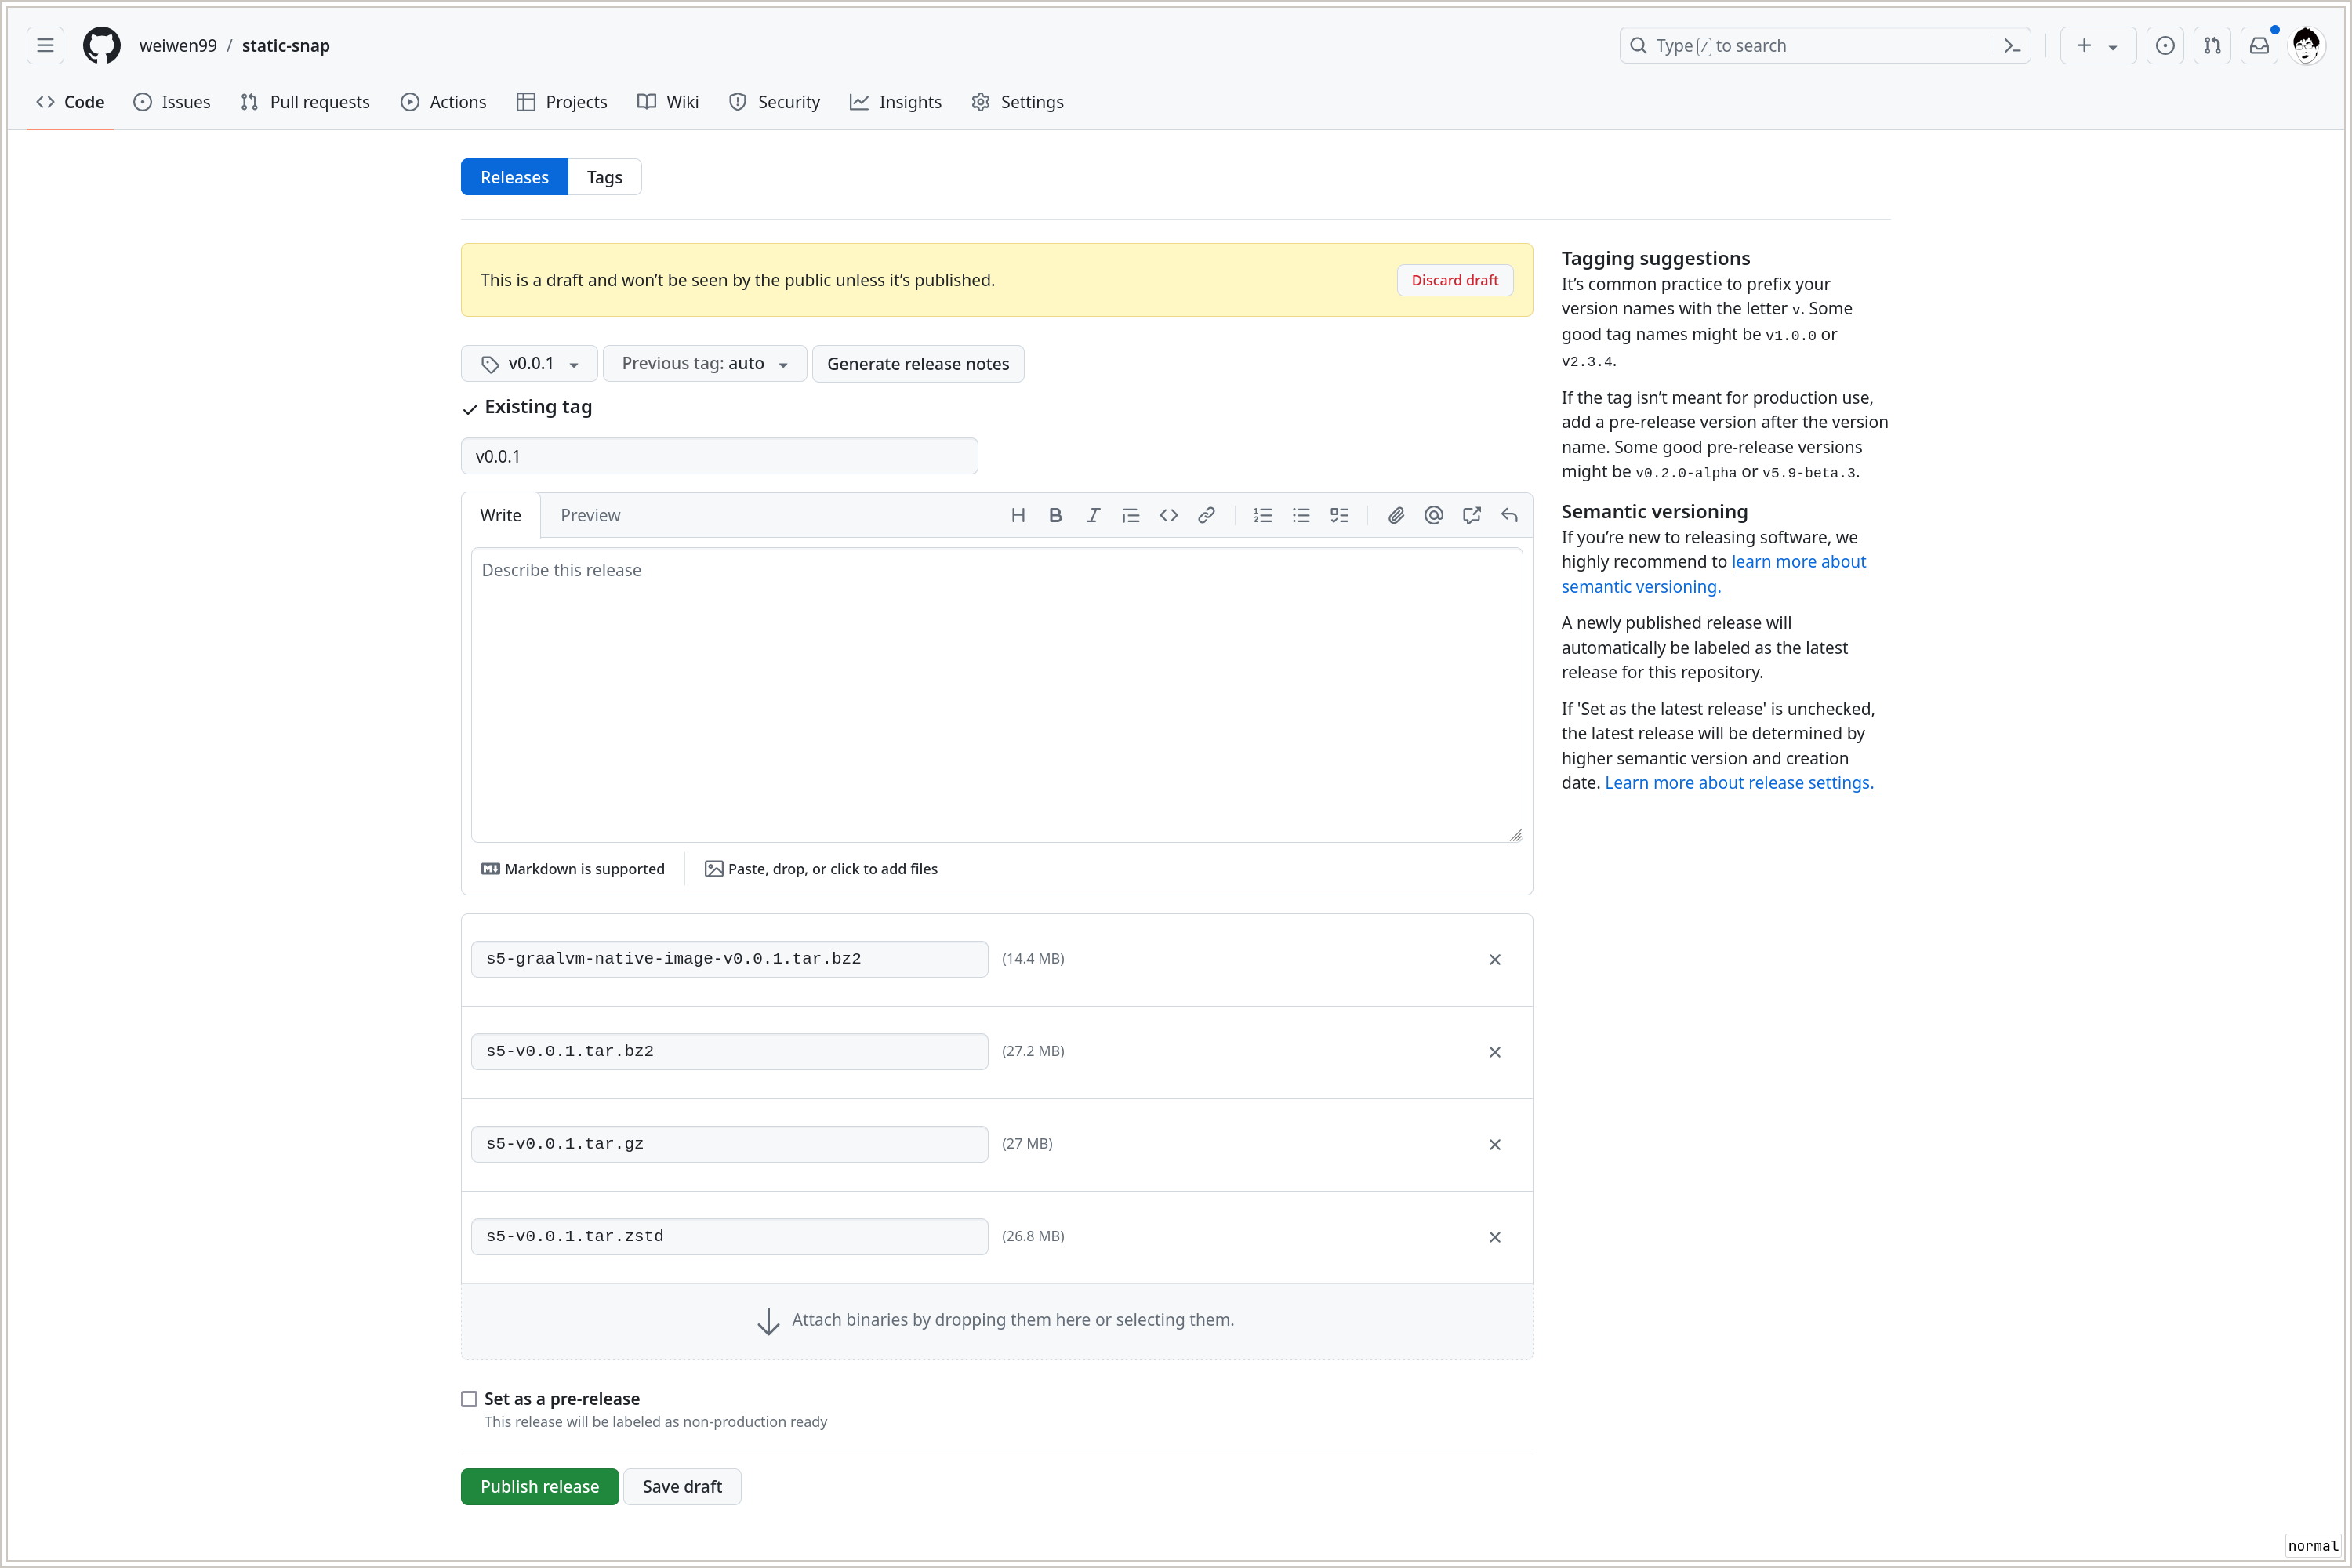
接下来我们需要正式发布 v0.0.1, 直接在 Github 页面操作就行:
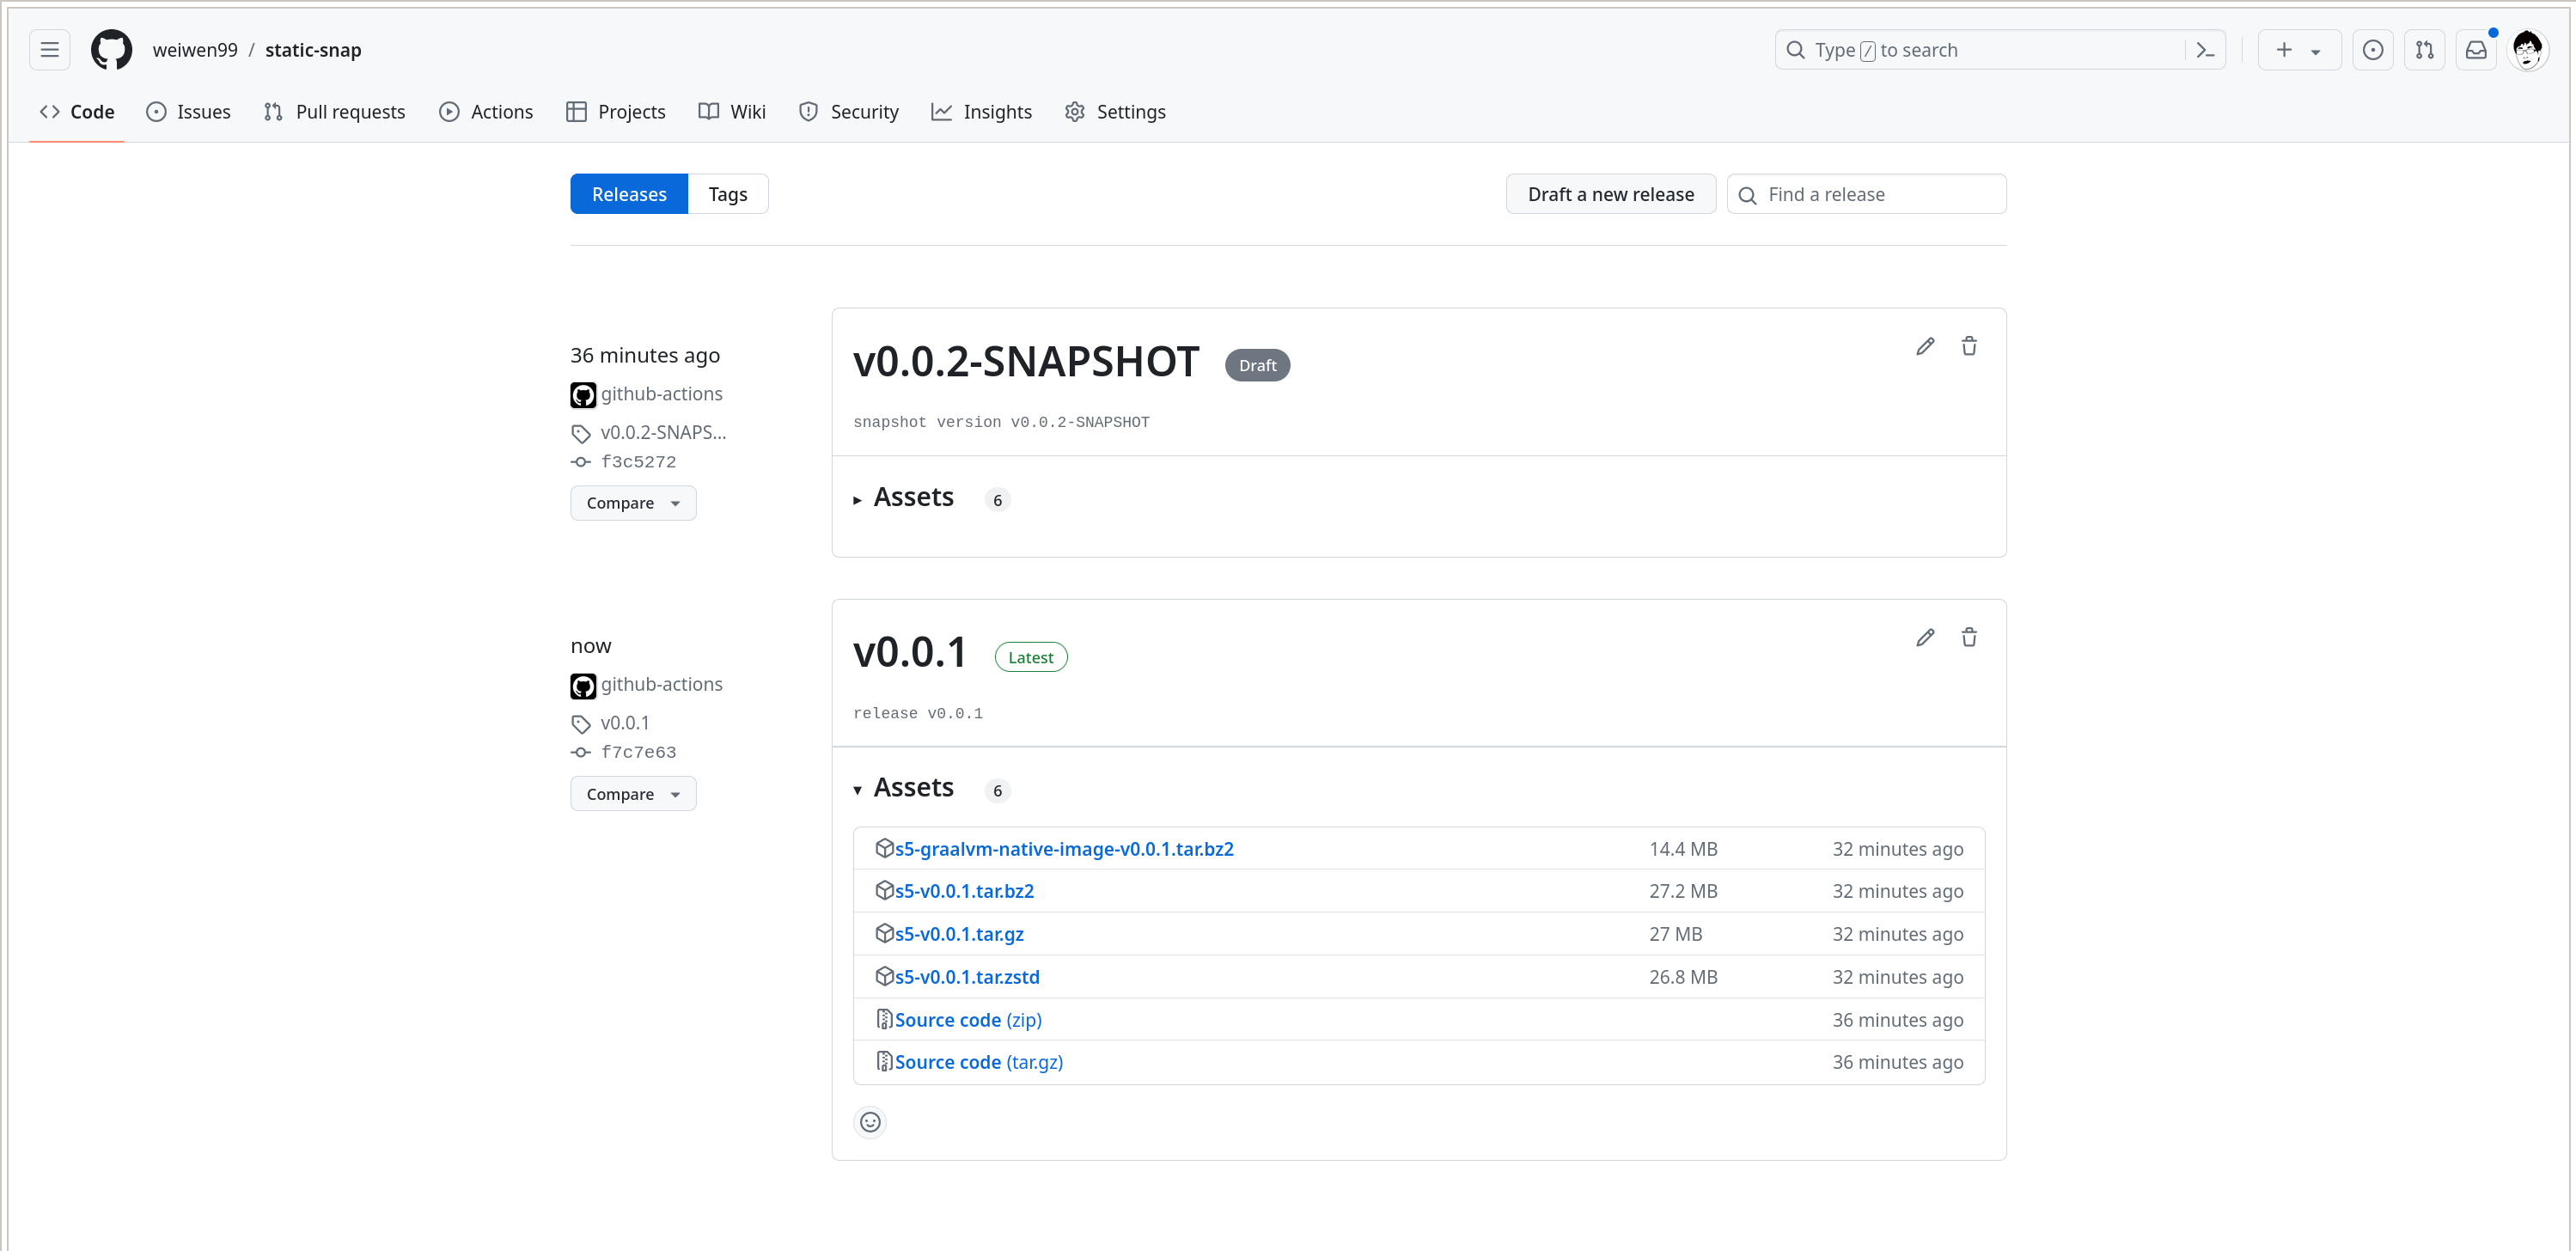
现在我本人访问 https://github.com/weiwen99/static-snap/releases 是这样的:
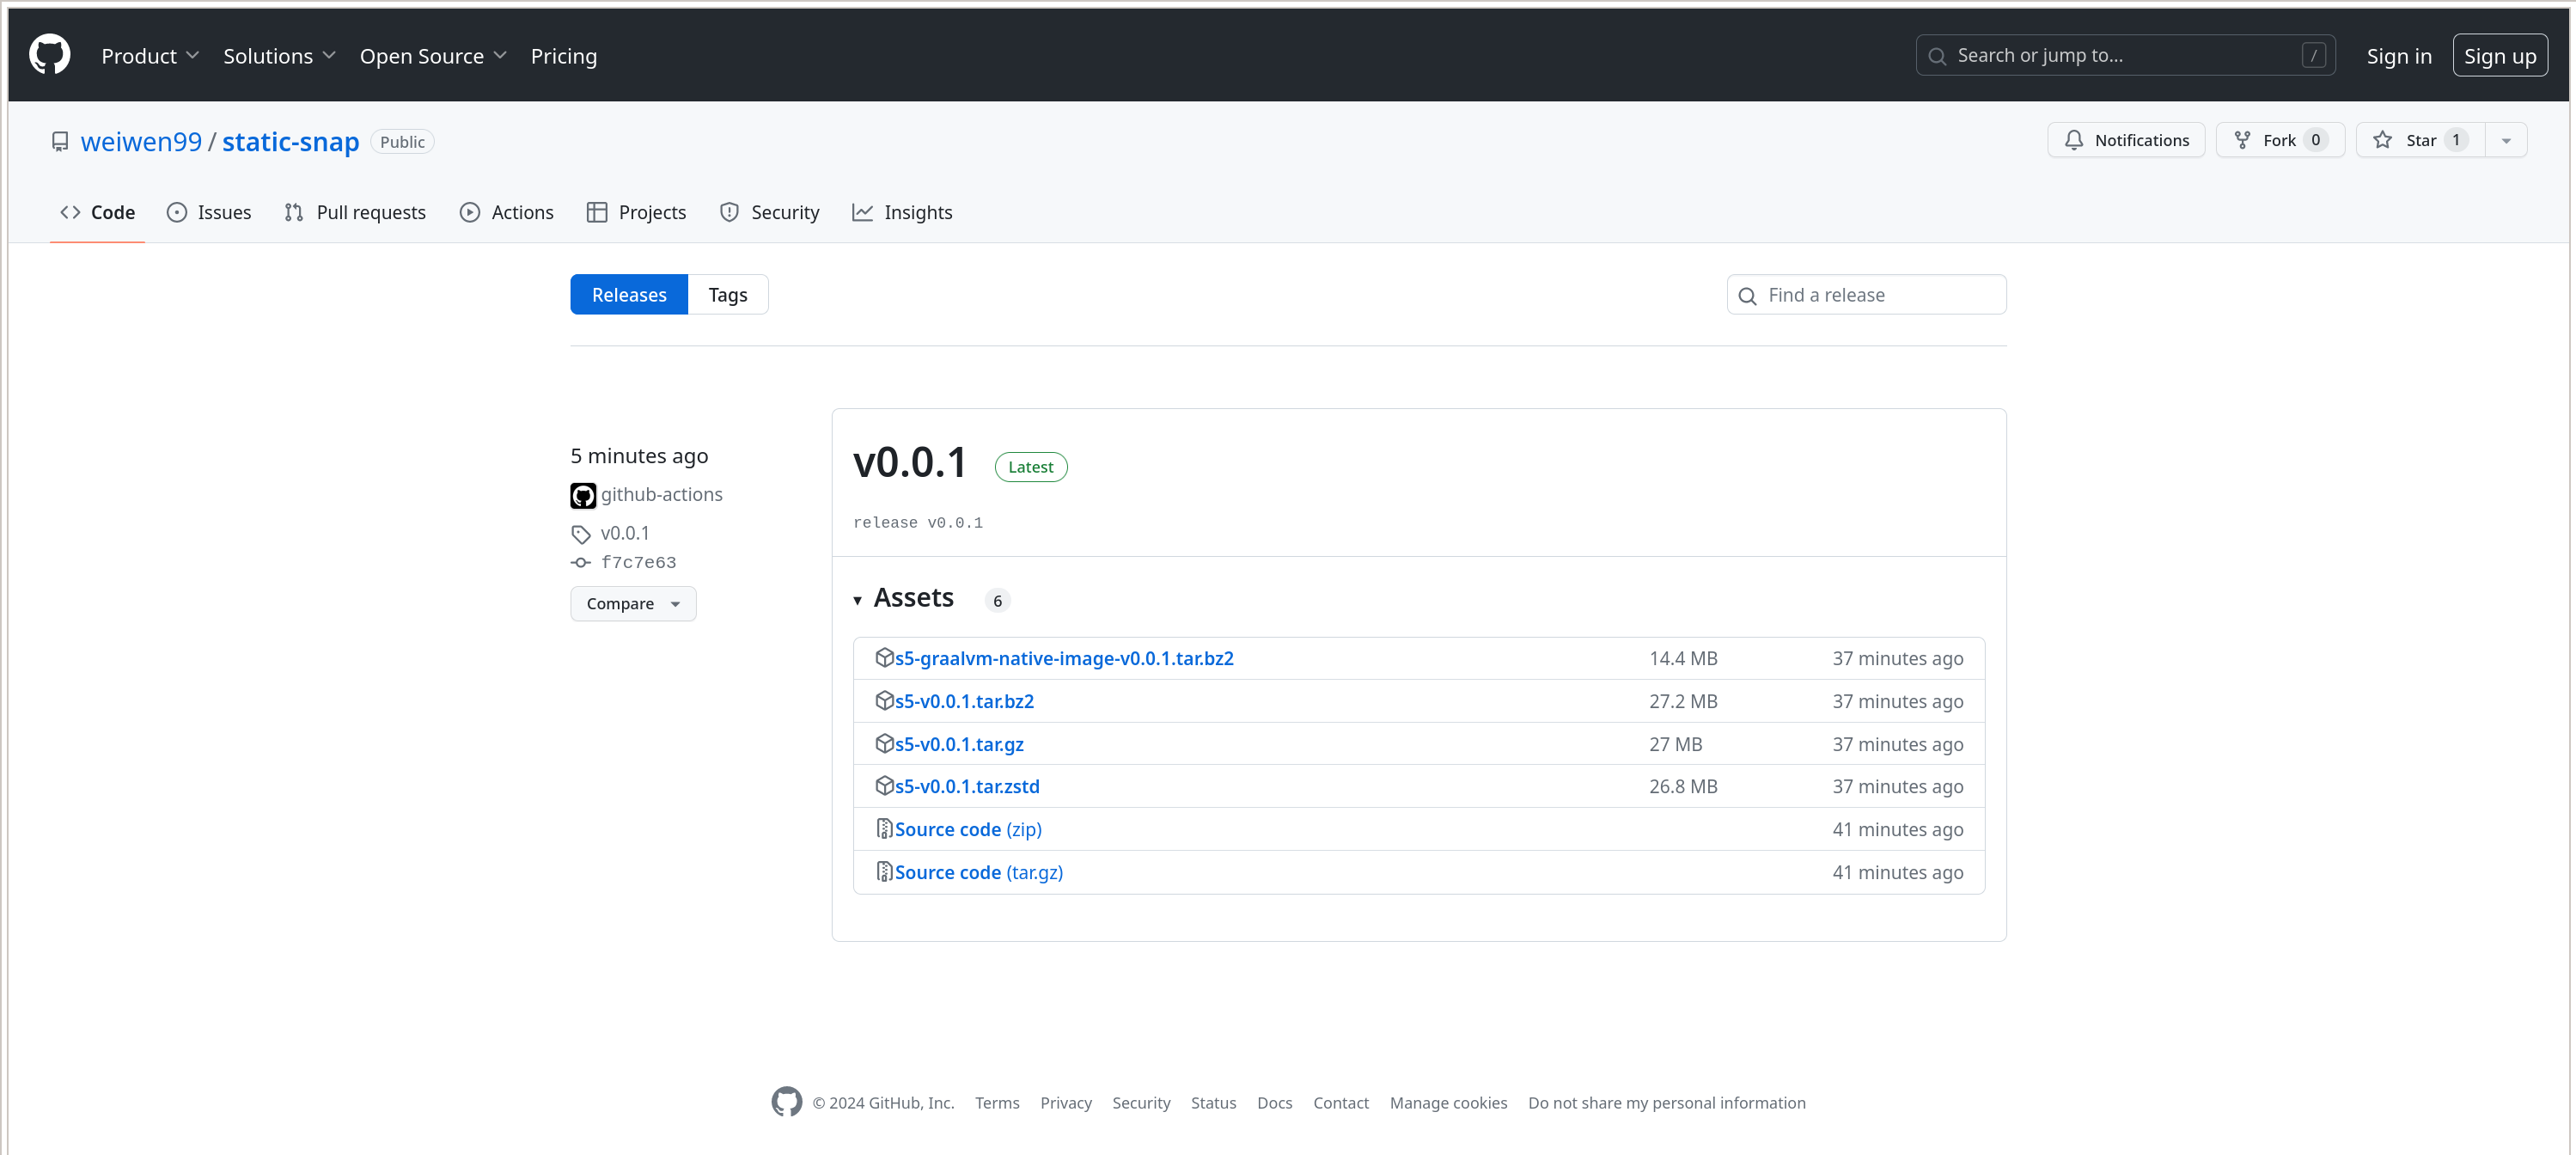
而普通用户看到的界面是这样的:
小结
本节我们构建了在 Github 上打包发布的半自动化工作流,发现 Github 对 mill 和 GraalVM Native Image 构建 Scala 应用程序的支持本身还是挺完善的。
至此,我们基本上完成了一个使用 Scala 构建的开源项目的技术工作。
本节所有的阶段性代码,都可以在这个 Github tag 链接上找到:https://github.com/weiwen99/static-snap/tree/v0.0.1 .
(本系列完。)